Sunday, July 29, 2012
9:12 PM | Edit Post

This tutorial was written by me. Any resemblance to any other tutorial is
pure coincidence.Please DO NOT claim this tutorial as your own. It was written for PSP 9, but should be compatible with any version of PSP.
pure coincidence.Please DO NOT claim this tutorial as your own. It was written for PSP 9, but should be compatible with any version of PSP.
I am using the artwork of Verymany. You need a license to use her tubes. You can buy the tube at PicsforDesign
I am using the PTU kit called Skull-Tastic by AmyMarie. You can purchase the kit at Scrap-A-Licious
BP_Template 84 By BeckyP's Creations. You can find the template HERE
Open BP_Template 84
Duplicate and close original
Delete layers: Preview, TOU and White Rectangle & Background
Image, canvas size 650 x 600
Select Horizontal rectangle 3 layer
Selections, Select All, Float, Defloat
Edit, copy Paper 8
Edit, paste, paste as new layer
Selections, Invert
Edit, Clear
Selections, Select None
Effects, 3D Effects, Drop Shadow, Settings of
Vertical and Horizontal: 3
Opacity: 50
Blur: 5
Color: Black
Shadow on new layer NOT checked
Delete Horizontal Rectangle Layer 3
Select Horizontal Rectangle Layer 2
Edit, copy Paper 6
Edit, paste, paste as new layer
Selections, Invert
Edit, Clear
Selections, Select None
Effects, 3D Effects, Drop Shadow, Same settings
Delete Horizontal Rectangle Layer 2
Select Horizontal Rectangle Layer 1
Edit, copy Paper 2
Edit, paste, paste as new layer
Selections, Invert
Edit, clear
Selections, Select None
Effects, 3D Effects, Drop Shadow, Same Settings
Delete Horizontal Rectangle 1
Select Vertical Rectangle
Edit, copy Paper 5
Edit, Paste, paste as new layer
Selections, invert
Edit, Clear
Selections, Select None
Effects, 3D Effects, Drop Shadow, Same Settings
Delete Vertical Rectangle
Edit, copy Tube
Edit, paste, paste as new layer
Image, Arrange, bring to top
Image, resize 50%
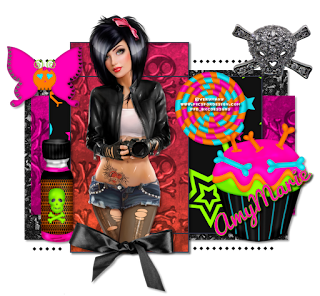
Place on the frame where you wish.I put my tube on the left..See my tag for placement
Effects, 3D Effects, Drop Shadow. Same Settings
Edit, copy Skull 5
Edit, paste, paste as new layer
Image, resize 50%
Move to the right of the template. See my tag for placement
Effects, 3D Effects, Drop Shadow, Same Settings
Edit, copy Bow 1
Edit, paste, paste as new layer
Move down to the bottom of the tube so that the cut off legs are covered
Image, resize 60%
Effects, 3D Effects, Drop Shadow, Same Settings
Edit, Copy Butterfly 1
Edit, paste, Paste as new layer
Move to the top left of frame. See my tag for placement
Image, resize 60%
Effects, 3D Effects, Drop Shadow, Same Settings
Edit, copy Cupcake 1
Edit, paste, paste as new layer
Move to the bottom right of the template
Image, resize 60%
Effects, 3D Effects, Drop Shadow, Same Settings
Edit, copy Sucker 1
Edit, paste, paste as new layer. Make sure it is below the cupcake..See my tag for placement
Image, resize 60%
Image, rotate, free rotate, left, 20
Effects, 3D Effects, Drop Shadow, Same Settings
Edit, copy Nailpolish
Edit, paste, paste as new layer
Move to bottom left of template
Image, resize 60%
Effects, 3D Effects, Drop Shadow, Same Settings
My tag is just a guide
Remember to add your copyright info. Make sure it is plain and legible
Add your name to the tag
Save as PNG
Labels:PTU,Scrap-A-Licious CT,Tutorial
Subscribe to:
Post Comments
(Atom)
Categories
- Amy(Gimptastic) (433)
- Amy(Gimptastic) Tutorial (4)
- Artistic Tag Passions Exclusive Tut (2)
- Barbara Jensen (24)
- Berry (1)
- Birthstone (36)
- CDO (651)
- Christmas (70)
- Cluster frame (106)
- Color Palette (2)
- Creative Addiction Exclusive (17)
- Creative Crazy Scraps (1)
- Crystals Creations (1)
- Curious Creative Dreams (10)
- Designs by Sarah Bryan (1)
- Diamond Creations (44)
- emo (2)
- Foxys Designz (62)
- Frames (4)
- Freek's Creations CT (22)
- FTU (300)
- FTU Tutorial (38)
- Halloween (10)
- Keith Garvey (5)
- Lady Mishka (1)
- Ladybug (2)
- Ladyhawwk (224)
- Magik (206)
- Manipulated by Magic Forum Exclusive (3)
- Manipulated by Magik (182)
- Masks (1)
- Mellie Beans (1)
- Michael Calandra (1)
- Michael Landefeld (1)
- Monti's Scraps (17)
- Mystical Scraps (7)
- Naughty Angelz Creationz (5)
- Ocean (3)
- Old School (8)
- Pammers Passions (1)
- Paper Pack (5)
- Pimpin' PSPers Warehouse (5)
- Pinup Toons (3)
- PTU (1248)
- PTU Now FTU (2)
- PTU Tutorial (699)
- Purple (1)
- Purple's CT (16)
- Schnegge's Scraps (49)
- Scrap-A-Licious CT (20)
- Snags (32)
- Steampunk (1)
- Summer (1)
- Sweet Cravings Scraps (80)
- tag show off (5)
- Tasha's Playground (188)
- Template (24)
- Textures (2)
- Thanksgiving (3)
- Treasured Scraps (4)
- Tutorial (1298)
- Valentine (11)
- Wallpaper (21)
- Whisprd Designz Store (9)
- Wicked Princess Scraps (101)
- Wordart (16)
Blog Archive
-
▼
2012
(158)
-
▼
July
(21)
- Denim Girl FTU Tutorial
- 80's Girl PTU Tutorial
- Skulltastic Emo Chick PTU Tutorial
- Skullalicious PTU Tutorial
- Skulled PTU Tutorial
- CT Tag & Extras Totally 80's Girl
- Sweet Seduction FTU Tutorial
- Sweet Seduction FTU Cluster Frame
- CT Tag & Extras
- Fairy In The Great Outdoors FTU Tutorial
- I Love My Dog FTU Tutorial
- Love My Dog FTU Cluster Frame
- Great Outdoors FTU Cluster Frame
- Stavroula FTU Cluster Frame
- Longing FTU Cluster Frame
- Textured FTU Frames
- Longing FTU Tutorial
- Sail Away FTU Cluster Frame
- Red White Boom FTU Cluster Frame
- Happy Moment FTU Cluster Frame
- Tropical Beauty FTU Tutorial
-
▼
July
(21)


0 comments:
Post a Comment