NO to AI

You will not find AI on my blog!
CT Teams


Tuesday, July 31, 2012

Monday, July 30, 2012

This tutorial was written by me. Any resemblance to any other tutorial is pure coincidence.Please DO NOT claim this tutorial as your own. It was written for PSP 9, but should be compatible with any version of PSP.
I am using the artwork of Jose Cano. You need a license to use his tubes. I purchased this tube while he was at PTE. He will be there til August 31st. Than he will be with SATC
I am using the PTU kit called 80's Girl by Amy of Gimptastic Scraps. You can to Amy's blog HERE to find where this kit is sold.
Open new image 600 x 600
Edit, copy Frame 2
Edit, paste, paste as new layer
Image resize 85%
With your magic wand select the center of your frame
Selections, Expand by 8
Edit, copy Paper 6
Edit, paste, paste as new layer
Layers, arrange, send to bottom
Selections, Invert
Edit, Clear
Edit, copy the close up of your tube
Edit, paste, paste as new layer
Move to the far right of the frame
Edit, clear
Selections, Select None
Layers, duplicate
Image, mirror
Layers, merge, merge down
Change Blend Mode of this Layer to Luminance(Legacy)
Select Raster 2
Effects, 3D Effects, Drop Shadow, with the settings of:
Vertical: 3
Horizontal: -3
Opacity: 50
Blur: 5
Color: Black
Shadow on new layer NOT checked
Edit, copy tube
Edit, paste, paste as new layer
Effects, 3D Effects, Drop Shadow, same settings
Edit, copy Pink Converse
Edit, paste, paste as new layer
Move to place on top of the tubes legs, since they are cut off. See my tag for placement
Image, resize 70%
Effects, 3D Effects, Drop Shadow, same settings
Edit, copy Tulle 1
Edit, paste, paste as new layer
Layers, arrange, send to bottom
Image, Mirror
Image, resize 85%
Edit, copy Boombox
Edit, paste, paste as new layer
Move to bottom left of frame. Move down til it is below the Pink Converse. See my tag for placement
Image, resize 70%
Effects, 3D Effects, Drop Shadow, same settings
Edit, copy Cassette Tape
Edit, paste, paste as new layer
Move til it is above the cassette player, Move down til it is below the handle. See my tag for placement
Image, resize 70%
Image, rotate, free rotate, right, 20
Effects, 3D Effects, Drop Shadow, same settings
Edit, copy CompBook
Edit, paste, paste as new layer
Move to the right of the frame. See my tag for placement
Image, resize 40%
Image, rotate, free rotate, right, 20
Effects, 3D Effects, Drop Shadow, same settings
Edit, copy, Sunglasses
Edit, paste, paste as new layer
Layers, arrange, move up
Place near the Pink Converse. See my tag for placement
Image, resize 50%
Effects, 3D Effects, Drop Shadow, same settings
Edit, copy, Lip Phone
Edit, paste, paste as new layer
Move to the right of the frame and below the shoes and compbook. See my tag for placement
Image, resize 50%
Effects, 3D Effects, Drop Shadow, same settings
Add as many elements and place them as you wish.
My tag is just a guide
Remember to add your copyright info. Make sure it is plain and legible
Add your name to the tag
Save as PNG
Sunday, July 29, 2012

This tutorial was written by me. Any resemblance to any other tutorial is
pure coincidence.Please DO NOT claim this tutorial as your own. It was written for PSP 9, but should be compatible with any version of PSP.
pure coincidence.Please DO NOT claim this tutorial as your own. It was written for PSP 9, but should be compatible with any version of PSP.
I am using the artwork of Verymany. You need a license to use her tubes. You can buy the tube at PicsforDesign
I am using the PTU kit called Skull-Tastic by AmyMarie. You can purchase the kit at Scrap-A-Licious
BP_Template 84 By BeckyP's Creations. You can find the template HERE
Open BP_Template 84
Duplicate and close original
Delete layers: Preview, TOU and White Rectangle & Background
Image, canvas size 650 x 600
Select Horizontal rectangle 3 layer
Selections, Select All, Float, Defloat
Edit, copy Paper 8
Edit, paste, paste as new layer
Selections, Invert
Edit, Clear
Selections, Select None
Effects, 3D Effects, Drop Shadow, Settings of
Vertical and Horizontal: 3
Opacity: 50
Blur: 5
Color: Black
Shadow on new layer NOT checked
Delete Horizontal Rectangle Layer 3
Select Horizontal Rectangle Layer 2
Edit, copy Paper 6
Edit, paste, paste as new layer
Selections, Invert
Edit, Clear
Selections, Select None
Effects, 3D Effects, Drop Shadow, Same settings
Delete Horizontal Rectangle Layer 2
Select Horizontal Rectangle Layer 1
Edit, copy Paper 2
Edit, paste, paste as new layer
Selections, Invert
Edit, clear
Selections, Select None
Effects, 3D Effects, Drop Shadow, Same Settings
Delete Horizontal Rectangle 1
Select Vertical Rectangle
Edit, copy Paper 5
Edit, Paste, paste as new layer
Selections, invert
Edit, Clear
Selections, Select None
Effects, 3D Effects, Drop Shadow, Same Settings
Delete Vertical Rectangle
Edit, copy Tube
Edit, paste, paste as new layer
Image, Arrange, bring to top
Image, resize 50%
Place on the frame where you wish.I put my tube on the left..See my tag for placement
Effects, 3D Effects, Drop Shadow. Same Settings
Edit, copy Skull 5
Edit, paste, paste as new layer
Image, resize 50%
Move to the right of the template. See my tag for placement
Effects, 3D Effects, Drop Shadow, Same Settings
Edit, copy Bow 1
Edit, paste, paste as new layer
Move down to the bottom of the tube so that the cut off legs are covered
Image, resize 60%
Effects, 3D Effects, Drop Shadow, Same Settings
Edit, Copy Butterfly 1
Edit, paste, Paste as new layer
Move to the top left of frame. See my tag for placement
Image, resize 60%
Effects, 3D Effects, Drop Shadow, Same Settings
Edit, copy Cupcake 1
Edit, paste, paste as new layer
Move to the bottom right of the template
Image, resize 60%
Effects, 3D Effects, Drop Shadow, Same Settings
Edit, copy Sucker 1
Edit, paste, paste as new layer. Make sure it is below the cupcake..See my tag for placement
Image, resize 60%
Image, rotate, free rotate, left, 20
Effects, 3D Effects, Drop Shadow, Same Settings
Edit, copy Nailpolish
Edit, paste, paste as new layer
Move to bottom left of template
Image, resize 60%
Effects, 3D Effects, Drop Shadow, Same Settings
My tag is just a guide
Remember to add your copyright info. Make sure it is plain and legible
Add your name to the tag
Save as PNG

This tutorial was written by me. Any resemblance to any other tutorial is pure coincidence.Please DO NOT claim this tutorial as your own. It was written for PSP 9, but should be compatible with any version of PSP.
I am using the artwork of Arthur Crowe. You need a license to use his tubes. You can buy his work at his store found HERE
I am using the PTU kit called Skull-Tastic by Lexi Creationz. You can purchase the kit at Scrap-A-Licious
Open new image 600 x 600
Edit, copy Frame3
Edit, paste, paste as new layer
Image, resize by 80%
Select in middle of frame with magic wand
Selections, Modify, Expand by 8
Edit, copy Paper4
Edit, paste, paste as new layer
Layers, arrange, send to bottom
Selections, Invert
Edit, Clear
Selections, Select None
Select Raster 2
Effects, 3D Effects, Drop Shadow, Settings of
Vertical and Horizontal: 3
Opacity: 50
Blur: 5
Color: Black
Shadow on new layer NOT checked
Edit, copy Tube
Edit, paste, paste as new layer
Image, resize 60%
Effects, 3D Effects, Drop Shadow. Same Settings
Select Raster 2
Layers, Duplicate
Layers, arrange, bring to top
Use your eraser tool to erase the access frame from your tube...I do it this way when a tube is cut off so that I can hide the legs
Edit, copy Wire
Edit, paste, paste as new layer
Layers, arrange, send to bottom
Image, resize by 60%
Edit, copy DiscoBall
Image, resize 50%
Effects, 3D Effects, Drop Shadow, same settings
Edit, copy Bow
Edit, paste, paste as new layer
Move to right of frame. See my tag for placement
Image, resize by 30%
Effects, 3D Effects, Drop Shadow, same settings
Edit, copy Button1
Edit, paste, paste as new layer
Move on top of bow. See my tag for placement
Image, resize 20%
Effects, 3D Effects, Drop Shadow, Same Settings
Edit, copy Ribbon1
Edit, paste, paste as new layer
Move to the bottom of frame. See my tag for placement
Image, resize 80%
Effects, 3D Effects, Drop Shadow, same settings
Layers, Duplicate
Image, Mirror
Edit, copy Flower2
Edit, paste, paste as new layer
Move to bottom left of frame. See my tag for placement
Image, resize 30%
Effects, 3D Effects, Drop Shadow, Same settings
Layers, Duplicate
Image, Mirror
Edit, copy Doodle1
Edit, paste, paste as new layer
Layers, arrange, send to bottom
Effects, 3D Effects, Drop Shadow, same settings
Layers, Duplicate
Image, Mirror
Edit, copy Perfume Bottle
Edit, paste, paste as new layer
Layers, arrange move down til it is behind the flower on the right side. See my tag for placement
Image, resize 40%
Effects, 3D Effects, Drop Shadow, same settings
My tag is just a guide
Remember to add your copyright info. Make sure it is plain and legible
Add your name to the tag
Save as PNG

This tutorial was written by me. Any resemblance to any other tutorial ispure coincidence.Please DO NOT claim this tutorial as your own. It was writtenfor PSP 9, but should be compatible with any version of PSP.
I am using the artwork of Ismael Rac. You need a license to use his tubes. You can buy his work at his store found HERE
I am using the PTU kit called You_ve Been Skulled by Sinister Creationz. You can purchase the kit at Scrap-A-Licious
Open new image 600 x 600
Edit, copy Skulled Frame 1
Edit, paste, paste as new layer
Image, resize by 80%
Select in middle of frame with magic wand
Selections, Modify, Expand by 25
Edit, copy paper 1
Edit, paste, paste as new layer
Layers, arrange, send to bottom
Selections, Invert
Edit, Clear
Selections, Select None
Select Raster 2
Effects, 3D Effects, Drop Shadow, Settings of
Vertical and Horizontal: 3
Opacity: 50
Blur: 5
Color: Black
Shadow on new layer NOT checked
Edit, copy Grid
Edit, paste, paste as new layer
Image, resize 50%
Layers, arrange, send to bottom
Edit, copy Tube
Edit, paste, paste as new layer
Layers, arrange, bring to top
Image, resize by 80%
Effects, 3D Effects, Drop Shadow. Same Settings
Edit, copy Heart_Spiked
Edit, paste, paste as new layer
Move to the top left of the frame. See my tag for placement
Image, resize by 30%
Effects, 3D Effects, Drop Shadow, same settings
Edit, copy heart w skull
Move to bottom right of frame
Image, resize by 30%
Effects, 3D Effects, Drop Shadow, same settings
Edit, copy Shoe w skull
Edit, paste, paste as new layer
Move to bottom right of frame. See my tag for placement
Image, resize by 30%
Effects, 3D Effects, Drop Shadow, same settings
Layers, Duplicate
Image, Mirror
Move shoe over to the other shoe. See my tag for placement
Edit, copy Skull
Edit, paste, paste as new layer
Move to the top right of frame. See my tag for placement
Image, resize 30%
Effects, 3D Effects, Drop Shadow, Same Settings
Edit, copy Cupcake w Skull
Edit, paste, paste as new layer
Move to the right and slightly behind heart. See my tag for placement
Image, resize 50%
Effects, 3D Effects, Drop Shadow, same settings
Edit, copy Cluster Of stars
Edit, paste, paste as new layer
Move to bottom left of frame below shoes. See my tag for placement
Image, resize 50%
Effects, 3D Effects, Drop Shadow, Same settings
Edit, copy Pierced Lips
Make sure Raster 3 is active
Edit, paste, paste as new layer
Image, resize 30%
Image, rotate, free, rotate, 25, left
Effects, 3D Effects, Drop Shadow, same settings
Layers, Duplicate
Image, Mirror
Move to the right so that the lips are showing. See my tag for placement
My tag is just a guide
Remember to add your copyright info. Make sure it is plain and legible
Add your name to the tag
Save as PNG
Saturday, July 28, 2012

The kit for this is called 80's Girl by Amy (Gimptastic Scraps) of Amy and Leah's GimptasticTuts. The scrapkit can be purchased at PicsforDesign.
I made some extras for all of you, click on the tag to get the full size version. Please Do NOT alter these in anyway.


Wednesday, July 25, 2012
 This tutorial was written by me. Any resemblance to any other tutorial is pure coincidence.Please DO NOT claim this tutorial as your own. It was written for PSP 9, but should be compatible with any version of PSP
I am using the artwork of Misticheskaya. You need a license to use her tubes. You can buy this tube at PicsforDesign
I am using the FTU kit called Sweet Seduction by Gimptastic Scraps.
Open new image 600 x 600
Edit, copy Frame 3
Edit, paste, paste as new layer
Image, resize by 85%
Select in middle of frame with magic wand
Selections, Modify, Expand by 8
Edit, copy paper 7
Edit, paste, paste as new layer
Layers, arrange, send to bottom
Selections, Invert
Edit, Clear
Edit, copy SparkleHeart
Edit, paste, paste as new layer
Image, resize by 60%
Move til the heart is shown clearly in the frame
Edit, clear
Selections, Select None
Select Raster 2
Effects, 3D Effects, Drop Shadow, Settings of
Vertical and Horizontal: 3
Opacity: 50
Blur: 5
Color: Black
Shadow on new layer NOT checked
Edit, copy tube
Edit, paste, paste as new layer
Image, resize tube to fit the way you want. The tube I used I had to resize by 40%
Effects, 3D Effects, Drop Shadow, Same Settings
Edit, copy Lace1
Edit, paste, paste as new layer
Layers, arrange, send to bottom
Image, resize by 80%
Effects, 3D Effects, Drop Shadow. Same Settings
Edit, copy Flower
Edit, paste, paste as new layer
Move to the top of the frame
Image, resize by 80%
Effects, 3D Effects, Drop Shadow, same settings
Edit, copy Leaves
Move under the flower layer
Image, mirror
Effects, 3D Effects, Drop Shadow, same settings
Edit, copy Case
Edit, paste, paste as new layer
Move to bottom right of frame. See my tag for placement
Image, resize by 80%
Effects, 3D Effects, Drop Shadow, same settings
Edit, copy Gift1
Edit, paste, paste as new layer
Move to the left of the case. See my tag for placement
Effects, 3D Effects, Drop Shadow, Same Settings
Edit, copy Wine
Edit, paste, paste as new layer
Move in front of the case. See my tag for placement
Image, resize 88%
Effects, 3D Effects, Drop Shadow, same settings
Edit, copy Cupcake
Edit, paste, paste as new layer
Move to place in front of wine. See my tag for placement
Image, resize 60%
Effects, 3D Effects, Drop Shadow, Same settings
Edit, copy Ring
Edit, paste, paste as new layer
Move down three times til the ring is in front of the gift. See my tag for placement
Image, resize 80%
Effects, 3D Effects, Drop Shadow, same settings
Edit,Copy Haircomb
Edit, paste, paste as new layer
Move down 3 times it it is behind the case. See my tag for placement
Effects, 3D Effects, Drop Shadow, Same settings
My tag is just a guide
Remember to add your copyright info. Make sure it is plain and legible
Add your name to the tag
Save as PNG
Monday, July 23, 2012
Here is a new cluster frame for you..This is using the PTU kit Sweet Seduction by Amy of Amy & Leah's Gimptastic Tuts. Click on the preview below to take you to the download. Amy is no longer selling kits.


The kit for this is called Sweet Seduction by Amy of Amy and Leah's GimptasticTuts. The scrapkit can be purchased at PicsforDesign.
I made some extras for all of you, click on the tag to get the full size version. Please Do NOT alter these in anyway.


Saturday, July 21, 2012

This tutorial was written by me. Any resemblance to any other tutorial is pure coincidence.Please DO NOT claim this tutorial as your own. It was written for PSP 9, but should be compatible with any version of PSP
I am using the artwork of Deborah Grieves. You need a license to use her tubes. You can buy this tube at PTE
I am using the FTU kit called The Great Outdoor by Gimptastic Scraps.
Open new image 600 x 600
Edit, copy Frame 3
Edit, paste, paste as new layer
Image, resize by 80%
Select in middle of frame with magic wand
Selections, Modify, Expand by 8
Edit, copy paper 9
Edit, paste, paste as new layer
Layers, arrange, send to bottom
Selections, Invert
Edit, Clear
Edit, copy Grass
Edit, paste, paste as new layer
Layers, arrange, send to bottom
Edit, clear
Selections, Select None
Select Raster 2
Effects, 3D Effects, Drop Shadow, Settings of
Vertical and Horizontal: 3
Opacity: 50
Blur: 5
Color: Black
Shadow on new layer NOT checked
Edit, copy Branch2
Edit, paste, paste as new layer
Move to the top of the frame
Image, Mirror
Effects, 3D Effects, Drop Shadow, Same Settings
Edit, copy Hummingbird
Edit, paste, paste as new layer
Move to the top left of the frame. See my tag for placement
Effects, 3D Effects, Drop Shadow. Same Settings
Edit, copy Mushrooms2
Edit, paste, paste as new layer
Move down til it is about the grass. Move to the left of the frame
Image, resize by 70%
Effects, 3D Effects, Drop Shadow, same settings
Layers, Duplicate
Image, Mirror
Move the duplicate til the stems are moved down some and under the frame
Edit, copy Nuts
Edit, paste, paste as new layer
Move til they are between the mushrooms
Effects, 3D Effects, Drop Shadow, same settings
Edit, copy Plant
Edit, paste, paste as new layer
Layers, arrange, bring to top
Move to lower left of the frame. See my tag for placement
Effects, 3D Effects, Drop Shadow, Same Settings
Edit, copy Hedgehog
Edit, paste, paste as new layer
Move to the bottom left of the frame. See my tag for placement
Image, resize 85%
Effects, 3D Effects, Drop Shadow, same settings
Edit, copy Fox
Edit, paste, paste as new layer
Move to the bottom right of the frame. See my tag for placement
Image, resize 80%
Effects, 3D Effects, Drop Shadow, Same settings
Edit, copy Butterfly
Edit, paste, paste as new layer
Move to the left hand side of the frame. Near the middle. See my tag for placement
Image, resize 80%
Image, rotate, free rotate, left, 20
Effects, 3D Effects, Drop Shadow, same settings
Edit,Copy tube
Edit, paste, paste as new layer
Effects, 3D Effects, Drop Shadow, Same settings
My tag is just a guide
Remember to add your copyright info. Make sure it is plain and legible
Add your name to the tag
Save as PNG
Friday, July 20, 2012
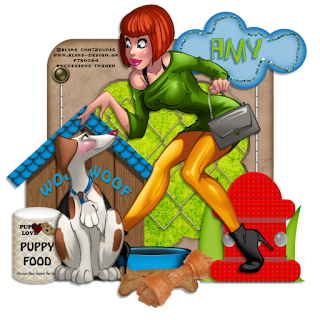
This tutorial was written by me. Any resemblance to any other tutorial is pure coincidence.Please DO NOT claim this tutorial as your own. It was written for PSP 9, but should be compatible with any version of PSP
I am using the artwork of Elias Chatzoudis. You need a license to use his tubes. The tube I am using was a Limited Edition tube by Elias at PTE
I am using the FTU kit called I Love My Dog by Gimptastic Scraps.
Open new image 600 x 600
Edit, copy Frame 3
Edit, paste, paste as new layer
Image, resize by 85%
Select in middle of frame with magic wand
Selections, Modify, Expand by 8
Edit, copy paper 7
Edit, paste, paste as new layer
Layers, arrange, send to bottom
Selections, Invert
Edit, Clear
Selections, Select None
Edit, copy Wirefence
Edit, paste, paste as new layer
Effects, 3D Effects, Drop Shadow, Settings of
Vertical and Horizontal: 3
Opacity: 50
Blur: 5
Color: Black
Shadow on new layer NOT checked
Select Raster 2
Effects, 3D Effects, Drop Shadow, Same Settings
Edit, copy your tube
Edit, arrange, bring to top
Effects, 3D Effects, Drop Shadow. Same Settings
Edit, copy Cloud
Edit, paste, paste as new layer
Move to the top right of the frame
Move below the tubes head. See my tag for placement
Effects, 3D Effects, Drop Shadow, same settings
Edit, copy House
Edit, paste, paste as new layer
Move to the bottom left of the frame
Effects, 3D Effects, Drop Shadow, same settings
Edit, copy FoodBowl
Edit, paste, paste as new layer
Move to the beside the dog house. See my tag for placement
Image, resize by 85%
Effects, 3D Effects, Drop Shadow, Same Settings
Edit, copy Hydrant
Edit, paste, paste as new layer
Move to the bottom right of the frame. See my tag for placement
Image, resize 85%
Effects, 3D Effects, Drop Shadow, same settings
Edit, copy Grass
Edit, paste, paste as new layer
Layers arrange, move down below the hydrant. See my tag for placement
Effects, 3D Effects, Drop Shadow, Same settings
Edit, copy Food
Edit, paste, paste as new layer
Move beside dog. See my tag for placement
Image, resize 60%
Effects, 3D Effects, Drop Shadow, same settings
Edit,Copy Bone1
Edit, paste, paste as new layer
Move to place about food bowl. See my tag for placement
Effects, 3D Effects, Drop Shadow, Same settings
Edit, copy BoneRawhide
Edit, paste, paste as new layer
Move above Bone1. See my tag for placement
Effects, 3D Effects, Drop Shadow, same settings
My tag is just a guide
Remember to add your copyright info. Make sure it is plain and legible
Add your name to the tag
Save as PNG
Thursday, July 19, 2012
Here is a new cluster frame for you..This is using the PTU kit I Love My Dog by Amy of Amy & Leah's Gimptastic Tuts. Click on the preview below to take you to the download. Amy is no longer selling kits.

Here is a new cluster frame for you..This is using the PTU kit The Great Outdoors by Amy of Amy & Leah's Gimptastic Tuts. Click on the preview below to take you to the download. Amy is no longer selling kits.

Wednesday, July 18, 2012
Here is a new cluster frame for you..This is using the PTU kit Stavroula by Amy of Amy & Leah's Gimptastic Tuts. Click on the preview below to take you to the download. Amy is no longer selling kits.

Sunday, July 8, 2012
Here is a new cluster frame for you..This is using the PTU kit Longing by Amy of Amy & Leah's Gimptastic Tuts. Click on the preview below to take you to the download. Amy is no longer selling kits.

Thursday, July 5, 2012
Here is a set of Frames I made today....Just playing around and wanted to do something different...Hope that someone may like..They are FTU. Click on the preview to take you to download.

Wednesday, July 4, 2012

This tutorial was written by me. Any resemblance to any other tutorial is pure coincidence.Please DO NOT claim this tutorial as your own. It was written for PSP 9, but should be compatible with any version of PSP
I am using the artwork of Keith Garvey. You need a license to use his tubes.I bought this tube when he was at PTE. You can now purchase his work at his store HERE
I am using the FTU kit called Longing by Gimptastic Scraps.
Open new image 600 x 600
Edit, copy Frame 5
Edit, paste, paste as new layer
Select in middle of frame with magic wand
Selections, Modify, Expand by 8
Edit, copy paper 1
Edit, paste, paste as new layer
Layers, arrange, send to bottom
Selections, Invert
Edit, Clear
Edit, copy close up of your tube
Edit, paste, paste as new layer
Edit, clear
Selections, Select None
Change blend mode of this layer to Luminance (Legacy
Select Raster 2
Effects, 3D Effects, Drop Shadow, Settings of
Vertical and Horizontal: 3
Opacity: 50
Blur: 5
Color: Black
Shadow on new layer NOT checked
Edit, copy your tube
Edit, arrange, bring to top
Effects, 3D Effects, Drop Shadow. Same Settings
Edit, copy heels
Edit, paste, paste as new layer
Move to the bottom left of the frame
Move below the tubes knee. See my tag for placement
Effects, 3D Effects, Drop Shadow, same settings
Edit, copy bling 2
Edit, paste, paste as new layer
Move to the top of the frame
Image, resize by 80%
Move to the left. See my tag for placement
Effects, 3D Effects, Drop Shadow, same settings
Edit, copy bling 3
Edit, paste, paste as new layer
Move to the top of the frame and to the right. See my tag for placement.
Image, resize by 80%
Effects, 3D Effects, Drop Shadow, Same Settings
Edit, copy Swirl
Edit, paste, paste as new layer
Layers, arrange, send to bottom
Edit, copy Heartbox
Edit, paste, paste as new layer
Layers arrange, move down below the heels. See my tag for placement
Image, resize by 80%
Effects, 3D Effects, Drop Shadow, Same settings
Edit, copy Bottle
Edit, paste, paste as new layer
Layers, arrange, move down
Move over to the left. See my tag for placement
Effects, 3D Effects, Drop Shadow, same settings
Edit,Copy bow 3
Edit, paste, paste as new layer
Move to the top above the bling
Effects, 3D Effects, Drop Shadow, Same settings
Edit, copy compact
Edit, paste, paste as new layer
Move below the heart box. See my tag for placement
Effects, 3D Effects, Drop Shadow, same settings
My tag is just a guide
Remember to add your copyright info. Make sure it is plain and legible
Add your name to the tag
Save as PNG
Here is a new cluster frame for you..This is using the PTU kit Come Sail Away by Amy of Amy & Leah's Gimptastic Tuts. Click on the preview below to take you to the download. Amy is no longer selling kits.

Tuesday, July 3, 2012
Here is a cluster frame using Purple's PTU scrap kit called Big White and Boom that you can purchase at Scraps From The Heart. You can find more of her work HERE. She has some great FTU as well as PTU kits on her site..To get the frame click on the preview below to take you to the download..I do not believe Purple still sells.

Monday, July 2, 2012
Here is a new cluster frame for you..This is using the PTU kit Betty by Amy of Amy & Leah's Gimptastic Tuts. You can buy this kit at PSP Tubes Emporium. Click on the preview below to take you to the download. Amy is no longer selling kits.


Subscribe to:
Posts
(Atom)