NO to AI

You will not find AI on my blog!
CT Teams


Friday, November 29, 2013

I am using the artwork of Di_Halim You need a license to use this tube. You can buy this tube at PFD
I am using the PTU kit Winter Frost by Tasha's Playground. You can find where to purchase the kit HERE
Open new image 600 x 600
Select Frame 3
Image, rotate, rotate clockwise 90
Edit, Copy Frame 3
Edit, paste, paste as new layer
Image, resize 80%
With your magic wand click inside the frame
Selections, Modify, Expand by 8
Edit, copy Paper 1
Edit, paste, paste as new layer
Layers, arrange, send to bottom
Selections, Invert
Edit, Clear
Edit, copy Snowflakes
Edit, paste, paste as new layer
Edit, Clear
Selections Select None
Select Raster 2
Effects, 3D Effects, Drop Shadow, Settings of:
Vertical : -3
Horizontal: 3
Opacity: 50
Blur: 10
Color: Black
Shadow on new layer NOT Checked
Edit, Copy Tree 2
Edit, paste, paste as new layer
Image, resize 70%
Move to the left of the frame
Effects, 3D Effects, Drop Shadow, Same Settings
Edit, Copy Tree
Edit, paste, paste as new layer
Image, resize 60%
Move to the left and place on the left part of the tree.. See my tag for placement
Effects, 3D Effects, Drop Shadow, Same Settings
Edit, Copy Snow 1
Edit, Paste, Paste as new layer
Move down to Raster 2 at the bottom of the frame
Image, mirror
Effects, 3D Effects, Drop Shadow, Same Settings
Edit, copy Snowballs
Edit, paste, paste as new layer
Move to the bottom of the frame and to the right
Image, mirror
Image, resize 60%
Effects, 3D Effects, Drop Shadow, Same Settings
Edit, copy Leaves 3
Edit, paste, paste as new layer
Move to raster 2 and to the right and make sure it is behind the snowballs
Image, mirror
Image, resize 60%
Effects, 3D Effects, Drop Shadow, Same Settings
Edit, copy Leaf 4
Edit, paste, paste as new layer
Move to the right and place to the left of leaves 3. See my tag for placement
Image, resize 60%
Effects, 3D Effects, Drop Shadow, Same settings
Edit, copy Tube
Edit, paste, paste as new layer
Image, mirror
Image, resize to fit the tag you are making
Move to the left and place at the bottom of the two trees
Image, resize 60%
Effects, 3D Effects, Drop Shadow, Same Settings
Edit, Copy Fence
Edit, Paste, Paste as new layer
Move down to raster 2
Move down to the bottom of the frame
Effects, 3D Effects, Drop Shadow, Same Settings
Edit, Copy Sled
Edit, Paste, paste as new layer
Image, rotate, free rotate, right 90
Image, resize 80%
Move to the left and place in front of the trees but behind the tube
Effects, 3D Effects, Drop Shadow, Same Settings
Edit, Copy Wheel
Edit, Paste, paste as new layer
Image, resize 50%
Move to the right and place behind the snowballs
Effects, 3D Effects, Drop Shadow, Same settings
Edit, Copy Bird
Edit, paste, paste as new layer
Image, resize 50%
Move to the right and place on the wheel
Effects, 3D Effects, Drop Shadow, Same settings
Edit, Copy Lantern
Edit, Paste, paste as new layer
Image, resize 40%
Move to place on the wheel to make it look like it is hanging there
Effects, 3D Effects, Drop Shadow, Same Settings
Edit, Copy Sparkles 2
Move so that it is on Raster 2
Image, resize 80%
Effects, 3D Effects, Drop Shadow, Same Settings
Edit, Copy Sparkles 4
Edit, paste, paste as new layer
Move to the right side of the frame
Image, resize 80%
Effects, 3D Effects, Drop Shadow, Same Settings
Layers, Duplicate
Image, Mirror
Remember to add your copyright info. Make sure it is plain and legible
Add your name to the tag
Save as PNG
Winter Frost FTU Cluster Frames using the PTU Kit Winter Frost by Tasha's
Playground. Tasha no longer sales kits.


Monday, November 25, 2013

I am using the artwork of Arthur Crowe. You need a license to use his tubes. You can buy his work at his store HERE
I am using the PTU kit Silver N Gold by Freek's Creations. You can buy the kit at Mystical Scraps
Open new image 600 x 600
Edit, Copy Frame 2
Edit, paste, paste as new layer
Image, resize 20%
With your magic wand click inside the frame
Selections, Modify, Expand by 8
Edit, copy Paper 8
Edit, paste, paste as new layer
Layers, arrange, send to bottom
I resized the paper 30%
Selections, Invert
Edit, Clear
Edit, copy Snow
Edit, paste, paste as new layer
Image, resize 20%
Edit, Clear
Edit, Copy Snowflake Dangle
Edit, Paste, paste as new layer
Image, resize 10%
Move up so that the strings are above the frame some
Edit, Clear
Edit, Copy Scene
Edit, paste, paste as new layer
Move to the bottom of the frame
Image, resize 40%
Edit, Clear
Selections Select None
Select Raster 2
Effects, 3D Effects, Drop Shadow, Settings of:
Vertical : -3
Horizontal: 3
Opacity: 50
Blur: 10
Color: Black
Shadow on new layer NOT Checked
Edit, Copy Tree
Edit, paste, paste as new layer
Image, resize 25%
Move to the left of the frame
Effects, 3D Effects, Drop Shadow, Same Settings
Edit, Copy Present
Edit, paste, paste as new layer
Image, resize 10%
Move to the left of the tree
Effects, 3D Effects, Drop Shadow, Same Settings
Layers, duplicate
Image, Mirror
Edit, Copy Bells
Edit, Paste, Paste as new layer
Image, resize 20%
Move to the top of the frame in the middle
Effects, 3D Effects, Drop Shadow, Same Settings
Edit, copy Bag
Edit, paste, paste as new layer
Move to the left and place in front of the tree but behind the present
Image, resize 15%
Effects, 3D Effects, Drop Shadow, Same Settings
Edit, copy Candy Cane
Edit, paste, paste as new layer
Move to the top right of the frame
Image, resize 20%
Effects, 3D Effects, Drop Shadow, Same Settings
Edit, copy Santa
Edit, paste, paste as new layer
Move to place in front of the presents
Image, resize 20%
Effects, 3D Effects, Drop Shadow, Same settings
Edit, copy Candle
Edit, paste, paste as new layer
Move over to the right and place at the bottom right of the frame
Image, resize 20%
Effects, 3D Effects, Drop Shadow, Same Settings
Edit, Copy Candy
Edit, Paste, Paste as new layer
Image, Resize 10%
Move down til it is on Raster 2 at the bottom of the frame
Effects, 3D Effects, Drop Shadow, Same Settings
Edit, Copy Lights
Edit, Paste, paste as new layer
Move up to the top of the frame
Image, resize 30%
Effects, 3D Effects, Drop Shadow, Same Settings
Edit, Copy Tube
Edit, Paste, paste as new layer
Layers, arrange, bring to top
Image, resize to fit your tag
Effects, 3D Effects, Drop Shadow, Same settings
Remember to add your copyright info. Make sure it is plain and legible
Add your name to the tag
Save as PNG
Sunday, November 24, 2013

I am using the artwork of Jose Cano. I bought this tube while he was at PTE. As of right now Jose is in the process of building his own store
I am using the FTU Kit Happy Trails by Sweet Cravings Scraps. The Kit can be found HERE
WSL_Mask220 Found HERE there is a download on the side of the blog for all her masks. You will find the link there for this mask
Go 2 Old Western Font found HERE
Open new image 600 x 600
Edit, Copy Fence
Edit, paste, paste as new layer
Image, resize 70%
Move down toward the bottom but not all the way to the bottom of your image
Effects, 3D Effects, Drop Shadow, Settings of:
Vertical : -3
Horizontal: 3
Opacity: 50
Blur: 10
Color: Black
Shadow on new layer NOT Checked
Edit, copy Desert Overlook
Edit, paste, paste as new layer
Layers, arrange, send to bottom
Image, resize 70%
Move to the top of the fence
Effects, 3D Effects, Drop Shadow, Same Settings
Edit, copy Dried Grass
Edit, paste, paste as new layer
Layers, arrange, bring to top
Image, resize 80%
Move to the right some
Effects, 3D Effects, Drop Shadow, Same Settings
Edit, copy Cactus
Edit, Paste, Paste as new layer
Move to the right of the fence some
Image, resize 70%
Effects, 3D Effects, Drop Shadow, Same Settings
Edit, Copy Pebbles
Edit, paste, paste as new layer
Layers, arrange, send to bottom
Move so that you can see it
Image, resize 70%
Effects, 3D Effects, Drop Shadow, Same settings
Edit, Copy Wagon
Edit, Paste, Paste as new layer
Layers, arrange, bring to top
Image, resize 55%
Move to the left
Effects, 3D Effects, Drop Shadow, Same Settings
Edit, Copy Horse
Edit, Paste, Paste as new layer
Move to the left and place beside the wagon
Image, resize 40%
Effects, 3D Effects, Drop Shadow, Same settings
Edit, copy Tube
Edit, paste, paste as new layer
Move over to the right and place in front of the cactus
Effects, 3D Effects, Drop Shadow, Same Settings
Go back to the overlook and pull it up so that it is peeking over the wagon
Edit, Copy Paper 8
Edit, Paste, paste as new layer
Layers, arrange, send to bottom
Layers, Load/save mask, load mask from disk, settings:
WSL_Mask220
Source Luminance
Fit To Canvas
Invert Transparency NOT checked
Hide All Mask
Layers, merge, merge group
When putting your name on the tag I used a dark color from the tube to write the name with
Remember to add your copyright info. Make sure it is plain and legible
Add your name to the tag
Save as PNG

I am using the artwork of Eugene Rzhevskii You need a license to use this tube. This tube was the gift of the month in April if you bought 3 or more tubes at PFD
I am using the PTU kit I Snow Day by Gimptastic Scraps . This kit is exclusive to The PSP Project
Open new image 600 x 600
Edit, Copy Frame 5
Edit, paste, paste as new layer
Image, resize 80%
With your magic wand click inside the frame
Selections, Modify, Expand by 8
Edit, copy Paper 1
Edit, paste, paste as new layer
Layers, arrange, send to bottom
Selections, Invert
Edit, Clear
Edit, copy Snowscape
Edit, paste, paste as new layer
Move down some toward the bottom of the frame
Edit, Clear
Edit, Copy Snow
Edit, Paste, paste as new layer
Edit, Clear
Edit, copy Snowflake Scatter
Edit, paste, paste as new layer
Move around til you have it the way you want it
Edit, Clear
Edit, Copy Icicles
Edit, Paste, paste as new layer
Move to the top of the frame leave some of it peaking out out of the bottom
Edit, Clear
Selections Select None
Select Raster 2
Effects, 3D Effects, Drop Shadow, Settings of:
Vertical : -3
Horizontal: 3
Opacity: 50
Blur: 10
Color: Black
Shadow on new layer NOT Checked
Edit, Copy Tree
Edit, paste, paste as new layer
Image, resize 80%
Move to the left of the frame
Effects, 3D Effects, Drop Shadow, Same Settings
Edit, Copy Fence
Edit, paste, paste as new layer
Image, resize 80%
Layers, arrange, move down
Move to the bottom of the frame
Effects, 3D Effects, Drop Shadow, Same Settings
Edit, Copy Snowman
Edit, Paste, Paste as new layer
Image, resize 80%
Move to the left and place in front of the tree
Effects, 3D Effects, Drop Shadow, Same Settings
Edit, copy Tube
Edit, paste, paste as new layer
Image, resize to fit your tube
Effects, 3D Effects, Drop Shadow, Same Settings
Edit, copy Sled
Edit, paste, paste as new layer
Move to place at the bottom of the cut off tubes legs
Image, resize 80%
Effects, 3D Effects, Drop Shadow, Same Settings
Edit, copy Snowballs
Edit, paste, paste as new layer
Move to the right and place on the right part of the fence and behind the sled to make it look like the sled is leaning on the snowballs
Image, resize 80%
Effects, 3D Effects, Drop Shadow, Same settings
Edit, copy Boots
Edit, paste, paste as new layer
Move over to the right and place in front of the snowballs and the sled. See my tag for placement
Image, resize 50%
Effects, 3D Effects, Drop Shadow, Same Settings
Edit, Copy Branch 3
Edit, Paste, Paste as new layer
Image, Mirror
Move toward the top right of your frame
Layers, arrange, send to bottom
Effects, 3D Effects, Drop Shadow, Same Settings
Layers, Duplicate
Image, Mirror
Edit, Copy Skis
Edit, Paste, paste as new layer
Layers, arrange, bring to top
Move to the right and move til it is behind the snowballs but in front of the fence
Effects, 3D Effects, Drop Shadow, Same Settings
Edit, Copy Scarf
Edit, Paste, paste as new layer
Layers, arrange, bring to top
Image, resize 50%
Move to the boots and place on them
Image, rotate, free rotate, right, 10
Effects, 3D Effects, Drop Shadow, Same settings
Edit, Copy Mittens
Edit, paste, paste as new layer
Image, resize 50%
Move to the right and place on the skis
Effects, 3D Effects, Drop Shadow, Same settings
Edit, Copy Hat
Edit, Paste, paste as new layer
Image, resize 50%
Move to the right and make it look like it is hanging on the right ski
Effects, 3D Effects, Drop Shadow, Same Settings
Edit, Copy Branch 2
Move over and up to the right
Move down til it is on Raster 2
Effects, 3D Effects, Drop Shadow, Same Settings
Edit, Copy Deer
Edit, paste, paste as new layer
Move to the right and than move down til it is above the snowdrift. It will look like the deer is looking out from the snow
Image, resize 50%
Effects, 3D Effects, Drop Shadow, Same Settings
Remember to add your copyright info. Make sure it is plain and legible
Add your name to the tag
Save as PNG
Saturday, November 23, 2013

I am using the artwork of VeryMany. You need a license to use this tube. You can buy the art at their store found HERE
I am using the PTU kit Winter Blush by Tasha's Playground. You can find where to purchase the kit HERE
Open new image 600 x 600
Edit, Copy Frame 2
Edit, paste, paste as new layer
Image, resize 80%
With your magic wand click inside the frame
Selections, Modify, Expand by 8
Edit, copy Paper 7
Edit, paste, paste as new layer
Layers, arrange, send to bottom
Selections, Invert
Edit, Clear
Edit, Copy Snowflakes 3
Edit, Paste, paste as new layer
Edit, Clear
Selections Select None
Select Raster 2
Effects, 3D Effects, Drop Shadow, Settings of:
Vertical : -3
Horizontal: 3
Opacity: 50
Blur: 10
Color: Black
Shadow on new layer NOT Checked
Edit, Copy Snowpile 2
Edit, paste, paste as new layer
Image, resize 65%
Move down to bottom of frame
Effects, 3D Effects, Drop Shadow, Same Settings
Edit, Copy Snowpile 1
Edit, paste, paste as new layer
Image, Mirror
Move to the bottom of the frame and over to the right some
Effects, 3D Effects, Drop Shadow, Same Settings
Edit, Copy Tree
Edit, Paste, Paste as new layer
Image, resize 70%
Move to the right and place behind the snowpiles
Effects, 3D Effects, Drop Shadow, Same Settings
Edit, copy Sled
Edit, paste, paste as new layer
Move to the right and move up to place in front of the snowpiles. Make it look like the sled is leaning against the tree
Image, resize 65%
Effects, 3D Effects, Drop Shadow, Same Settings
Edit, copy Birdhouse
Edit, paste, paste as new layer
Move to the left side of frame
Image, resize 85%
Move down below the snow piles
Effects, 3D Effects, Drop Shadow, Same settings
Edit, copy Branch 3
Edit, paste, paste as new layer
Move over to the right and move up to place in front of the tree
Effects, 3D Effects, Drop Shadow, Same Settings
Edit, Copy Branch 2
Edit, Paste, Paste as new layer
Move to the left and place in front of the birdhouse
Effects, 3D Effects, Drop Shadow, Same Settings
Edit, Copy Berries 2
Edit, Paste, paste as new layer
Image, Mirror
Move to the right and place to the right side of the tree
Effects, 3D Effects, Drop Shadow, Same Settings
Edit, Copy Leaves 1
Edit, Paste, paste as new layer
Move to the left and place in front of the bird house
Effects, 3D Effects, Drop Shadow, Same settings
Edit, Copy Wheel
Edit, paste, paste as new layer
Image, resize 75%
Move to the left and move up til it is above to snowpiles but look to be lying against the birdhouse and branches
Effects, 3D Effects, Drop Shadow, Same settings
Edit, Copy Berries
Edit, Paste, paste as new layer
Image, resize 40%
Move to the birdhouse and move to place at the top middle of the birdhouse
Effects, 3D Effects, Drop Shadow, Same Settings
Edit, Copy Branches
Move to Raster 2 and place at the top of the frame
Image, resize 50%
Effects, 3D Effects, Drop Shadow, Same Settings
Edit, Copy Tube
Edit, paste, paste as new layer
Layers, arrange, bring to top
Image, resize to fit your tag
Effects, 3D Effects, Drop Shadow, Same Settings
Remember to add your copyright info. Make sure it is plain and legible
Add your name to the tag
Save as PNG
Winter Blush FTU Cluster Frame using the PTU Kit Winter Blush by Tasha's
Playground. Tasha no longer sales kits.


Tuesday, November 19, 2013

This tutorial was written by me. Any resemblance to any other tutorial is pure coincidence. Please DO NOT claim this tutorial as your own. It was written in PSP 9 but should be compatible with any version of PSP.
I am using the artwork of Ismael Rac You need a license to use this tube. You can buy this tube at his store HERE
I am using the PTU kit Winter Wonders by Gimptastic Scraps . This kit is exclusive to Thrifty Scraps
Open new image 600 x 600
Edit, Copy Frame 4
Edit, paste, paste as new layer
Image, resize 80%
With your magic wand click inside the frame
Selections, Modify, Expand by 8
Edit, copy Paper 7
Edit, paste, paste as new layer
Layers, arrange, send to bottom
I resize this paper 80%
Selections, Invert
Edit, Clear
Edit, Copy Falling Snow
Edit, Paste, paste as new layer
Edit, Clear
Selections Select None
Select Raster 2
Effects, 3D Effects, Drop Shadow, Settings of:
Vertical : -3
Horizontal: 3
Opacity: 50
Blur: 10
Color: Black
Shadow on new layer NOT Checked
Edit, Copy Frame 1
Edit, paste, paste as new layer
Layers, arrange, send to bottom
Image, resize 90%
Effects, 3D Effects, Drop Shadow, Same Settings
Edit, Copy Grass
Edit, paste, paste as new layer
Layers, arrange, bring to top
Move to the bottom of the frame. See my tag for placement
Effects, 3D Effects, Drop Shadow, Same Settings
Edit, Copy Plant 1
Edit, Paste, Paste as new layer
Move to the right and place on top of the grass on the right
Effects, 3D Effects, Drop Shadow, Same Settings
Edit, copy Plant 2
Edit, paste, paste as new layer
Move to the right and place behind the grass
Effects, 3D Effects, Drop Shadow, Same Settings
Edit, copy Tree
Edit, paste, paste as new layer
Move to the left
Image, resize 75%
Effects, 3D Effects, Drop Shadow, Same settings
Edit, copy Tube
Edit, paste, paste as new layer
Move over to the left and place in front of the tree
Image, resize 75%
Effects, 3D Effects, Drop Shadow, Same Settings
Edit, Copy Sled
Edit, Paste, Paste as new layer
Image, resize 80%
Move to the left and place to the left and behind the tube so that you can still see it
Effects, 3D Effects, Drop Shadow, Same Settings
Edit, Copy Well
Edit, Paste, paste as new layer
Image, resize 60%
Move to the right and place in front of the grass and plants
Effects, 3D Effects, Drop Shadow, Same Settings
Edit, Copy Birdbranch
Edit, Paste, paste as new layer
Move to place on top of the well
Image, resize 60%
Effects, 3D Effects, Drop Shadow, Same settings
Edit, Copy Rabbit
Edit, paste, paste as new layer
Image, Mirror
Image, resize 60%
Move to the left and place behind the tubes feet and in front of the sled
Effects, 3D Effects, Drop Shadow, Same settings
Edit, Copy Deer
Edit, Paste, paste as new layer
Layers, arrange, bring to top
Image, resize 80%
Move to place in front of the well
Effects, 3D Effects, Drop Shadow, Same Settings
Edit, Copy Branch 2
Image, Mirror
Move to the top left of the frame
Layers, arrange, send to bottom
Effects, 3D Effects, Drop Shadow, Same Settings
Layers, Duplicate
Image, Mirror
Edit, Copy Snowballs
Edit, paste, paste as new layer
Layers, arrange, bring to top
Image, resize 60%
Move to the right and place to the right behind the deer and in front of the well
Effects, 3D Effects, Drop Shadow, Same Settings
Remember to add your copyright info. Make sure it is plain and legible
Add your name to the tag
Save as PNG
Monday, November 18, 2013

I am using the artwork of Alex Prihodko You need a license to use this tubes. You can buy the tube at PFD
I am using the PTU kit Home For Christmas by Manipulated by Magik. You can buy this kit exclusively at Thrifty Scraps
Open new image 600 x 600
Edit, Copy Frame 4
Edit, paste, paste as new layer
Image, resize 80%
With your magic wand click inside the frame
Selections, Modify, Expand by 8
Edit, copy Paper 11
Edit, paste, paste as new layer
Layers, arrange, send to bottom
Selections, Invert
Edit, Clear
Edit, copy Sparkle Tree
Edit, paste, paste as new layer
Edit, Clear
Selections Select None
Select Raster 2
Effects, 3D Effects, Drop Shadow, Settings of:
Vertical : -3
Horizontal: 3
Opacity: 50
Blur: 10
Color: Black
Shadow on new layer NOT Checked
Edit, Copy Tree
Edit, paste, paste as new layer
Move to the left side of the frame
Effects, 3D Effects, Drop Shadow, Same Settings
Select Lights
Image, rotate, rotate clockwise 90
Edit, Copy Lights
Edit, paste, paste as new layer
Move to the top and move down to raster 2 so they will be on the frame
Image, resize 85%
Effects, 3D Effects, Drop Shadow, Same Settings
Edit, Copy Ornaments
Edit, Paste, Paste as new layer
Layers, arrange, bring to top
Move to the left and place in front of and to the left of the tree some.. See my tag for placement
Image, resize 40%
Effects, 3D Effects, Drop Shadow, Same Settings
Edit, copy Santa Bag
Edit, paste, paste as new layer
Image, resize 40%
Move to the left and place to the right of the ornaments than move down to it is behind the ornaments some
Effects, 3D Effects, Drop Shadow, Same Settings
Edit, copy Branch 2
Edit, paste, paste as new layer
Move toward the top of the frame some
Layers, arrange, send to bottom
Image, resize 70%
Effects, 3D Effects, Drop Shadow, Same settings
Edit, copy Christmas Sign
Edit, paste, paste as new layer
Move up until you have it on top or Raster 2 and below the lights
Image, resize 50%
Effects, 3D Effects, Drop Shadow, Same Settings
Edit, Copy Fireplace
Edit, Paste, Paste as new layer
Image, resize 60%
Move to the right side of the frame. See my tag for placement
Effects, 3D Effects, Drop Shadow, Same Settings
Edit, Copy Stars
Edit, Paste, paste as new layer
Image, resize 70%
Move toward the top right of the frame
Layers, arrange, send to bottom
Move to the left some
Effects, 3D Effects, Drop Shadow, Same Settings
Edit, Copy Gift
Edit, Paste, paste as new layer
Layers, arrange, bring to top
Move over to the tree and move behind the ornaments and santas bag
Image, resize 50%
Effects, 3D Effects, Drop Shadow, Same settings
Edit, Copy Bells
Edit, paste, paste as new layer
Image, resize 20%
Move to the fireplace and place in the middle of the garland
Effects, 3D Effects, Drop Shadow, Same settings
Edit, Copy Tube
Edit, Paste, paste as new layer
Move to the right and place in front and to the right of the gourds
Image, resize to fit your tag
Effects, 3D Effects, Drop Shadow, Same Settings
Remember to add your copyright info. Make sure it is plain and legible
Add your name to the tag
Save as PNG
Sunday, November 17, 2013

I am using the artwork of VeryMany. You need a license to use this tube. You can buy the art at their store found HERE
I am using the PTU kit Autumn kiss by Tasha's Playground. You can find where to purchase the kit HERE
Jayne Print Font found HERE
Open new image 600 x 600
Edit, Copy Frame 4
Edit, paste, paste as new layer
Image, resize 85%
With your magic wand click inside the frame
Selections, Modify, Expand by 8
Edit, copy Paper 4
Edit, paste, paste as new layer
Layers, arrange, send to bottom
Selections, Invert
Edit, Clear
Edit, copy Leaf Scatter
Edit, paste, paste as new layer
Move to the left
Edit, Clear
Selections Select None
Layers, Duplicate
Image, Mirror
Image, Flip
Select Raster 2
Effects, 3D Effects, Drop Shadow, Settings of:
Vertical : -3
Horizontal: 3
Opacity: 50
Blur: 10
Color: Black
Shadow on new layer NOT Checked
Edit, Copy Tree
Edit, paste, paste as new layer
Move to the left side of the frame
Image, resize 85%
Effects, 3D Effects, Drop Shadow, Same Settings
Edit, Copy Wheelbarrow
Edit, paste, paste as new layer
Image, resize 60%
Image, mirror
Move to the left and place in front of the tree
Effects, 3D Effects, Drop Shadow, Same Settings
Edit, Copy Pumpkin 1
Edit, Paste, Paste as new layer
Move to the left and place to the left of the wheelbarrow some. See my tag for placement
Image, resize 40%
Effects, 3D Effects, Drop Shadow, Same Settings
Edit, copy Basket
Edit, paste, paste as new layer
Image, resize 60%
Move to the right of the wheelbarrow. See my tag for placement
Effects, 3D Effects, Drop Shadow, Same Settings
Select Branch 2
Image, rotate, rotate counter clockwise 90
Image, Mirror
Edit, copy Branch 2
Edit, paste, paste as new layer
Move to the right side of the frame
Effects, 3D Effects, Drop Shadow, Same settings
Select Branch
Image, rotate, rotate, clockwise 90
Edit, copy Branch
Edit, paste, paste as new layer
Move to the top right and place on top of the first branch
Image, resize 75%
Effects, 3D Effects, Drop Shadow, Same Settings
Edit, Copy Flowers
Edit, Paste, Paste as new layer
Image, resize 60%
Move to the right and place in front of the branches
Effects, 3D Effects, Drop Shadow, Same Settings
Edit, Copy Gourds
Edit, Paste, paste as new layer
Image, resize 70%
Image, mirror
Move to the right and place in front of the flowers
Effects, 3D Effects, Drop Shadow, Same Settings
Edit, Copy Dead Grass
Edit, Paste, paste as new layer
Move to Raster 2 and move to the left
Effects, 3D Effects, Drop Shadow, Same settings
Layers, Duplicate
Image, Mirror
Layers, Duplicate and move to the middle of the frame
Edit, Copy Rabbit
Edit, paste, paste as new layer
Layers, arrange, bring to top
Image, resize 70%
Move to place between the pumpkin and basket
Effects, 3D Effects, Drop Shadow, Same settings
Edit, Copy Squirrel
Edit, Paste, paste as new layer
Move to the right and place in front and to the right of the gourds
Image, resize 40%
Image, Mirror
Effects, 3D Effects, Drop Shadow, Same Settings
Edit, Copy Leaves 2
Edit, paste, paste as new layer
Move to the top right of the frame
Layers, arrange, send to bottom and move around til you get it place where you want
Effects, 3D effects, Drop shadow, Same settings
Edit, Copy Leaves 3
Layers, arrange, bring to top
Move to the right of the frame
Layers, arrange, send to bottom
Effects, 3D effects, Drop Shadow, Same settings
Edit, Copy Tube
Edit, Paste, paste as new layer
Layers, arrange, bring to top
Image resize to fit your tag
Since my tube is a cut off I move up to place so her legs will be behind the wheelbarrow, basket and gourds
Effects, 3D Effects, Drop Shadow, Same Settings
Remember to add your copyright info. Make sure it is plain and legible
Add your name to the tag
Save as PNG
Autumn Kiss FTU Cluster Frame using the PTU Kit Autumn Kiss by Tasha's
Playground. Tasha no longer sales kits.


Saturday, November 16, 2013

I am using the artwork of Keith Garvey. You need a license to use his tubes. I purchased this tube while he was at MPT. You can buy his work at his store found HERE
I am using the PTU kit Christmas of Old by Freek's Creations. You can buy the kit at Mystical Scraps
Open new image 600 x 600
Edit, Copy Frame
Edit, paste, paste as new layer
Image, resize 70%
With your magic wand click inside the frame
Selections, Modify, Expand by 8
Edit, copy Paper 9
Edit, paste, paste as new layer
Layers, arrange, send to bottom
Selections, Invert
Edit, Clear
Edit, copy Snow
Edit, paste, paste as new layer
Image, resize 80%
Move around to place how you like
Edit, Clear
Edit, Copy Sparkles
Edit, Paste, paste as new layer
Move down below the snow
Edit, Clear
Edit, Copy Stars
Edit, Paste, paste as new layer
Move to the right of the frame
Edit, Clear
Selections Select None
Layers, Duplicate
Image, Mirror
Select Raster 2
Effects, 3D Effects, Drop Shadow, Settings of:
Vertical : -3
Horizontal: 3
Opacity: 50
Blur: 10
Color: Black
Shadow on new layer NOT Checked
Edit, Copy Tree
Edit, paste, paste as new layer
Move to the right side of the frame
Effects, 3D Effects, Drop Shadow, Same Settings
Edit, Copy Gift 2
Edit, paste, paste as new layer
Image, resize 50%
Move to the right and place in front of the tree in the middle
Effects, 3D Effects, Drop Shadow, Same Settings
Edit, Copy Gift
Edit, Paste, Paste as new layer
Move to the right and place behind gift 2
Image, resize 50%
Effects, 3D Effects, Drop Shadow, Same Settings
Edit, copy Tube
Edit, paste, paste as new layer
Effects, 3D Effects, Drop Shadow, Same Settings
Edit, copy MistleToe
Edit, paste, paste as new layer
Move to the left side of the frame near the top
Image, Mirror
Image, resize 40%
Effects, 3D Effects, Drop Shadow, Same settings
Edit, copy Holly
Edit, paste, paste as new layer
Move to the top left and place in the center of the bow of the mistletoe
Image, resize 20%
Effects, 3D Effects, Drop Shadow, Same Settings
Edit, Copy Fireplace
Edit, Paste, Paste as new layer
Image, resize 60%
Move to bottom left of the frame and move down til it is above Raster 2
Effects, 3D Effects, Drop Shadow, Same Settings
Edit, Copy Stocking
Edit, copy. paste as new layer
Image, resize 40%
Move to the left and move to place on the fireplace to make it look like it is hanging there
Effects, 3D Effects, Drop Shadow, Same Settings
Edit, Copy Bells
Edit, Paste, paste as new layer
Move to Raster 2 and place at the top of the frame in the middle
Image, resize 30%
Effects, 3D Effects, Drop Shadow, Same settings
Edit, Copy Candle
Edit, paste, paste as new layer
Image, resize 20%
Move to place in front of the fireplace. See my tag for placement
Effects, 3D Effects, Drop Shadow, Same settings
Edit, Copy Jingle Bell
Edit, Paste, paste as new layer
Move to the right and place next to the gift
Image, resize 30%
Effects, 3D Effects, Drop Shadow, Same Settings
Remember to add your copyright info. Make sure it is plain and legible
Add your name to the tag
Save as PNG
Friday, November 15, 2013

I am using the artwork of Anna Liwanag You need a license to use this tube. You can buy this tube at CDO
I am using the PTU kit I Hot & Nerdy by Gimptastic Scraps . This kit is exclusive to The PSP Project
Open new image 600 x 600
Edit, Copy Frame 4
Edit, paste, paste as new layer
Image, resize 80%
With your magic wand click inside the frame
Selections, Modify, Expand by 8
Edit, copy Paper 5
Edit, paste, paste as new layer
Layers, arrange, send to bottom
Selections, Invert
Edit, Clear
Selections, Select None
Select Raster 2
Effects, 3D Effects, Drop Shadow, Settings of:
Vertical : -3
Horizontal: 3
Opacity: 50
Blur: 10
Color: Black
Shadow on new layer NOT Checked
Edit, Copy Locker
Edit, paste, paste as new layer
Move to the right side of the frame
Effects, 3D Effects, Drop Shadow, Same Settings
Edit, Copy Backpack
Edit, paste, paste as new layer
Image, resize 60%
Move to the right and place in front of the locker and to the right some
Effects, 3D Effects, Drop Shadow, Same Settings
Edit, Copy Books
Edit, Paste, Paste as new layer
Move to the right and place in front and to the left of the backpack
Image, resize 60%
Effects, 3D Effects, Drop Shadow, Same Settings
Edit, copy Tube
Edit, paste, paste as new layer
Move to the left side of the locker
Image, resize 90% or to the size that you want to fit your tag
Effects, 3D Effects, Drop Shadow, Same Settings
Edit, copy Ready To Learn WA
Edit, paste, paste as new layer
Move to the top left of the frame
Image, rotate, free rotate, 20, left
Image, resize 70%
Effects, 3D Effects, Drop Shadow, Same settings
Edit, copy Owl
Edit, paste, paste as new layer
Move to the top left and place on the top of the WA..see my tag for placement
Image, resize 50%
Effects, 3D Effects, Drop Shadow, Same Settings
Edit, Copy Cellphone
Edit, Paste, Paste as new layer
Image, resize 60%
Move to right and place between the books and book bag
Effects, 3D Effects, Drop Shadow, Same Settings
Edit, Copy Ipod
Edit, Paste, paste as new layer
Image, resize 50%
Move to the right and place in front of the books but to look to be beside the cell
Effects, 3D Effects, Drop Shadow, Same Settings
Edit, Copy Apple
Edit, Paste, paste as new layer
Move to the right and place on top of the books
Image, resize 40%
Effects, 3D Effects, Drop Shadow, Same settings
Edit, Copy Get Prepped
Edit, paste, paste as new layer
Image, resize 70%
Move to place at the bottom of the tube since the tube is a cut off tube and I like to hide that
Effects, 3D Effects, Drop Shadow, Same settings
For the next two steps I duplicated them and placed them all over the tree
Edit, Copy Comp Book
Edit, Paste, paste as new layer
Move to the left and place at the bottom of the frame
Image, resize 50%
Image, rotate, free rotate, left, 20
Effects, 3D Effects, Drop Shadow, Same Settings
Edit, Copy Diploma
Edit, Paste, paste as new layer
Move to the left and place in front of the comp book
Image, resize 70%
Effects, 3D Effects, Drop shadow, Same Settings
Edit, Copy Ruler
Edit, paste, paste as new layer
Image, resize 70%
Move to the left and move below the composition book
Effects, 3D Effects, Drop Shadow, Same settings
Select Raster 3
Edit, Copy Crayons
Edit, paste, paste as new layer
Effects, 3D Effects, Drop Shadow, Same Settings
Edit, Copy Glasses
Edit, paste, paste as new layer
Image, resize 50%
Layers, arrange, bring to top
Image, resize 50%
Move to the left and place on the diploma and to the left some
Image, rotate, free rotate, right, 20
Effects, 3D Effects, Drop Shadow, Same Settings
Select Raster 3
Edit, Copy Scatter
Edit, Paste, paste as new layer
Image, rotate, free rotate, right, 40
Effects, 3D Effects, Drop Shadow, Same Settings
Edit, Copy Brad 2
Edit, Paste, Paste as new layer
Layers, Arrange, bring to top
Image, resize 50%
Move to place on the slats in the locker
Effects, 3D Effects, Drop Shadow, same settings on both words
Edit, copy Protractor
Edit, paste, paste as new layer
Image, resize 50%
Move to the left and place behind the diploma
Effects, 3D Effects, Drop Shadow, Same Settings
Edit, Copy Kitty
Edit, Paste, paste as new layer
Layers, arrange, bring to top
Move to the right and place in front of the books to the right
Image, resize 50%
Effects, 3D Effects, Drop Shadow, Same Settings
Remember to add your copyright info. Make sure it is plain and legible
Add your name to the tag
Save as PNG
Wednesday, November 13, 2013
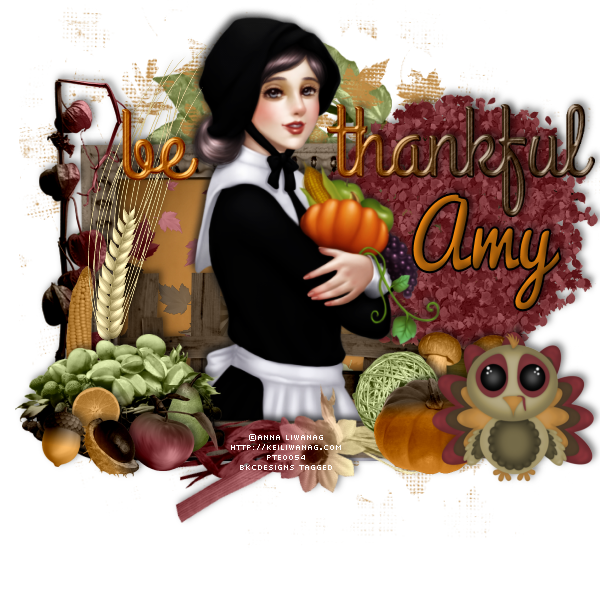
I am using the artwork of Anna Liwanag You need a license to use this tube. I bought this tube at PTE but now Anna sells her terrific work at CDO
I am using the PTU kit I Be Thankful by Gimptastic Scraps . This kit is exclusive to The PSP Project
Pacifico Font HERE
Open new image 600 x 600
Edit, Copy Frame 1
Edit, paste, paste as new layer
Image, resize 80%
With your magic wand click inside the frame
Selections, Modify, Expand by 8
Edit, copy Paper 10
Edit, paste, paste as new layer
Layers, arrange, send to bottom
Selections, Invert
Edit, Clear
Edit, Copy Leaf Scatter 1
Edit, Paste, paste as new layer
Edit, Clear
Edit, Copy Leaf Scatter 2
Move so it is above raster 3
Move down to bottom of frame
Edit, Clear
Edit, Copy Fence
Edit, Paste, Paste as new layer
Image, resize 70%
Pull down so that some of it is out of the frame
Edit, Clear
Selections, Select None
Go to Leaf Scatter 2
Layers, Duplicate
Image, Flip
Select Raster 2
Effects, 3D Effects, Drop Shadow, Settings of:
Vertical : -3
Horizontal: 3
Opacity: 50
Blur: 10
Color: Black
Shadow on new layer NOT Checked
Edit, Copy Tree
Edit, paste, paste as new layer
Image, resize 60%
Move to the right side of the frame
Effects, 3D Effects, Drop Shadow, Same Settings
Edit, Copy Pumpkin
Edit, paste, paste as new layer
Image, resize 50%
Move to the right and place in front of the base of the tree
Effects, 3D Effects, Drop Shadow, Same Settings
Edit, Copy Tube
Edit, Paste, Paste as new layer
Image, resize to fit your tag..I resize 80%
Image, Mirror
Effects, 3D Effects, Drop Shadow, Same Settings
Select Raster 2
Layers, Duplicate
Move to the top
Use your eraser tool to get rid of the excess frame. I do this since the tube is cut off and I want to hide the hard edges
Edit, copy Turkey
Edit, paste, paste as new layer
Move to the right and place to the right of the pumpkin
Image, resize 50%
Effects, 3D Effects, Drop Shadow, Same Settings
Edit, copy mushrooms
Edit, paste, paste as new layer
Image, resize 50%
Move to the bottom right and place in front of the tree
Effects, 3D Effects, Drop Shadow, Same settings
Layes, Duplicate
Image, Mirror
Edit, copy Basket of fruit
Edit, paste, paste as new layer
Move to the bottom left of the frame
Image, resize 70%
Effects, 3D Effects, Drop Shadow, Same Settings
Edit, Copy Acorn
Edit, Paste, Paste as new layer
Image, resize 40%
Move to left and place to the left side of the fruit basket. See my tag for placement
Effects, 3D Effects, Drop Shadow, Same Settings
Edit, Copy Fruit
Edit, Paste, paste as new layer
Image, resize 40%
Move to the right of the fruit basket. See my tag for placement
Effects, 3D Effects, Drop Shadow, Same Settings
Edit, Copy Nut
Edit, Paste, paste as new layer
Move to the left and place between the acorn and fruit
Image, resize 40%
Effects, 3D Effects, Drop Shadow, Same settings
Edit, Copy Corn
Edit, paste, paste as new layer
Image, Flip
Image, resize 60%
Move to the left and than so it is below the fruit basket to the left
Effects, 3D Effects, Drop Shadow, Same settings
For the next two steps I duplicated them and placed them all over the tree
Edit, Copy Wheat
Edit, Paste, paste as new layer
Move to the left and place next to the corn
Effects, 3D Effects, Drop Shadow, Same Settings
Select Branch 2
Image, rotate, rotate counter clockwise 90
Image, Mirror
Edit, Copy Branch 2
Edit, Paste, paste as new layer
Move to the left and place so it is on raster 2 behind the corn and wheat
Effects, 3D Effects, Drop shadow, Same Settings
Edit, Copy Deco 2
Edit, paste, paste as new layer
Image, resize 70%
Move down to the bottom of the frame so it is laying on the duplicate of raster 2
Image, rotate, free rotate, 10, right
Effects, 3D Effects, Drop Shadow, Same settings
Edit, Copy Ball
Edit, paste, paste as new layer
Image, resize 60%
Move to the right and place behind the Pumpkin at the left of it and in front of the mushrooms
Effects, 3D Effects, Drop Shadow, Same Settings
Edit, Copy Orange
Edit, paste, paste as new layer
Image, resize 40%
Move to the left and place behind the acorn and nut. It wil be between the 2 of them
Effects, 3D Effects, Drop Shadow, Same Settings
Edit, Copy Pear
Edit, Paste, paste as new layer
Image, resize 40%
Move to the left and place to the right side of the fruit
Effects, 3D Effects, Drop Shadow, Same Settings
Edit, Copy Mask
Edit, Paste, Paste as new layer
Layers, Arrange, send to bottom
Select WA2
I use my selection tool and go around the word Thankful than edit copy that word. Press delete on the keyboard, Selections, select none.
Image, resize both words 70%
Move be to the left side at the top of the frame and thankful to the right side of the frame
Effects, 3D Effects, Drop Shadow, same settings on both words
Select Vine
Image, Flip
Edit, copy Vine
Edit, paste, paste as new layer
Move to the top of the frame
Layers, arrange, send to bottom
Image, resize 85%
Effects, 3D Effects, Drop Shadow, Same Settings
Remember to add your copyright info. Make sure it is plain and legible
Add your name to the tag
Save as PNG
Tuesday, November 12, 2013

This tutorial was written by me. Any resemblance to any other tutorial is pure coincidence. Please DO NOT claim this tutorial as your own. It was written in PSP 9 but should be compatible with any version of PSP.
I am using the artwork of Roman Zaric. You need a license to use his work. I received this tube while he was at PTE but you can buy his tubes at his store found HERE
I am using the PTU kit Christmas In Pink by Manipulated by Magik . Visit her blog HERE to find where she sales her kits and more.
Open new image 600 x 600
Edit, Copy Frame 5
Edit, paste, paste as new layer
Image, resize 80%
With your magic wand click inside the frame
Selections, Modify, Expand by 8
Edit, copy Paper 4
Edit, paste, paste as new layer
Layers, arrange, send to bottom
Selections, Invert
Edit, Clear
Edit, Copy Sparkles
Edit, Paste, paste as new layer
Edit, Clear
Selections, Select None
Select Raster 2
Effects, 3D Effects, Drop Shadow, Settings of:
Vertical : -3
Horizontal: 3
Opacity: 50
Blur: 10
Color: Black
Shadow on new layer NOT Checked
Edit, Copy Garland
Edit, paste, paste as new layer
Image, resize 70%
Image, Flip
Move to the top of the frame
Effects, 3D Effects, Drop Shadow, Same Settings
Edit, Copy Lights
Edit, paste, paste as new layer
Image, resize 75%
Move to the top and place on the top of the garland
Effects, 3D Effects, Drop Shadow, Same Settings
Edit, Copy Tree 2
Edit, Paste, Paste as new layer
Move to the left of the frame. See my tag for placement
Effects, 3D Effects, Drop Shadow, Same Settings
Edit, Copy Giftbox
Edit, paste, paste as new layer
Image, resize 50%
Move to the left and place on the left bottom of the tree
Effects, 3D Effects, Drop Shadow, Same settings
Edit, Copy Tim
Edit, Paste, Paste as new layer
Image, resize 40%
Move to the left and place to the right of giftbox and move behind and to the right
Effects, 3D Effects, Drop Shadow, Same Settings
Edit, copy Deco
Edit, paste, paste as new layer
Move to the right and place at the bottom right of the frame
Image, resize 60%
Effects, 3D Effects, Drop Shadow, Same Settings
Edit, copy Stocking
Edit, paste, paste as new layer
Image, resize 40%
Move to the top of the frame and make it look like it is hanging from the lights
Effects, 3D Effects, Drop Shadow, Same settings
Edit, copy Branch
Edit, paste, paste as new layer
Move to the top of the tree and place the ribbon on the top of the tree
Image, resize 60%
Effects, 3D Effects, Drop Shadow, Same Settings
Edit, Copy Bells
Edit, Paste, Paste as new layer
Image, resize 40%
Move to place in the middle of the frame on top of the lights
Effects, 3D Effects, Drop Shadow, Same Settings
Edit, Copy Teddy
Edit, Paste, paste as new layer
Image, resize 40%
Sit on top of the tin
Effects, 3D Effects, Drop Shadow, Same Settings
Edit, Copy Christmas Kitty
Edit, Paste, paste as new layer
Move to the left and place in front of the gift box
Image, resize 60%
Effects, 3D Effects, Drop Shadow, Same settings
Edit, Copy Tube
Edit, paste, paste as new layer
Image, Mirror
Image, resize 85%
Effects, 3D Effects, Drop Shadow, Same settings
For the next two steps I duplicated them and placed them all over the tree
Edit, Copy Bauble
Edit, Paste, paste as new layer
Image, resize 20%
Place at all the places on the tree you want it to be.
Effects, 3D Effects, Drop Shadow, Same Settings
Edit, Copy Bauble 2
Edit, Paste, paste as new layer
Move to the left and place it on the tree the way you want
Image, resize 20%
Effects, 3D Effects, Drop shadow, Same Settings
Edit, Copy Candy Cane
Edit, paste, paste as new layer
Image, resize 40%
Move to the right and place in front of the deco
Effects, 3D Effects, Drop Shadow, Same settings
Edit, Copy Jingle Bell
Edit, paste, paste as new layer
Image, resize 40%
Move to place in front of the tin but behind the christmas kitty
Effects, 3D Effects, Drop Shadow, Same Settings
Edit, Copy Charm
Edit, paste, paste as new layer
Image, resize 50%
Move to the right and place on the lights beside the stocking
Effects, 3D Effects, Drop Shadow, Same Settings
Remember to add your copyright info. Make sure it is plain and legible
Add your name to the tag
Save as PNG
Monday, November 11, 2013

I am using the artwork of Keith Garvey. You need a license to use his work. You can buy his work at his store HERE
I am using the FTU kit Holiday Love by Manipulated by Magik . Visit her blog HERE to find where she sales her kits and more.
Open new image 600 x 600
Edit, Copy Frame 2
Edit, paste, paste as new layer
Image, resize 80%
With your magic wand click inside the frame
Selections, Modify, Expand by 8
Edit, copy Paper 11
Edit, paste, paste as new layer
Layers, arrange, send to bottom
Selections, Invert
Edit, Clear
Edit, Copy Sparkles
Edit, Paste, paste as new layer
Edit, Clear
Selections, Select None
Select Raster 2
Effects, 3D Effects, Drop Shadow, Settings of:
Vertical : -3
Horizontal: 3
Opacity: 50
Blur: 10
Color: Black
Shadow on new layer NOT Checked
Edit, Copy Tree
Edit, Paste, Paste as new layer
Move to the left of the frame. See my tag for placement
Effects, 3D Effects, Drop Shadow, Same Settings
Edit, Copy Gift 1
Edit, paste, paste as new layer
Image, rotate, free rotate, left 10
Image, resize 40%
Move to the left and place on the left bottom of the tree
Effects, 3D Effects, Drop Shadow, Same settings
Edit, Copy Gift 2
Edit, Paste, Paste as new layer
Image, resize 40%
Move to the left and place to the right of gift 1 than move down so it is behind gift 1 some
Effects, 3D Effects, Drop Shadow, Same Settings
Edit, copy Tin
Edit, paste, paste as new layer
Move to the left and place in front of the gifts
Image, resize 40%
Effects, 3D Effects, Drop Shadow, Same Settings
Select Raster 2
Edit, copy Beaded Garland
Edit, paste, paste as new layer
Move to the top of the frame
Effects, 3D Effects, Drop Shadow, Same settings
Edit, copy Bells
Edit, paste, paste as new layer
Move to place in the middle of the beads. See my tag for placement
Image, resize 40%
Effects, 3D Effects, Drop Shadow, Same Settings
Edit, Copy Holly
Edit, Paste, Paste as new layer
Image, resize 40%
Move to the top right of the frame
Effects, 3D Effects, Drop Shadow, Same Settings
Edit, Copy Bag of Ornaments
Edit, Paste, paste as new layer
Layers, arrange, bring to top
Image, resize 40%
Sit on top of the tin
Effects, 3D Effects, Drop Shadow, Same Settings
Edit, Copy Tinsel
Edit, Paste, paste as new layer
Move up to the top of the frame than move down til it is about the beads
Image, resize 90%
Effects, 3D Effects, Drop Shadow, Same settings
Edit, Copy Charm
Edit, paste, paste as new layer
Move to the right and and place behind the holly
Image, resize 70%
Effects, 3D Effects, Drop Shadow, Same settings
Edit, Copy Tube
Edit, Paste, paste as new layer
Image, resize 80%
Effects, 3D Effects, Drop Shadow, Same Settings
Edit, Copy Candle
Edit, Paste, paste as new layer
Move to the right and place at the bottom right of the frame
Image, resize 60%
Effects, 3D Effects, Drop shadow, Same Settings
Edit, Copy Candy Cane
Edit, paste, paste as new layer
Image, resize 40%
Move to the right and place on the candle. See my tag for placement
Effects, 3D Effects, Drop Shadow, Same settings
Remember to add your copyright info. Make sure it is plain and legible
Add your name to the tag
Save as PNG

This tutorial was written by me. Any resemblance to any other tutorial is pure coincidence. Please DO NOT claim this tutorial as your own. It was written in PSP 9 but should be compatible with any version of PSP.
I am using the artwork of Caron Vinson. You need a license to use this tube. I bought this tube at CDO
I am using the PTU kit Naturally by Sweet Cravings Scraps. You can buy the kit at TKO Scraps, Exquisite Scraps, and Scraps & Tubes
Open new image 600 x 600
Edit, Copy Frame 1
Edit, paste, paste as new layer
Image, resize 65%
With your magic wand click inside the frame
Selections, Modify, Expand by 8
Edit, copy Paper 4
Edit, paste, paste as new layer
Layers, arrange, send to bottom
Selections, Invert
Edit, Clear
Edit, Copy Petal Shower
Edit, Paste, paste as new layer
Image, resize 80%
Edit, Clear
Edit, copy Clouds
Edit, Paste, Paste as new layer
Move toward the top of the frame
Edit, Clear
Selections, Select None
Select Raster 2
Effects, 3D Effects, Drop Shadow, Settings of:
Vertical : -3
Horizontal: 3
Opacity: 50
Blur: 10
Color: Black
Shadow on new layer NOT Checked
Edit, Copy Tree
Edit, Paste, Paste as new layer
Image, resize 50%
Move to the left of the frame. See my tag for placement
Effects, 3D Effects, Drop Shadow, Same Settings
Edit, Copy Splatter
Edit, paste, paste as new layer
Layers, arrange, send to bottom
Image, resize 85%
Effects, 3D Effects, Drop Shadow, Same settings
Edit, Copy Pumpkins
Edit, Paste, Paste as new layer
Layers, arrange, bring to top
Image, resize 50%
Move to the left and place in front of the tree
Effects, 3D Effects, Drop Shadow, Same Settings
Edit, copy Wood stack
Edit, paste, paste as new layer
Move to place on the right on raster 2
Image, resize 50%
Effects, 3D Effects, Drop Shadow, Same Settings
Edit, copy Dried Grass
Edit, paste, paste as new layer
Move to the right and place to the right of the dried wood
Image, Mirror
Image, resize 70%
Effects, 3D Effects, Drop Shadow, Same settings
Edit, copy Hot Air Balloon
Edit, paste, paste as new layer
Layers, arrange bring to top
Image, resize 30%
Move to the left and place near the tree
Image, rotate, free rotate, left 15
Effects, 3D Effects, Drop Shadow, Same Settings
Edit, Copy Branch
Edit, Paste, Paste as new layer
Image, resize 85%
Move to the right and place to the right side of the wood pile
Effects, 3D Effects, Drop Shadow, Same Settings
Edit, Copy Tube
Edit, Paste, paste as new layer
Move to the place the way you wish on the tag.I moved mine to the right some
Effects, 3D Effects, Drop Shadow, Same Settings
Edit, Copy Bird
Edit, Paste, paste as new layer
Move to the left and place on one of the branches of the tree
Image, resize 20%
Effects, 3D Effects, Drop Shadow, Same settings
Edit, Copy Squash
Edit, paste, paste as new layer
Move to the right and place in front of the branch
Image, resize 40%
Effects, 3D Effects, Drop Shadow, Same settings
Edit, Copy Pumpkin
Edit, Paste, paste as new layer
Move to the left and than below the pumpkins
Image, resize 40%
Effects, 3D Effects, Drop Shadow, Same Settings
Edit, Copy Squirrel
Edit, Paste, paste as new layer
Move up
Move to the left and place to the left side of the pumpkins
Image, resize 30%
Effects, 3D Effects, Drop shadow, Same Settings
Edit, Copy Flower 1
Edit, paste, paste as new layer
Image, rotate, free rotate, left 50
Image, resize 60%
Move to place in front of the branch but behind the squash
Effects, 3D Effects, Drop Shadow, Same settings
Edit, Copy Butterfly 2
Edit, paste, paste as new layer
Layers, Arrange, bring to top
Image, resize 20%
Place on the tubes Hat
Effects, 3D Effects, Drop Shadow, Same Settings
Remember to add your copyright info. Make sure it is plain and legible
Add your name to the tag
Save as PNG
Sunday, November 10, 2013

This tutorial was written by me. Any resemblance to any other tutorial is pure coincidence. Please DO NOT claim this tutorial as your own. It was written in PSP 9 but should be compatible with any version of PSP.
I am using the artwork of Zebrush You need a license to use this tube. You can buy this tube at PFD
I am using the PTU kit have A Pint by Gimptastic Scraps . This kit is exclusive to Thrifty Scraps
Brewsky Font found HERE
Open new image 600 x 600
Edit, Copy Frame 4
Edit, paste, paste as new layer
Image, resize 80%
With your magic wand click inside the frame
Selections, Modify, Expand by 8
Edit, copy Paper 7
Edit, paste, paste as new layer
Layers, arrange, send to bottom
Selections, Invert
Edit, Clear
Selections, Select None
Select Raster 2
Effects, 3D Effects, Drop Shadow, Settings of:
Vertical : -3
Horizontal: 3
Opacity: 50
Blur: 10
Color: Black
Shadow on new layer NOT Checked
Edit, Copy Tube
Edit, Paste, Paste as new layer
Image, resize to fit your tag
Effects, 3D Effects, Drop Shadow, Same Settings
Edit, Copy Radio
Edit, paste, paste as new layer
Move to the right and place behind the tube
Image, resize 85%
Effects, 3D Effects, Drop Shadow, Same settings
Edit, Copy Beer 2
Edit, Paste, Paste as new layer
Move to the top and place on the left side of the top of the radio
Image, resize 50%
Effects, 3D Effects, Drop Shadow, Same Settings
Edit, copy Beer 1
Edit, paste, paste as new layer
Move to the right of Beer 1
Image, resize 50%
Effects, 3D Effects, Drop Shadow, Same Settings
Edit, copy Cold Beer
Edit, paste, paste as new layer
Move to the left top corner of the frame
Image, resize 70%
Effects, 3D Effects, Drop Shadow, Same settings
Edit, copy Have a Pint
Edit, paste, paste as new layer
Layers, arrange bring to top
Image, resize 60%
Move to place at the bottom of the cut off legs of the tube
Effects, 3D Effects, Drop Shadow, Same Settings
Edit, Copy Bowling
Edit, Paste, Paste as new layer
Image, resize 60%
Move to the right and behind the tube but in front of the radio. See my tag for placement
Effects, 3D Effects, Drop Shadow, Same Settings
Edit, Copy Buckets
Edit, Paste, paste as new layer
Move to the left and place on the frame
Image resize 60%
Effects, 3D Effects, Drop Shadow, Same Settings
Edit, Copy Dice
Edit, Paste, paste as new layer
Move to the left and place on the left of the buckets
Image, resize 50%
Effects, 3D Effects, Drop Shadow, Same settings
Edit, Copy Label
Edit, paste, paste as new layer
Move to the left and place on the frame below the Cold Beer Sign to make it look like the stamp is holding the sign
Image, resize 70%
Effects, 3D Effects, Drop Shadow, Same settings
Edit, Copy Playing Card
Edit, Paste, paste as new layer
Move to the left of the frame. Move down behind the dice
Image, rotate, free rotate, left, 5
Image, resize 40%
Effects, 3D Effects, Drop Shadow, Same Settings
Edit, Copy Horse Shoe
Edit, Paste, paste as new layer
Move to the left and place in front of buckets but behind the playing card
Image, resize 40%
Effects, 3D Effects, Drop shadow, Same Settings
Edit, Copy Bow
Edit, paste, paste as new layer
Move up to the top left of the frame
Layers, arrange, send to bottom
Make it look like it around the beer sign
Effects, 3D Effects, Drop Shadow, Same settings
Edit, Copy Stamp
Edit, paste, paste as new layer
Layers, Arrange, bring to top
Move over to the buckets
Image, resize 30%
Effects, 3D Effects, Drop Shadow, Same Settings
Remember to add your copyright info. Make sure it is plain and legible
Add your name to the tag
Save as PNG
Wednesday, November 6, 2013

I am using the artwork of Barbara Jensen You need a license to use her tubes. You can buy this tube at her store HERE
I am using the PTU kit Have A Glass by Gimptastic Scraps . This kit is exclusive to Thrifty Scraps
Open new image 600 x 600
Edit, Copy Frame 2
Edit, paste, paste as new layer
Image, resize 80%
With your magic wand click inside the frame
Selections, Modify, Expand by 8
Edit, copy Paper 6
Edit, paste, paste as new layer
Layers, arrange, send to bottom
Selections, Invert
Edit, clear
Edit, Copy Scatter
Edit, Paste, paste as new layer
Move to the left
Edit, Clear
Selections, Select None
Layers, Duplicate
Image, Mirror
Select Raster 2
Effects, 3D Effects, Drop Shadow, Settings of:
Vertical : -3
Horizontal: 3
Opacity: 50
Blur: 10
Color: Black
Shadow on new layer NOT Checked
Edit, Copy Deco
Edit, Paste, Paste as new layer
Move to the left of the frame
Layers, arrange, send to bottom
Effects, 3D Effects, Drop Shadow, Same Settings
Layers, Duplicate
Image, Mirror
Edit, Copy Ribbon
Edit, paste, paste as new layer
Layers, arrange, bring to top
Move to the top of the frame. Make sure the loop is to the left
Effects, 3D Effects, Drop Shadow, Same settings
Edit, Copy Charm
Edit, Paste, Paste as new layer
Move to the top left and place it on the ribbon
Effects, 3D Effects, Drop Shadow, Same Settings
Edit, copy Bottle 1
Edit, paste, paste as new layer
Move to the right side of the frame. See my tag for placement
Image, resize 80%
Effects, 3D Effects, Drop Shadow, Same Settings
Edit, copy Bottle 2
Edit, paste, paste as new layer
Move to the right and place to the left of Bottle 1
Image, resize 80%
Move down so it is behind the first bottle some. See my tag for placement
Effects, 3D Effects, Drop Shadow, Same settings
Edit, copy Glass
Edit, paste, paste as new layer
Move to the right and move up to place in front of the bottles
Image, resize 70%
Effects, 3D Effects, Drop Shadow, Same Settings
Edit, Copy Tube
Edit, Paste, Paste as new layer
Image, resize to fit your tag
Effects, 3D Effects, Drop Shadow, Same Settings
Edit, Copy Corkscrew
Edit, Paste, paste as new layer
Move to the left and place at the bottom left of the frame
Image resize 70%
Effects, 3D Effects, Drop Shadow, Same Settings
Edit, Copy Cork
Edit, Paste, paste as new layer
Move to the left and place in front of the corkscrew
Image, resize 80%
Effects, 3D Effects, Drop Shadow, Same settings
Edit, Copy Grapes
Edit, paste, paste as new layer
Move to the left and down to Raster 2. Place behind the corkscrew
Image, resize 60%
Effects, 3D Effects, Drop Shadow, Same settings
Edit, Copy Branch
Edit, Paste, paste as new layer
Move to the left of the frame. Make sure it is on Raster 2
Effects, 3D Effects,Drop Shadow, Same Settings
Layers, Duplicate
Image, Mirror
Edit, Copy Bubbles
Edit, Paste, paste as new layer
Move to the right and place behind the bottles
Image, resize 80%
Effects, 3D Effects, Drop shadow, Same Settings
Remember to add your copyright info. Make sure it is plain and legible
Add your name to the tag
Save as PNG

This tutorial was written by me. Any resemblance to any other tutorial is pure coincidence. Please DO NOT claim this tutorial as your own. It was written in PSP 9 but should be compatible with any version of PSP.
I am using the artwork of Anna Liwanag. You need a license to use this tube. I got this tube through when she was saling at PTE. You can now buy her artwork at CDO
I am using the FTU kit Good Gobble by Tasha's Playground. You can find where to get the kit HERE
Template 416 by Millie's PSP Madness found HERE
Turkey Sandwich Font found HERE
Open template
Duplicate and close original
Delete Raster 1 and background
Image, resize to 600 width as the height will adjust
Image, canvas size 625 x 625
Select Raster 1
Selections, Select All, Float, Defloat
Edit, copy Paper 11
Edit, paste, paste as new layer.
Selections, Invert
Edit, clear
Selections, Select None
Effects, 3D Effects, Drop Shadow, settings of:
Vertical: -3
Horizontal: 3
Opacity: 50
Blur: 10
Color: Black
Shadow on new layer NOT Checked
Delete Raster 1
Select Raster 2
Selections, Select All, Float, Defloat
Edit, copy Paper 2
Edit, paste, paste as new layer
Selections, Invert
Edit, Clear
Selections, Select None
Effects, 3D Effects, Drop Shadow, Same Settings
Delete Raster 2
Select Raster 3
Selections, Select All, Float, Defloat
Edit, copy Paper 4
Edit, paste, paste as new layer
Selections, Invert
Edit, Clear
Selections, Select None
Effects, 3D Effects, Drop Shadow, Same settings
Delete Raster 3
Select Raster 4
Selections, Select All, Float, Defloat
Edit, copy Paper 3
Edit, paste, paste as new layer
Selections, Invert
Edit, Clear
Selections, Select None
Effects, 3D Effects, Drop Shadow, Same settings
Delete Raster 4
Select Raster 5
Selections, Select All, Float, Defloat
Edit, copy Paper 15
Edit, paste, paste as new layer
Selections, Invert
Edit, Clear
Selections, Select None
Effects, 3D Effects, Drop Shadow, Same settings
Delete Raster 5
Select Raster 6
Selections, Select All, Float, Defloat
Edit, copy Paper 15
Edit, paste, paste as new layer
Selections, Invert
Edit, Clear
Selections, Select None
Effects, 3D Effects, Drop Shadow, Same settings
Delete Raster 6
Edit, copy Tree
Edit, paste, paste as new layer
Move to the left of the tag
Image, resize 70%
Effects, 3D Effects, Drop Shadow, Same Settings
Edit, copy Owl
Edit, paste, paste as new layer
Move to the left and place near the top of the tree
Effects, 3D Effects, Drop shadow, Same settings
Edit, Copy Pumpkin
Edit, paste, paste as new layer
Move to place at the base of the tree
Image, resize 40%
Effects, 3D Effects, Drop Shadow, same settings
Select Branch
Image, rotate, rotate clockwise 90
Image, Mirror
Edit, copy Branch
Edit, paste, paste as new layer
Move to the right side of the tag
Image, resize 85%
Effects, 3D Effects, Drop Shadow, Same settings
Edit, copy Turkey 3
Edit, paste, paste as new layer
Move to the left of the pumpkin
Image, resize 40%
Effects, 3D Effects, Drop Shadow, Same Settings
Edit, Copy Cornucopia
Edit, Paste, paste as new layer
Image, Mirror
Image, resize 50%
Move to the right and place at the base of the branch
Effects, 3D Effects, Drop Shadow, Same settings
Edit, Copy Pear
Edit, Paste, paste as new layer
Image, resize 40%
Move to the right and place to the left of the cornucopia some
Effects, 3D Effects, Drop Shadow, Same Settings
Layers, Duplicate
Move to the left of the first pear
Edit,copy Apple
Edit, Paste, Paste as new layer
Move to the right and place in front of the pears
Image, resize 40%
Effects, 3D Effects, Drop Shadow, Same Settings
Edit, Copy Acorn
Edit, Paste, paste as new layer
Image, resize 40%
Move to the right of the apple
Image, rotate, free rotate, left 10
Effects, 3D Effects, Drop Shadow, Same Settings
Layers, Duplicate
Image, Mirror and move to the left of the apple
Edit, copy Leaf 3
Edit, paste, paste as new layer
Move over to the right of the tag so that you will be able to see it
Layers, arrange, send to bottom
Effects, 3D Effects, Drop Shadow, Same Settings
Layers, Duplicate
Image, Flip
Layers, merge, merge down
Layers, Duplicate
Image, Mirror
Edit, copy Leaf 4
Edit, paste, paste as new layer
Layers, Arrange, move top
Move the leaf to the top of your frame so that you can see it
Layers, arrange, send to bottom
Effects, 3D Effects, Drop Shadow, Same settings
Layers, Duplicate
Image, Flip
Edit, Copy Tube
Edit, Paste, paste as new layer
Layers, arrange, bring to top
Effects, 3D Effects, Drop Shadow, Same Settings
My Tag is just a guide
Remember to add your copyright info. Make sure it is plain and legible
Add your name to the tag
Save as PNG
Subscribe to:
Posts
(Atom)