NO to AI

You will not find AI on my blog!
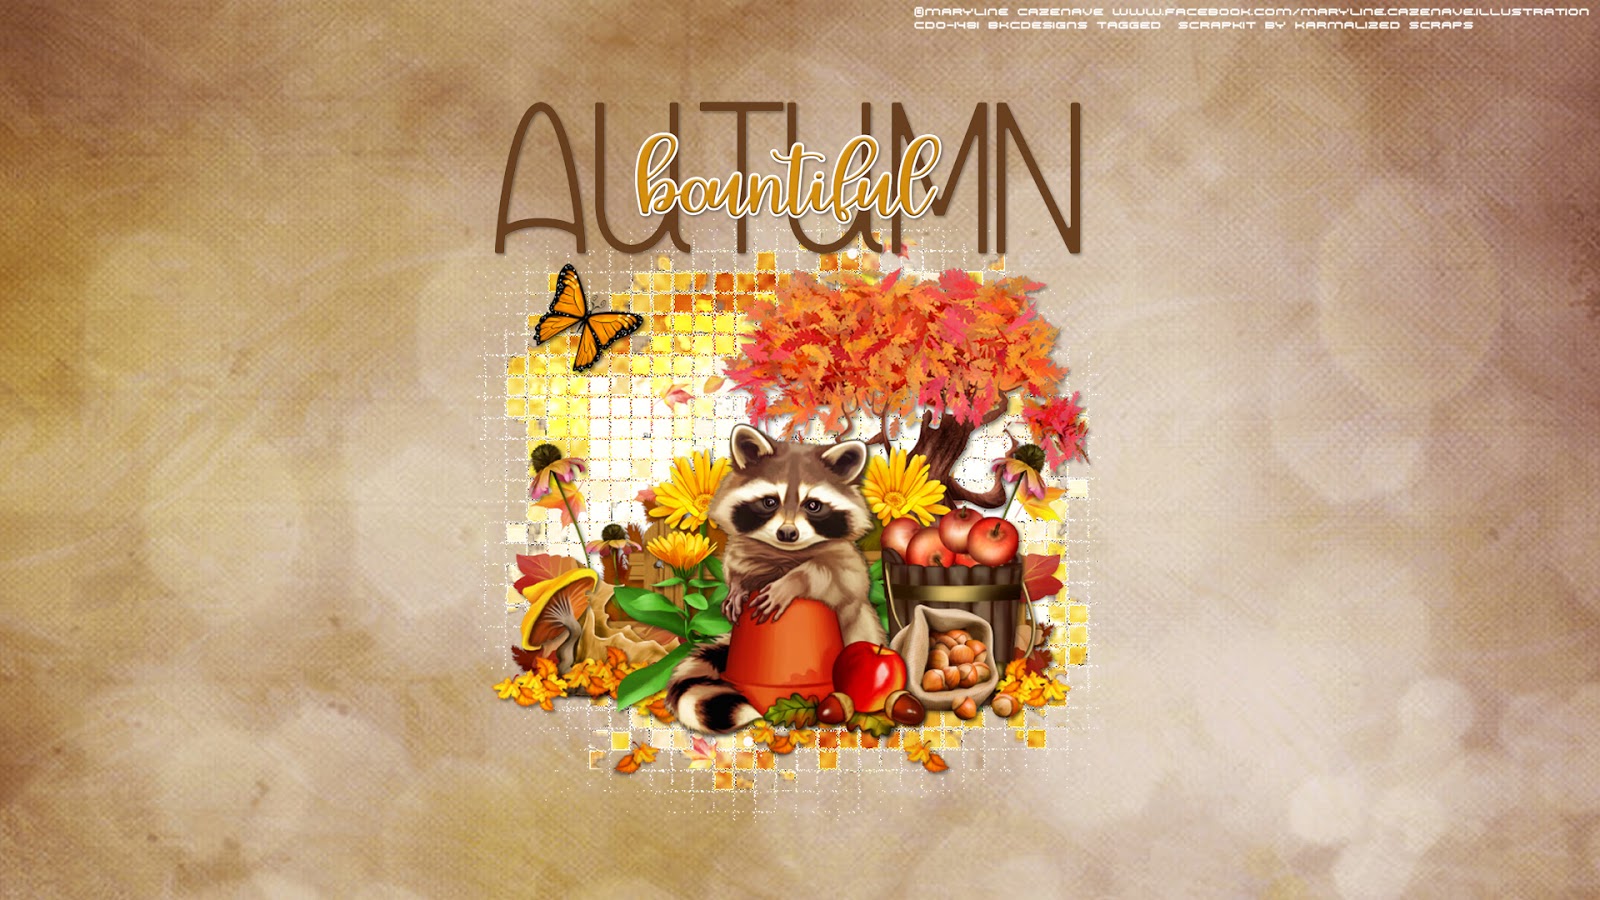
CT Teams


Saturday, September 28, 2019

I am using the artwork of Pinuptoons. You need a license to use this tube. You can purchase this tube at CDO
I am using the PTU kit IB Pinuptoons 141-1 by Ladyhawwk Designs. You can find this kit at CDO
Open new image 600 x 600
Edit, copy Frame 3
Edit, paste, paste as new layer
Image, resize 70%
With your magic wand click inside of the frame
Selections, Modify, Expand by 8
Edit, copy Paper 6
Edit, paste, paste as new layer
Layers, arrange, send to bottom
Selections, Invert
Edit, Clear
Selections, Select None
Select Raster 2
Effects, 3D Effects, Drop Shadow, Settings of:
Vertical : 2
Horizontal: 2
Opacity: 50
Blur: 6
Color: Black
Shadow on new layer NOT Checked
Edit, copy Ele 22
Edit, paste, paste as new layer
Image, resize 50%
Move to the bottom left of the frame
Effects, 3D Effects, Drop Shadow, Same Settings
Layers, Duplicate
Image, Mirror
Select Raster 2
Edit, copy Ele 25
Edit, paste, paste as new layer
Image, resize 50%
Move down to the bottom of the frame
Effects, 3D Effects, Drop Shadow, Same Settings
Edit, copy Ele 1
Edit, paste, paste as new layer
Image, resize 70%
Move to the left side of the frame
Layers, arrange, send to bottom
Effects, 3D Effects, Drop Shadow, Same Settings
Layers, Duplicate
Image, Mirror
Select Raster 2
Edit, copy Ele 17
Edit, paste, paste as new layer
Image, resize 70%
Move to left side of the frame and move behind the flower that is at the bottom. Move around til you have it placed where you wish
Effect, 3D effects, Drop Shadow, Same Settings
Layers, Duplicate
Image, Mirror
Select Raster 2
Edit, copy Ele 21
Edit, paste, paste as new layer
Image, Resize 50%
Move to the left side of the frame and move up toward the top some
Effects, 3D Effects, Drop Shadow, Same settings
Layers, Duplicate
Image, Mirror
Edit, copy Tube
Edit, paste, paste as new layer
Image, resize to fit your tag
Layers, arrange, bring to top
Effects, 3D Effects, Drop Shadow, Same Settings
Select Raster 2
Edit, copy Ele 23
Edit, paste, paste as new layer
Image, resize 70%
Move to the top right of the frame
Effects, 3D Effects, Drop Shadow, Same Settings
Layers, Duplicate
I moved the duplicate down so it is between the flowers on each side of the frame
Edit, copy Ele 14
Edit, paste, paste as new layer
Move to the left side of the frame. Move around til you have the hearts showing the way you want
Layers, arrange, send to bottom
Effects,3D Effects, Drop Shadow, Same Settings
Layers, Duplicate
Image, Mirror
Image, Flip
Remember to add your copyright info. Make sure it is plain and legible
Add your name to the tag
Save as PNG
Friday, September 27, 2019

I am using the artwork of Keith Garvey. You need a license to use this tube. I bought this tube when he had his own store. You can now buy his tubes at CDO
I am using the PTU kit Pink Nights by Foxys Designz. You can buy the kit at Treasured Scraps and Mystical Scraps

Open new image 600 x 600
Edit, copy Element 4
Edit, paste, paste as new layer
Image, resize 70%
With your magic wand click inside of the frame
Selections, Modify, Expand by 8
Edit, copy Paper 10
Edit, paste, paste as new layer
Layers, arrange, send to bottom
Selections, Invert
Edit, Clear
Edit, copy Element 40
Edit, paste, paste as new layer
Edit, Clear
Selections, Select None
Select Raster 2
Effects, 3D Effects, Drop Shadow, Settings of:
Vertical : 2
Horizontal: 2
Opacity: 50
Blur: 6
Color: Black
Shadow on new layer NOT Checked
Edit, Copy Tube
Edit, paste, paste as new layer
I have moved the tube to the left some so you can see what is written on the frame I used
Image, resize 60%
Effects, 3D Effects, Drop Shadow, Same Settings
Edit, Copy Element 1
Edit, paste, paste as new layer
Image, resize 60%
Move to place at the bottom of the cut off legs of the tube
Effects, 3D Effects, Drop Shadow, Same Settings
Edit, copy Element 28
Edit, paste, paste as new layer
Image, resize 80%
Layers, arrange, send to bottom
Move to the left some.
Effects, 3D Effects, Drop Shadow, Same Settings
Layers, Duplicate
Image, Mirror
Image, Flip
Edit, copy Element 31
Edit, paste, paste as new layer
Image, resize 55%
Layers, arrange, send to bottom
Move til it is in the middle across the back of the frame
Effects, 3D Effects, Drop Shadow, Same settings
Select Raster 2
Edit, copy Element 11
Edit, paste, paste as new layer
Image, Mirror
Image, resize 50%
Move to the left side placing slightly up and behind the tube some. See my tag for placement
Effects, 3D Effects, Drop Shadow, Same settings
Edit, copy Element 9
Edit, paste, paste as new layer
Image, flip
Image, resize 30%
Layers, arrange bring to top
Move to place on the boot, See my tag for placement..I placed it on the toe of the boot to look like it is hanging there
Effects, 3D Effects, Drop Shadow, Same settings
Select Raster 2
Edit, copy Element 14
Edit, paste, paste as new layer
Image, resize 70%
Move toward the bottom right of the frame
Effects, 3D Effects, Drop Shadow, Same settings
Select Raster 2
Edit, copy Element 30
Edit, paste, paste as new layer
Image, resize 70%
Move to the right of the tube than move down toward the bottom of the frame some
Effects, 3D Effects, Drop Shadow, Same settings
Select Raster 3
Edit, copy Element 7
Edit, paste, paste as new layer
Image, resize 40%
Move to down toward the bottom of the frame. Place so you can see the writing behind the tube. I moved this element up above the sparkle layers
Effects, 3D Effects, Drop Shadow, Same settings
Remember to add your copyright info. Make sure it is plain and legible
Add your name to the tag
Save as PNG
Tuesday, September 24, 2019

I am using the artwork of Sheena Pike. You need a license to use this tube. You can purchase this tube at CDO
I am using the PTU kit Halloween SS by Ladyhawwk Designs. You can find this kit at CDO
Open new image 600 x 600
Edit, copy Frame 2
Edit, paste, paste as new layer
Image, resize 50%
With your magic wand click inside of the frames
Selections, Modify, Expand by 8
Edit, copy Paper 6
Edit, paste, paste as new layer
Layers, arrange, send to bottom
Selections, Invert
Edit, Clear
Selections, Select None
Select Raster 2
Effects, 3D Effects, Drop Shadow, Settings of:
Vertical : 2
Horizontal: 2
Opacity: 50
Blur: 6
Color: Black
Shadow on new layer NOT Checked
Edit, copy Tube
Edit, paste, paste as new layer
Image, resize to fit your tag
Move to the bottom of the frame
Effects, 3D Effects, Drop Shadow, Same Settings
Edit, copy Ele 10
Edit, paste, paste as new layer
Image, resize 80%
Place behind the tube and move to the left
Effects, 3D Effects, Drop Shadow, Same Settings
Edit, copy Wordart
Edit, paste, paste as new layer
Image, resize 55%
Layers, arrange, bring to top
Place in front of the tube some. See my tag for placement
Effects, 3D Effects, Drop Shadow, Same Settings
Select Raster 2
Edit, copy Ele 9
Edit, paste, paste as new layer
Image, resize 70%
Image, Mirror
Move to the left side of the frame behind the house
Effect, 3D effects, Drop Shadow, Same Settings
Select Raster 2
Edit, copy Ele 15
Edit, paste, paste as new layer
Image, Resize 60%
Move to the right side behind the tube and over so you can see it
Effects, 3D Effects, Drop Shadow, Same settings
Edit, copy Ele 22
Edit, paste, paste as new layer
Image, resize 40%
Layers, arrange, bring to top
Move to the right and place that the paws are sitting on the wordart some. See my tag for placement
Effects, 3D Effects, Drop Shadow, Same Settings
Edit, copy Ele 25
Edit, paste, paste as new layer
Image, resize 70%
Move to the top and place over the top of the frame on the right side
Effects, 3D Effects, Drop Shadow, Same Settings
Select Raster 2
Edit, copy Ele 8
Edit, paste, paste as new layer
Image, resize 70%
Image, Mirror
Move to the right. Place behind the pumpkin and move up some. See my tag for placement
Effects,3D Effects, Drop Shadow, Same Settings
Select Raster 2
Edit, copy Ele 24
Edit, paste, paste as new layer
Move to the right side of the house. See my tag for placement
Effects, 3D Effects, Drop Shadow, Same Settings
Remember to add your copyright info. Make sure it is plain and legible
Add your name to the tag
Save as PNG
Wednesday, September 18, 2019

I am using the artwork of Jennifer Janesko. You need a license to use this tube. You can purchase this tube at CDO
I am using the PTU Kit IB Jennifer Janesko 176-1 by Foxys Designz. This kit is sold at CDO

Open new image 600 x 600
Edit, copy Frame 2
Edit, paste, paste as new layer
Image, resize 60%
With your magic wand click inside of the frame
Selections, Modify, Expand by 8
Edit, copy Paper 5
Edit, paste, paste as new layer
Layers, arrange, send to bottom
Selections, Invert
Edit, clear
Selections, Select None
Select Raster 2
Effects, 3D Effects, Drop Shadow, Settings of:
Vertical : 2
Horizontal: 2
Opacity: 65
Blur: 5
Color: Black
Shadow on new layer NOT Checked
Edit, copy Tube
Edit, paste, paste as new layer
Image, resize to fit your tag. The top of this tube has a flat line so I lined it up with the bottom of the top of the frame so it would not be to noticable
Effects, 3D Effects, Drop Shadow, Same settings
Edit, Copy Element 10
Edit, paste, paste as new layer
Image, resize 75%
Layers, arrange, send to bottom
Effects, 3D Effects, Drop Shadow, same Settings
Select Raster 2
Edit, copy Element 8
Edit, paste, paste as new layer
Image, Mirror
Image, resize 40%
Move to the bottom right of the frame
Effects, 3D Effects, Drop Shadow, Same Settings
Select Raster 2
Edit, copy Element 2
Edit, paste, paste as new layer
Image, resize 40%
Move to the right and move down and over some behind the element that you previously placed
Effects, 3D Effects, Drop Shadow, Same Settings
Select Raster 2
Edit, copy Element 9
Edit, paste, paste as new layer
Image, resize 30%
Move to the bottom left of the frame
Effects, 3D Effects, Drop Shadow, Same Settings
Select Raster 2
Edit, copy Element 12
Edit, paste, paste as new layer
Image, resize 30%
Move to the left and move behind the previous element and move around til you have it the way you want
Effects, 3D Effects, Drop Shadow, Same Settings
Select Raster 2
Edit, copy Element 1
Edit, paste, paste as new layer
Move to the bottom of the frame and move to the left. Move down til you can see it.
Effects, 3D Effects, Drop Shadow, Same Settings
Layers, Duplicate
Image, Mirror
I used my selection tool and went around the stem that was showing and deleted it
Select Raster 2
Edit, copy Element 16
Edit, paste, paste as new layer
Move to the right and move behind the element that is there and move over just a little
Image, resize 70%
Effects, 3D Effects, Drop Shadow, Same Settings
Layers, Duplicate
Image, Mirror
Select Raster 2
Edit, copy Element 17
Edit, paste, paste as new layer
Move up just a tad
Image, resize 80%
Effects, 3D Effects, Drop Shadow, Same Settings
Layers, Duplicate
Image, Mirror
Select Raster 2
Remember to add your copyright info. Make sure it is plain and legible
Add your name to the tag
Save as PNG
Sunday, September 15, 2019

I am using the artwork of Lysisange. You need a license to use this tube. You can purchase this tube at her store HERE(This tube is free at her store)
I am using the kit Power Of Pink by Manipulated by Magik. You can buy this kit only at her store found HERE
Open new image 600 x 600
Edit, copy POP F 2
Edit, paste, paste as new layer
Image, resize 70%
With your magic wand click inside of the frame
Selections, Modify, Expand by 8
Edit, copy POP P 23
Edit, paste, paste as new layer
Layers, arrange, send to bottom
Selections, Invert
Edit, clear
Edit, copy POP E 24
Edit, paste, paste as new layer
Edit, Clear
Selections, Select None
Select Raster 2
Effects, 3D Effects, Drop Shadow, Settings of:
Vertical : 2
Horizontal: 2
Opacity: 50
Blur: 6
Color: Black
Shadow on new layer NOT Checked
Edit, copy POP F 6
Edit, paste, paste as new layer
Image, resize 80%
Layers, arrange, send to bottom
Effects, 3D Effects, Drop Shadow, same settings
Edit, copy Tube
Edit, paste, paste as new layer
Layers, arrange, bring to top
Image, resize to fit your tag
Effects, 3D Effects, Drop Shadow, Same settings
Select Raster 2
Edit, copy POP E 112
Edit, Paste, paste as new layer
Image, resize 50%
Move to the right and place behind the tube and move over til you can see what is on the pillow
Effects, 3D Effects, Drop Shadow, Same Settings
Edit, copy POP E 94
Edit, paste, paste as new layer
Image, resize 30%
Move to the right placing in front of the pillow
Effects, 3D Effects, Drop Shadow, Same Settings
Select Raster 2
Edit, copy POP E 17
Edit, paste, paste as new layer
Image, resize 40%
Image, Mirror
Move to the bottom left of the frame
Effects, 3D Effects, Drop Shadow, Same settings
Select Raster 2
Edit, copy POP E 111
Edit, paste, paste as new layer
Image, resize 70%
Move to the left placing behind the flower and move up a little
Effects, 3D Effects, Drop Shadow, Same settings
Edit, copy POP E 101
Edit, paste, paste as new layer
Image, resize 30%
Layers, arrange, bring to top
Move to place in front of the tube and move over a little. See my tag for placement
Effects, 3D Effects, Drop Shadow, Same settings
Edit, copy POP E 92
Edit, paste, paste as new layer
Image, resize 30%
Move in front and over to the right some in front of the coffee mug
Effects, 3D Effects, Drop Shadow, Same settings
Edit, copy POP E 116
Edit, paste, paste as new layer
Image, resize 30%
Place in front of the tube. I have place it near the tubes feet
Effects, 3D Effects, Drop Shadow, Same settings
Select Raster 2
Edit, copy POP E 10
Edit, paste, paste as new layer
Image, resize 50%
Move to the top middle of the frame
Effects, 3D Effects, Drop Shadow, Same settings
Select Raster 2
Edit, copy POP E 13
Edit, paste, paste as new layer
Image, resize 40%
Move to the left side of the frame placing behind the candle and move around til you have it placed how you wish it to show
Effects, 3D Effects, Drop Shadow, Same Settings
Select Raster 2
Edit, copy POP E 57
Edit, paste, paste as new layer
Image, resize 60%
Move behind the tubes legs and move up til you can see. Place it a little behind the candle and move up just a tad
Effects, 3D Effects, Drop Shadow, Same Settings
Select Raster 2
Edit, copy POP E 28
Edit, paste, paste as new layer
Image, resize 90%
Move toward the bottom of the frame some
Effects, 3D Effects, Drop Shadow, Same Settings
Remember to add your copyright info. Make sure it is plain and legible
Add your name to the tag
Save as PNG
Friday, September 6, 2019


Texture 073 by ArtPlusLove found HERE. Place in your texture folder
Texas Toast font can be found HERE
Open a new image 600x250
Pick a dark color for your foreground and light color for background
Floodfill your image with the dark color
Layers, new raster layer
On your background color select the middle button that says Texture. I have a screen shot below to show you the button to click

The settings I used for texture as below:

Right click to add the texture
Layers, Duplicate
Image, Mirror
Edit, copy Tube
Edit, paste, paste as new layer
Move to the right and move around til you have part of the tube you want showing
Change the blend mode of this tube to Soft light
Edit, copy tube again and move to the left. Move to place how you wish on this side of the frame
Mirror this tube if you wish. I did in my examples
Change the blend mode of this layer to Dodge
Edit, cope tube again placing in the middle
Apply the following drop shadow
Effects, 3D Effects, Drop Shadow, Settings of:
Vertical : 2
Horizontal: 2
Opacity: 65
Blur: 5
Color: Black
Shadow on new layer NOT Checked
Select your bottom layer
Edit, copy tube
Edit, paste, paste as new layer
Effects, Reflection Effects, Pattern with the following settings:

*Noted that the pattern will be different with each tube. As I had a different result when I used a different tube*
Lower the opacity of the pattern to 40
Layers, New Raster Layer
Layers, arrange, bring to top
Selections, Select All
Selections, Modify, Contract 4
Selections Invert
Floodfill with your dark color
Selections, Select None
Adjust, Add/Remove Noise, Add Noise settings of:

Effects, 3D Effects, Drop Shadow, Settings of:
Vertical : 2
Horizontal: -2
Opacity: 65
Blur: 5
Color: Black
Shadow on new layer NOT Checked
Effects, 3D Effects, Drop Shadow, Settings of:
Vertical : 2
Horizontal: 2
Opacity: 65
Blur: 5
Color: Black
Shadow on new layer NOT Checked
Remember to add your copyright info. Make sure it is plain and legible
Add your name to the tag
Save as PNG
Monday, September 2, 2019


Sunday, September 1, 2019


Subscribe to:
Posts
(Atom)