NO to AI

You will not find AI on my blog!
CT Teams


Sunday, May 27, 2018

This tutorial was written by me. Any resemblance to any other tutorial is pure coincidence. Please DO NOT claim this tutorial as your own. It was written in PSP 9 but should be compatible with any version of PSP.
I am using the artwork of Anna Liwanag. You need a license to use this tube. The tube can be purchased at CDO
I am using the PTU Kit Anna Liwanag Package 106 by Foxys Designz. This kit is sold at CDO
Open new image 600 x 600
Edit, copy Frame 6
Edit, paste, paste as new layer
Image, resize 70%
With your magic wand click inside of the frame
Selections, Modify, Expand by 8
Edit, copy Paper 10
Edit, paste, paste as new layer
Layers, arrange, send to bottom
Selections, Invert
Edit, Clear
Selections, Select None
Select Raster 2
Effects, 3D Effects, Drop Shadow, Settings of:
Vertical : 2
Horizontal: 2
Opacity: 65
Blur: 5
Color: Black
Shadow on new layer NOT Checked
Edit, Copy Element 31
Edit, paste, paste as new layer
Image, resize 70%
Layers, arrange, send to bottom
Move toward the bottom of the frame some
Effects, 3D Effects, Drop Shadow, same Settings
Layers, Duplicate your frame
Image, Flip
Image, Mirror than move so it will looked like it is lined up
Edit, copy Tube
Edit, paste, paste as new layer
Layers, arrange, bring to top
Image, resize to fit your tag
Effects, 3D Effects, Drop Shadow, Same Settings
Layers, Duplicate Raster 2
Layers, arrange bring to top
Use your eraser tool and get rid of all the excess..I left the bottom of the frame to cover up the cut off legs of the tube
Edit, copy Element 41
Edit, paste, paste as new layer
Image, resize 70%
Move to the right and place behind the tube and move up some
Effects, 3D Effects, Drop Shadow, Same Settings
Edit, copy Element 30
Edit, paste, paste as new layer
Layers, arrange, bring to top
Image, Resize 40%
Move to the bottom right of the frame
Effects, 3D Effects, Drop Shadow, Same Settings
Select Raster 2
Edit, copy Element 5
Edit, paste, paste as new layer
Image, resize 40%
Move to the top left corner of the frame
Effects, 3D Effects, Drop Shadow, Same Settings
Remember to add your copyright info. Make sure it is plain and
legible
Add your name to the tag
Save as PNG

This
tutorial was written by me. Any resemblance to any other tutorial is pure
coincidence. Please DO NOT claim this tutorial as your own. It was written in
PSP 9 but should be compatible with any version of PSP.
I am using the artwork of Anna Liwanag. You
need a license to use this tube. The tube can be purchased at CDO
Open
new image 600 x 600
Edit,
copy Element 24
Edit,
paste, paste as new layer
Image,
resize 70%
This
may sound complicated but this is what I did to get the tube inside of the
black part of this element.
I did
a Selections, Select All, Modify, Contract by 25
Edit,
copy the Tube
Edit,
paste, paste as new layer after getting it where I wanted
Selections,
Invert
Selections,
Select None
There
was some of the tube on the white part of this element so I used my selection
took and move it around it and hit the delete on my keyboard. Than I could
still see a little after I did that and used my eraser to erase that away.
There is probably an easier way to do this but that is how I did it
There is probably an easier way to do this but that is how I did it
I
than changed the blend mode to Soft Light
Select
the Element
Effects,
3D Effects, Drop Shadow, Settings of:
Vertical
: 2
Horizontal:
2
Opacity:
65
Blur:
5
Color:
Black
Shadow
on new layer NOT Checked
Edit,
copy Element 33
Edit,
paste, paste as new layer
Layers,
arrange, send to bottom
Image,
resize 50%
Image,
rotate, free rotate, left 45
Move
to the top left corner of the Element
Effects,
3D Effects, Drop Shadow, Same Settings
Edit,
Copy Tube
Edit,
paste, paste as new layer
Image,
resize to fit your tag
Image,
Mirror
Move to the right side of the frame
Effects,
3D Effects, Drop Shadow, same Settings
Select
The Main Element we started with
Edit,
copy Element 1
Edit,
paste, paste as new layer
Layers,
arrange, bring to top of element
Image,
resize 50%
Effects,
3D Effects, Drop Shadow, Same Settings
Edit,
copy Element 14
Edit,
paste, paste as new layer
Image,
resize 50%
Move
to the top left corner of the element
Effects,
3D Effects, Drop Shadow, Same Settings
Edit,
copy Wordart 1
Edit,
paste, paste as new layer
Image,
Resize 40%
Move
to the bottom of the element behind the tube and over to the left some
Effects,
3D Effects, Drop Shadow, Same Settings
Remember to add your copyright info. Make sure it is plain and legible
Add your name to the tag
Save as PNG

I am using the artwork of Anna Liwanag. You need a license to use this tube. The tube can be purchased at CDO
I am using the PTU Kit Anna Liwanag Package 106 by Foxys Designz. This kit is sold at CDO
Open new image 600 x 600
Edit, copy Frame 4
Edit, paste, paste as new layer
Image, resize 60%
With your magic wand click inside of the frame
Selections, Modify, Expand by 8
Edit, copy Paper 8
Edit, paste, paste as new layer
Layers, arrange, send to bottom
Selections, Invert
Edit, Clear
Edit, copy Element 38
Edit, paste, paste as new layer
Edit, Clear
Selections, Select None
Select Raster 2
Effects, 3D Effects, Drop Shadow, Settings of:
Vertical : 2
Horizontal: 2
Opacity: 65
Blur: 5
Color: Black
Shadow on new layer NOT Checked
Edit, Copy Tube
Edit, paste, paste as new layer
Image, resize to fit your tag moving to the left side of the frame
Effects, 3D Effects, Drop Shadow, same Settings
Select Raster 2
Edit, copy Element 16
Edit, paste, paste as new layer
Image, resize 40%
Move to the left some behind the tube and move up. See my tag for placement
Effects, 3D Effects, Drop Shadow, Same Settings
Edit, copy Element 17
Edit, paste, paste as new layer
Image, resize 40%
Move to the right side of the pink flower and than move below and over some
Effects, 3D Effects, Drop Shadow, Same Settings
Select Raster 2
Edit, copy Element 21
Edit, paste, paste as new layer
Image, Resize 40%
Move to the bottom right of the frame
Effects, 3D Effects, Drop Shadow, Same Settings
Edit, copy Element 4
Edit, paste, paste as new layer
Image, resize 40%
Move to the place on top of the flowers
Effects, 3D Effects, Drop Shadow, Same Settings
Select Raster 2
Edit, copy Element 12
Edit, paste, paste as new layer
Move to the top of the frame and pull above the top of the frame some
Effects, 3D Effects, Drop Shadow, Same settings
Remember to add your copyright info. Make sure it is plain and
legible
Add your name to the tag
Save as PNG
Saturday, May 26, 2018
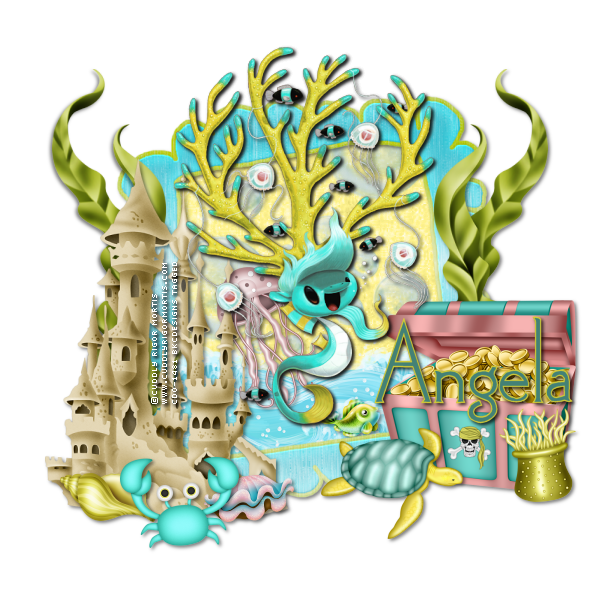
I am using the artwork of Cuddly Rigor Mortis. You need a license to use this tube. You can buy this tube at CDO
I am using the PTU Kit IB Cuddly Rigor Mortis 78-1 by Schnegge’s Scraps. This kit is sold at CDO
Open new image 600 x 600
Edit, copy Frame 01
Edit, paste, paste as new layer
Image, resize 70%
With your magic wand click inside of the frame
Selections, Modify, Expand by 8
Edit, copy Paper 05
Edit, paste, paste as new layer
Layers, arrange, send to bottom
Selections, Invert
Edit, Clear
Edit, copy Ele 03
Edit, paste, paste as new layer
Image, resize 70%
Edit, Clear
Edit, copy Ele 04
Edit, paste, paste as new layer
Move to the bottom of the frame
Edit, Clear
Selections, Select None
Select Raster 2
Effects, 3D Effects, Drop Shadow, Settings of:
Vertical : 2
Horizontal: 2
Opacity: 65
Blur: 5
Color: Black
Shadow on new layer NOT Checked
Edit, copy Ele 11
Edit, paste, paste as new layer
Image, resize 40%
Move to the bottom right
Effects, 3D Effects, Drop Shadow, Same Settings
Select Raster 2
Edit, copy Ele 07
Edit, paste, paste as new layer
Image, mirror
Move to the bottom left of the frame
Image, resize 60%
Effects, 3D Effects, Drop Shadow, Same Settings
Edit, copy Ele 05
Edit, paste, paste as new layer
Image, resize 20%
Move to place on the sand in front of the sand castle
Effects, 3D Effects, Drop Shadow, Same Settings
Edit, copy Ele 22
Edit, paste, paste as new layer
Image, resize 20%
Move to the left side of the sandcastle
Effects, 3D Effects, Drop Shadow, Same Settings
Edit, Copy Tube
Edit, paste, paste as new layer
Image, resize 70%
Layers, arrange, bring to top
Effects, 3D effects, Drop Shadow, Same Settings
Edit, copy Ele 06
Edit, paste, paste as new layer
Image, resize 20%
Move to place on the water at the bottom of the tube. See my tag for placement
Effects, 3D Effects, Drop Shadow, Same settings
Select Raster 2
Edit, copy Ele 01
Edit, paste, paste as new layer
Image, resize 60%
Image, Mirror
Move to the right behind the treasure chest
Effects, 3D Effects, Drop Shadow, Same Settings
Layers, Duplicate
Image, Mirror
Edit, copy Ele 21
Edit, paste, paste as new layer
Layers, arrange, bring to top
Image, resize 30%
Move to the right side of the treasure chest
Effects, 3D Effects, Drop Shadow, Same Settings
Edit, copy Ele 13
Edit, paste, paste as new layer
Image, resize 30%
Move to place in front of the sandcastle and sea shells
Effects, 3D Effects, Drop Shadow, Same settings
Edit, copy Ele 20
Edit, paste, paste as new layer
Image, resize 30%
Move behind the tube and make it look like it is on the water
Effects, 3D Effects, Drop Shadow, Same settings
Edit, copy Ele 14
Edit, paste, paste as new layer
Layers, arrange, bring to top
Image, resize 30%
Move to place in front of the treasure chest
Effects, 3D Effects, Drop Shadow, Same Settings
Remember to add your copyright info. Make sure it is plain and legible
Add your name to the tag
Save as PNG

I am using the artwork of Sheena Pike. You need a license to use this tube. You can purchase this tube at CDO
I am using the PTU kit IB Sheena Pike 15-3 by Ladyhawwk Designs. You can find this kit at CDO
Open new image 600 x 600
Edit, copy Frame 1
Edit, paste, paste as new layer
Image, resize 60%
With your magic wand click inside of the frame
Selections, Modify, Expand by 8
Edit, copy Paper 5
Edit, paste, paste as new layer
Layers, arrange, send to bottom
Selections, Invert
Edit, Clear
Selections, Select None
Select Raster 2
Effects, 3D Effects, Drop Shadow, Settings of:
Vertical : 2
Horizontal: 2
Opacity: 50
Blur: 6
Color: Black
Shadow on new layer NOT Checked
Edit, copy Tube
Edit, paste, paste as new layer
Image, resize 80%
Effects, 3D Effects, Drop Shadow, Same Settings
Select Raster 2
Edit, copy Ele 12
Edit, paste, paste as new layer
Image, resize 60%
Move to the right side of the frame
Effects, 3D Effects, Drop Shadow, Same Settings
Select Raster 2
Edit, copy Ele 13
Edit, paste, paste as new layer
Image, resize 50%
Move to the top of the frame
Effects, 3D Effects, Drop Shadow, Same Settings
Edit, copy Ele 11
Edit, paste, paste as new layer
Image, resize 70%
Layers, arrange, send to bottom. Move over to the left some
Effects, 3D Effects, Drop Shadow, Same Settings
Layers, Duplicate
Image, Mirror
Select Raster 2
Edit, copy Ele 24
Edit, paste, paste as new layer
Image, resize 50%
Move to the bottom of the frame. See my tag for placement
Effects, 3D Effects, Drop Shadow, Same settings
Edit, copy Ele 14
Edit, paste, paste as new layer
Image, resize 50%
Move to the the right side of the frame behind the tube and above the strip at the bottom
Effects, 3D Effects, Drop Shadow, Same Settings
Layers, Duplicate
Image, mirror
Edit, copy Ele 9
Edit, paste, paste as new layer
Image, resize 30%
Move to place on the left side of the banner at the bottom of the tag
Effects, 3D Effects, Drop Shadow, Same Settings
Layers, Duplicate
Image, mirror
Edit, copy Ele 4
Edit, paste, paste as new layer
Image, resize 30%
Move to the top left placing on the flowers
Effects, 3D Effects, Drop Shadow, Same settings
Remember to add your copyright info. Make sure it is plain and legible
Add your name to the tag
Save as PNG
Friday, May 25, 2018

I am using the artwork of Sheena Pike. You need a license to use this tube. You can buy this tube at CDO
I am using the PTU Kit IB Sheena Pike 11-2 by Schnegge’s Scraps. This kit is sold at CDO
Open new image 600 x 600
Edit, copy Frame 02
Edit, paste, paste as new layer
Image, resize 70%
With your magic wand click inside of the frame
Selections, Modify, Expand by 8
Edit, copy Paper 04
Edit, paste, paste as new layer
Layers, arrange, send to bottom
Selections, Invert
Edit, Clear
Edit, copy Tube
Edit, paste, paste as new layer
Image, resize 80%
Move over to the left and down some
Edit, Clear
Selections, Select None
On the tube
Effects, 3D Effects, Drop Shadow, Settings of:
Vertical : 2
Horizontal: 2
Opacity: 65
Blur: 5
Color: Black
Shadow on new layer NOT Checked
Select Raster 2
Effects, 3D Effects, Drop Shadow, Same settings
Edit, copy Ele 01
Edit, paste, paste as new layer
Layers, arrange, send to bottom
Image, resize 75%
Move to the left a little
Effects, 3D Effects, Drop Shadow, Same Settings
Layers, Duplicate
Image, Mirror
Edit, copy Ele 02
Edit, paste, paste as new layer
Layers, arrange, send to bottom
Image, resize 90%
Effects, 3D Effects, Drop Shadow, Same Settings
Layers, Duplicate
Image, Mirror
Image, Flip
Edit, copy Ele 22
Edit, paste, paste as new layer
Layers, arrange, bring to top
Move to the left side of the frame behind the tube and on the flowers
Image, resize 40%
Effects, 3D Effects, Drop Shadow, Same Settings
Edit, copy Ele 23
Edit, paste, paste as new layer
Image, resize 30%
Move to the left side of the frame placing in front of the element there
Effects, 3D Effects, Drop Shadow, Same Settings
Select Raster 2
Edit, Copy Ele 12
Edit, paste, paste as new layer
Image, resize 50%
Move to the far left side of the frame and pull out some
Effects, 3D effects, Drop Shadow, Same Settings
Select Raster 2
Edit, copy Ele 05
Edit, paste, paste as new layer
Image, Mirror
Image, resize 60%
Move to the bottom right of the frame
Effects, 3D Effects, Drop Shadow, Same settings
Edit, copy Ele 04
Edit, paste, paste as new layer
Image, resize 60%
Move to the right and move below the frame above the elements
Effects, 3D Effects, Drop Shadow, Same Settings
Layers, Duplicate
Image, Mirror
Select Raster 2
Edit, copy Ele 10
Edit, paste, paste as new layer
Image, mirror
Move to the right side behind the chess pieces and move behind it. See my tag for placement
Effects, 3D Effects, Drop Shadow, Same Settings
Edit, copy Ele 03
Edit, paste, paste as new layer
Layers, arrange, bring to top
Image, resize 50%
Move to place in front of the chess pieces
Effects, 3D Effects, Drop Shadow, Same settings
Select Raster 2
Edit, copy Ele 15
Edit, paste, paste as new layer
Image, Flip
Image, resize 50%
Move to the right side of the frame
Effects, 3D Effects, Drop Shadow, Same settings
Layers, Duplicate
Image, Mirror
Remember to add your copyright info. Make sure it is plain and legible
Add your name to the tag
Save as PNG

I am using the artwork of Sheena Pike. You need a license to use this tube. You can receive this tube for the month of May 2018 when you are a member of the CDO Diamond Club. You can find out HERE how you can do this!
I am using the PTU kit IB Sheena Pike May 2018 AOTM by Ladyhawwk Designs. You can find this kit at CDO
Open new image 600 x 600
Edit, copy Ele 11
Edit, paste, paste as new layer
Image, resize 60%
With your magic wand click inside of the frame
Selections, Modify, Expand by 8
Edit, copy Paper 5
Edit, paste, paste as new layer
Layers, arrange, send to bottom
Selections, Invert
Edit, Clear
Edit, copy Ele 29
Edit, paste, paste as new layer
Edit, Clear
Edit, copy Ele 12
Edit, paste, paste as new layer
Image, resize 40%
Edit, clear
Edit, copy Ele 3
Edit, paste, paste as new layer
Edit, clear
Edit, copy Ele 4
Edit, paste, paste as new layer
Image, resize 70%
Edit, Clear
Selections, Select None
Select Raster 2
Effects, 3D Effects, Drop Shadow, Settings of:
Vertical : 2
Horizontal: 2
Opacity: 50
Blur: 6
Color: Black
Shadow on new layer NOT Checked
Edit, copy Ele 7
Edit, paste, paste as new layer
Image, resize 120%
Layers, arrange, send to bottom
Effects, 3D Effects, Drop Shadow, Same Settings
Edit, copy Ele 19
Edit, paste, paste as new layer
Layers, arrange, Bring to top
Image, resize 50%
Image, rotate, free rotate, left 5
Move to the top of the frame
Effects, 3D Effects, Drop Shadow, Same Settings
Edit, copy Ele 10
Edit, paste, paste as new layer
Image, resize 70%
Move to the top of the frame
Effects, 3D Effects, Drop Shadow, Same Settings
Edit, copy Tube
Edit, paste, paste as new layer
Image, resize 50%
Move around til you have it where you want it
Effects, 3D Effects, Drop Shadow, Same Settings
Select Raster 2
Edit, copy Ele 20
Edit, paste, paste as new layer
Image, resize 50%
Move to the bottom of the frame
Effects, 3D Effects, Drop Shadow, Same settings
Layers, Duplicate
Image, Mirror
Than move the duplicate layer below the original
Select Raster 2
Edit, copy Ele 33
Edit, paste, paste as new layer
Image, resize 50%
Move to the the right side of the frame
Effects, 3D Effects, Drop Shadow, Same Settings
Layers, Duplicate
Image, mirror
Edit, copy Ele 13
Edit, paste, paste as new layer
Image, resize 30%
Move above the sparkle layer at the bottom of the frame and move behind the tubes foot
Effects, 3D Effects, Drop Shadow, Same Settings
Layers, Duplicate
Image, mirror
Move the duplicate to the right bottom of the frame
Edit, copy Ele 14
Edit, paste, paste as new layer
Layers, arrange, bring to top
Move to the right side placing n the flowers
Image, resize 20%
Effects, 3D Effects, Drop Shadow, Same settings
Select Raster 2
Edit, copy Ele 21
Edit, paste, paste as new layer
Image, Resize 70%
Move to the bottom of the frame..If you move any below the frame like I did I used my selection tool and drew around it and than edit, deleted the extra I did not want showing
Effects, 3D Effects, Drop Shadow, Same settings
Edit, copy Ele 1
Edit, paste, paste as new layer
Layers, arrange, bring to top
Image, resize 30%
Move to the top right side of the frame
Effects, 3D Effects, Drop Shadow, Same settings
Layers, Duplicate
Image, Mirror
Remember to add your copyright info. Make sure it is plain and legible
Add your name to the tag
Save as PNG
Saturday, May 12, 2018

This tutorial was written by me. Any resemblance to any other tutorial is pure coincidence. Please DO NOT claim this tutorial as your own. It was written in PSP 9 but should be compatible with any version of PSP.
I am using the artwork of Vinegar. You need a license to use this tube. The tube is can be purchased at CDO
I am using the PTU Kit IB Vinegar 17-1 by Foxys Designz. This kit is sold at CDO
Open new image 600 x 600
Edit, copy Frame 3
Edit, paste, paste as new layer
Image, resize 60%
With your magic wand click inside of the frame
Selections, Modify, Expand by 8
Edit, copy Paper 3
Edit, paste, paste as new layer
Layers, arrange, send to bottom
Selections, Invert
Edit, Clear
Edit, copy Ele 12
Edit, paste, paste as new layer
Image, resize 60%
Move around some til you have it the way you want
Edit, Clear
Edit, copy Element 3
Edit, paste, paste as new layer
Move down below the first bling
Edit, Clear
Selections, Select None
Select Raster 2
Effects, 3D Effects, Drop Shadow, Settings of:
Vertical : 2
Horizontal: 2
Opacity: 65
Blur: 5
Color: Black
Shadow on new layer NOT Checked
Edit, Copy Tube
Edit, paste, paste as new layer
Image, resize 60%
Move up the frame some
Effects, 3D Effects, Drop Shadow, same Settings
Layers, Duplicate your frame
Layers, arrange, bring to top
Use your eraser tool to get rid of what parts of the frame you don’t want.I erased the top and sides to leave the bottom covering the cut off tube as I can’t stand a cut off tube..Than after getting it the way I wanted I used the selection tool on the tube to get rid of the things sticking out on each side so that the tube is totally hidden now beneath the bottom of the frame
Edit, copy Element 15
Edit, paste, paste as new layer
Layers, arrange, send to bottom
Effects, 3D Effects, Drop Shadow, Same Settings
Layers, Duplicate
Image, Mirror
Edit, copy Element 17
Edit, paste, paste as new layer
Image, resize 90%
Layers, arrange, send to bottom
Move above the mask layers
Effects, 3D Effects, Drop Shadow, Same Settings
Edit, copy Element 5
Edit, paste, paste as new layer
Layers, arrange, bring to top
Image, Resize 30%
Move to the bottom right of the frame
Effects, 3D Effects, Drop Shadow, Same Settings
Layers, Duplicate
Image, Mirror
Edit, copy Element 6
Edit, paste, paste as new layer
Image, resize 3%
Move to the left side of the flower on the right and move down below it
Effects, 3D Effects, Drop Shadow, Same Settings
Layers, Duplicate
Image, Mirror
Edit, copy Element 7
Edit, paste, paste as new layer
Image, resize 40%
Move to the left and move below the flower and over some. See my tag for placement
Effects, 3D Effects, Drop Shadow, Same settings
Layers, Duplicate
Image, Mirror
Select Raster 2
Edit, copy Element 2
Edit, paste, paste as new layer
Move to the top left of the frame
Image, resize 60%
Pull up and move around til you have it the way you want it
Effects, 3D Effects, Drop Shadow, Same Settings
Layers, Duplicate
Image, Mirror
Select the Duplicate of Raster 2
Edit, copy Element 19
Edit, paste, paste as new layer
Image, resize 80%
Move down til you can see some of the ribbon below the flowers
Effects, 3D Effects, Drop shadow, same settings
Remember to add your copyright info. Make sure it is plain and legible
Add your name to the tag
Save as PNG
Sunday, May 6, 2018

I am using the artwork of Arthur Crowe. You need a license to use this tube. You can buy this tube at his store HERE
I am using the PTU kit Pink Nights by Foxys Designz. You can buy the kit at Treasured Scraps and Mystical Scraps
Open new image 600 x 600
Edit, copy frame 4
Edit, paste, paste as new layer
Image, resize 60%
With your magic wand click inside of the frame
Selections, Modify, Expand by 8
Edit, copy Paper 8
Edit, paste, paste as new layer
Layers, arrange, send to bottom
Selections, Invert
Edit, Clear
Edit, copy Element 23
Edit, paste, paste as new layer
Edit, Clear
Edit, copy Element 45
Edit, paste, paste as new layer
Edit, Clear
Edit, copy Element 16
Move down some. Not a lot but a little bit
Edit, Clear
Selections, Select None
Select Raster 2
Effects, 3D Effects, Drop Shadow, Settings of:
Vertical : 2
Horizontal: 2
Opacity: 50
Blur: 6
Color: Black
Shadow on new layer NOT Checked
Edit, Copy Element 47
Edit, paste, paste as new layer
Image, resize 50%
Layers, arrange, send to bottom
Effects, 3D Effects, Drop Shadow, Same Settings
Layers, Duplicate
Image, Mirror
Edit, Copy Tube
Edit, paste, paste as new layer
Image, resize 60%
Effects, 3D Effects, Drop Shadow, Same Settings
Select Raster 2
Edit, copy Element 6
Edit, paste, paste as new layer
Image, resize 30%
Move to the bottom left of the frame
Effects, 3D Effects, Drop Shadow, Same Settings
Select Raster 2
Edit, copy Element 5
Edit, paste, paste as new layer
Image, resize 30%
Move to the right side of the black flower. Make sure it is beneath the first flower
Effects, 3D Effects, Drop Shadow, Same settings
Select Raster 2
Edit, copy Element 4
Edit, paste, paste as new layer
Image, resize 30%
Move to the right side and behind the pink flower
Effects, 3D Effects, Drop Shadow, Same settings
Layers, Duplicate the black flower
Do the same with the pink one and move under the black flower
Than move the gray flower above the pink ones
Edit, copy Element 26
Edit, paste, paste as new layer
Layers, arrange, send to bottom
Bring above the mesh
Image, resize 80%
Move up so you can see the heart and to the left some
Effects, 3D Effects, Drop Shadow, Same settings
Edit, copy Element 27
Edit, paste, paste as new layer
Image, Mirror
Image, resize 80%
Move around til you have it the way you want it
Effects, 3D Effects, Drop Shadow, Same settings
Select Raster 2
Edit, copy Element 46
Edit, paste, paste as new layer
Image, resize 40%
Move to the left side of the frame and move up some. See my tag for placement
Effects, 3D Effects, Drop Shadow, Same settings
Select Raster 2
Edit, copy Element 18
Edit, paste, paste as new layer
Image, resize 60%
Move to the left side of the frame and move up some
Effects, 3D Effects, Drop Shadow, Same settings
Select Raster 2
Edit, copy Element 8
Edit, paste, paste as new layer
Image, resize 50%
Move to the right side of the frame and move up above the flowers. See my tag for placement
Effects, 3D Effects, Drop Shadow, Same settings
Remember to add your copyright info. Make sure it is plain and legible
Add your name to the tag
Save as PNG
Saturday, May 5, 2018

I am using the artwork of Martin Abel. You need a license to use this tube. You can buy this tube at CDO
I am using the PTU Kit IB Martin Abel 51-3 by Schnegge’s Scraps. This kit is sold at CDO
Open new image 600 x 600
Edit, copy Frame 02
Edit, paste, paste as new layer
Image, resize 70%
With your magic wand click inside of the frame
Selections, Modify, Expand by 8
Edit, copy Paper 01
Edit, paste, paste as new layer
Layers, arrange, send to bottom
Selections, Invert
Edit, Clear
Selections, Select None
Select Raster 2
Effects, 3D Effects, Drop Shadow, Settings of:
Vertical : 2
Horizontal: 2
Opacity: 65
Blur: 5
Color: Black
Shadow on new layer NOT Checked
Edit, copy Tube
Edit, paste, paste as new layer
Image, resize 80%
Effects, 3D Effects, Drop Shadow, Same settings
Select Raster 2
Edit, copy Ele 03
Edit, paste, paste as new layer
Move to the bottom left of the frame
Image, resize 50%
Effects, 3D Effects, Drop Shadow, Same Settings
Layers, Duplicate
Image, Mirror
Edit, copy Ele 02
Edit, paste, paste as new layer
Image, rotate, free rotate, right 90
Layers, arrange, send to bottom
Image, resize 90%
Effects, 3D Effects, Drop Shadow, Same Settings
Layers, Duplicate
Image, Mirror
Image, Flip
Edit, copy Ele 21
Edit, paste, paste as new layer
Move to the left side of the frame behind the tube and on the flowers
Image, resize 50%
Effects, 3D Effects, Drop Shadow, Same Settings
Edit, copy Ele 17
Edit, paste, paste as new layer
Image, resize 40%
Move to the right side of the frame placing it above the flowers and behind the tube
Effects, 3D Effects, Drop Shadow, Same Settings
Select Raster 2
Edit, Copy Ele 18
Edit, paste, paste as new layer
Image, resize 60%
Move to the far left of the frame
Effects, 3D effects, Drop Shadow, Same Settings
Select Raster 2
Edit, copy Ele 09
Edit, paste, paste as new layer
Image, resize 50%
Move to the top right of the frame
Effects, 3D Effects, Drop Shadow, Same settings
Edit, copy Ele 19
Edit, paste, paste as new layer
Image, resize 30%
Layers, arrange, bring to top
Move to the bottom right placing in front of the flower and the flower petals
Effects, 3D Effects, Drop Shadow, Same Settings
Remember to add your copyright info. Make sure it is plain and legible
Add your name to the tag
Save as PNG
Subscribe to:
Posts
(Atom)