Tuesday, May 3, 2016
4:21 PM | Edit Post
This tutorial was written by me. Any resemblance to any other tutorial is pure coincidence. Please DO NOT claim this tutorial as your own. It was written in PSP 9 but should be compatible with any version of PSP.
I am using the artwork of Edward Reed. You need a license to use this tube. You can buy this tube at CDO
I am using the PTU Kit Spring To Life- Mini by Gimptastic Scraps . This kit is exclusive to CDO
Open new image 600 x 600
Edit, Copy Frame 1
Edit, paste, paste as new layer
Image, resize 70%
With your magic wand click inside of the frame
Selections, Modify, Expand by 8
Edit, copy Paper 3
Edit, paste, paste as new layer
Layers, arrange, send to bottom
Selections, Invert
Edit, Clear
Edit, copy Ele 30
Edit, paste, paste as new layer
Image, resize 60%
Edit, Clear
Selections, Select None
Effects, 3D Effects, Drop Shadow, Settings of:
Vertical : 2
Horizontal: 2
Opacity: 65
Blur: 5
Color: Black
Shadow on new layer NOT Checked
Edit, copy Tube
Edit, paste, paste as new layer
Image, resize to fit your tag
Effects, 3D Effects, Drop Shadow, Same settings
Edit, copy Ele 17
Edit, paste, paste as new layer
Layers, arrange, send to bottom
Effects, 3D Effects, Drop Shadow, Same Settings
Edit, copy Ele 2
Edit, paste, paste as new layer
Move to the top of the frame
layers, arrange, send to bottom
Image, resize 70%
Move to the right some
Effects, 3D Effects, Drop Shadow, same Settings
Layers, Duplicate
Image, Mirror
Select Raster 2
Edit, copy Ele 36
Edit, paste, paste as new layer
Image, resize 80%
Move to the right side of the frame
Effects, 3D Effects, Drop Shadow, Same Settings
Layers, Duplicate
Image, Mirror
Move to place on the left side of the original
Edit, copy Ele 29
Edit, paste, paste as new layer
Image, Resize 70%
Move to the right side placing behind the flowers
Effects, 3D Effects, Drop Shadow, Same settings
Edit, Copy Ele 7
Edit, paste, paste as new layer
Image, resize 60%
Move to the far left placing on Raster 2. See my tag for placement
Effects, 3D Effects, Drop Shadow, same Settings
Edit, copy Ele 24
Edit, paste, paste as new layer
Image, resize 50%
Image, mirror
Move to the left placing behind the milk bottle and moving to the left
Effects, 3D Effects, Drop Shadow, Same Settings
Edit, copy Ele 4
Edit, paste, paste as new layer
Image, resize 40%
Move to the right side of the frame behind the tube
Effects, 3D Effects, Drop Shadow, Same Settings
Edit, copy Wordart
Edit, paste, paste as new layer
Image, resize 50%
Move down to place the white flowers in the background
Effects, 3D Effects, Drop Shadow, Same Settings
Edit, Copy Ele 11
Edit, paste, paste as new layer
Image, resize 50%
Image, Mirror
Move to the far right placing behind the tube
Effects, 3D Effects, Drop Shadow, Same Settings
Edit, copy Ele 15
Edit, paste, paste as new layer
Image, resize 60%
Move to the far left placing behind the milk and jam jars
Effects, 3D Effects, Drop Shadow, same settings
Edit, copy Ele 40
Edit, paste, paste as new layer
Layers, arrange, bring to top
Image, resize 40%
Move to the far right placing in front of the tube
Effects, 3D Effects, Drop Shadow, Same settings
Remember to add your copyright info. Make sure it is plain and legible
Add your name to the tag
Save as PNG
I am using the artwork of Edward Reed. You need a license to use this tube. You can buy this tube at CDO
I am using the PTU Kit Spring To Life- Mini by Gimptastic Scraps . This kit is exclusive to CDO
Open new image 600 x 600
Edit, Copy Frame 1
Edit, paste, paste as new layer
Image, resize 70%
With your magic wand click inside of the frame
Selections, Modify, Expand by 8
Edit, copy Paper 3
Edit, paste, paste as new layer
Layers, arrange, send to bottom
Selections, Invert
Edit, Clear
Edit, copy Ele 30
Edit, paste, paste as new layer
Image, resize 60%
Edit, Clear
Selections, Select None
Effects, 3D Effects, Drop Shadow, Settings of:
Vertical : 2
Horizontal: 2
Opacity: 65
Blur: 5
Color: Black
Shadow on new layer NOT Checked
Edit, copy Tube
Edit, paste, paste as new layer
Image, resize to fit your tag
Effects, 3D Effects, Drop Shadow, Same settings
Edit, copy Ele 17
Edit, paste, paste as new layer
Layers, arrange, send to bottom
Effects, 3D Effects, Drop Shadow, Same Settings
Edit, copy Ele 2
Edit, paste, paste as new layer
Move to the top of the frame
layers, arrange, send to bottom
Image, resize 70%
Move to the right some
Effects, 3D Effects, Drop Shadow, same Settings
Layers, Duplicate
Image, Mirror
Select Raster 2
Edit, copy Ele 36
Edit, paste, paste as new layer
Image, resize 80%
Move to the right side of the frame
Effects, 3D Effects, Drop Shadow, Same Settings
Layers, Duplicate
Image, Mirror
Move to place on the left side of the original
Edit, copy Ele 29
Edit, paste, paste as new layer
Image, Resize 70%
Move to the right side placing behind the flowers
Effects, 3D Effects, Drop Shadow, Same settings
Edit, Copy Ele 7
Edit, paste, paste as new layer
Image, resize 60%
Move to the far left placing on Raster 2. See my tag for placement
Effects, 3D Effects, Drop Shadow, same Settings
Edit, copy Ele 24
Edit, paste, paste as new layer
Image, resize 50%
Image, mirror
Move to the left placing behind the milk bottle and moving to the left
Effects, 3D Effects, Drop Shadow, Same Settings
Edit, copy Ele 4
Edit, paste, paste as new layer
Image, resize 40%
Move to the right side of the frame behind the tube
Effects, 3D Effects, Drop Shadow, Same Settings
Edit, copy Wordart
Edit, paste, paste as new layer
Image, resize 50%
Move down to place the white flowers in the background
Effects, 3D Effects, Drop Shadow, Same Settings
Edit, Copy Ele 11
Edit, paste, paste as new layer
Image, resize 50%
Image, Mirror
Move to the far right placing behind the tube
Effects, 3D Effects, Drop Shadow, Same Settings
Edit, copy Ele 15
Edit, paste, paste as new layer
Image, resize 60%
Move to the far left placing behind the milk and jam jars
Effects, 3D Effects, Drop Shadow, same settings
Edit, copy Ele 40
Edit, paste, paste as new layer
Layers, arrange, bring to top
Image, resize 40%
Move to the far right placing in front of the tube
Effects, 3D Effects, Drop Shadow, Same settings
Remember to add your copyright info. Make sure it is plain and legible
Add your name to the tag
Save as PNG
Labels:Amy(Gimptastic),CDO,PTU,PTU Tutorial,Tutorial | 0
comments
Sunday, May 1, 2016
1:33 PM | Edit Post
This tutorial was written by me. Any resemblance to any other tutorial is pure coincidence. Please DO NOT claim this tutorial as your own. It was written in PSP 9 but should be compatible with any version of PSP.
I am using the artwork of Alena Lazareva. You need a license to use this tube. You can buy this tube at CDO
I am using the PTU Kit IB Alena Lazareva 4-3 by Gimptastic Scraps . This kit is exclusive to CDO
Open new image 600 x 600
Edit, Copy Frame 1
Edit, paste, paste as new layer
Image, resize 70%
With your magic wand click inside of the frame
Selections, Modify, Expand by 8
Edit, copy Paper 2
Edit, paste, paste as new layer
Layers, arrange, send to bottom
Selections, Invert
Edit, Clear
Selections, Select None
Effects, 3D Effects, Drop Shadow, Settings of:
Vertical : 2
Horizontal: 2
Opacity: 65
Blur: 5
Color: Black
Shadow on new layer NOT Checked
Edit, copy Tube
Edit, paste, paste as new layer
Image, resize to fit your tag
Effects, 3D Effects, Drop Shadow, Same settings
Select Raster 2
Layers, Duplicate
Layers, arrange, bring to top
Using your eraser tube eraser all but the bottom of the frame so that it will hide the covering up of the cut off bottom of your tube
Edit, copy Ele 17
Edit, paste, paste as new layer
Layers, arrange, send to bottom
Effects, 3D Effects, Drop Shadow, Same Settings
Edit, copy Ele 2
Edit, paste, paste as new layer
Effects, 3D Effects, Drop Shadow, same Settings
Layers, Duplicate
Image, Mirror
Image, Flip
Edit, copy Ele 22
Edit, paste, paste as new layer
Image, resize 80%
Move down below the previous element
Pull some of it up toward the right
Effects, 3D Effects, Drop Shadow, Same Settings
Layers, Duplicate
Image, Mirror
Edit, copy Ele 19
Edit, paste, paste as new layer
Image, Resize 70%
Layers, arrange, bring to top
Move to the bottom of the frame
Effects, 3D Effects, Drop Shadow, Same settings
Edit, Copy Ele 5
Edit, paste, paste as new layer
Image, resize 50%
Move to the far left placing on the side of the vine
Effects, 3D Effects, Drop Shadow, same Settings
Layers, Duplicate
Image, Mirror
Select Raster 2
Edit, copy Ele 9
Edit, paste, paste as new layer
Image, resize 70%
Image, rotate, free rotate, right 90
Move to the left side of the frame
Effects, 3D Effects, Drop Shadow, Same Settings
Edit, copy Ele 14
Edit, paste, paste as new layer
Image, resize 50%
Move to the bottom left placing in front of the greenery
Effects, 3D Effects, Drop Shadow, Same Settings
Layers, Duplicate
Image, Mirror
Select Raster 2
Edit, copy Ele 8
Edit, paste, paste as new layer
Move to the top right of the frame moving it around some
Image, resize 50%
Effects, 3D Effects, Drop Shadow, Same Settings
Edit, Copy Ele 1
Edit, paste, paste as new layer
Image, resize 50%
Move to the far left and move down til it is right below the frame
Effects, 3D Effects, Drop Shadow, Same Settings
Layers, Duplicate
Image, Mirror
Remember to add your copyright info. Make sure it is plain and legible
Add your name to the tag
Save as PNG
I am using the artwork of Alena Lazareva. You need a license to use this tube. You can buy this tube at CDO
I am using the PTU Kit IB Alena Lazareva 4-3 by Gimptastic Scraps . This kit is exclusive to CDO
Open new image 600 x 600
Edit, Copy Frame 1
Edit, paste, paste as new layer
Image, resize 70%
With your magic wand click inside of the frame
Selections, Modify, Expand by 8
Edit, copy Paper 2
Edit, paste, paste as new layer
Layers, arrange, send to bottom
Selections, Invert
Edit, Clear
Selections, Select None
Effects, 3D Effects, Drop Shadow, Settings of:
Vertical : 2
Horizontal: 2
Opacity: 65
Blur: 5
Color: Black
Shadow on new layer NOT Checked
Edit, copy Tube
Edit, paste, paste as new layer
Image, resize to fit your tag
Effects, 3D Effects, Drop Shadow, Same settings
Select Raster 2
Layers, Duplicate
Layers, arrange, bring to top
Using your eraser tube eraser all but the bottom of the frame so that it will hide the covering up of the cut off bottom of your tube
Edit, copy Ele 17
Edit, paste, paste as new layer
Layers, arrange, send to bottom
Effects, 3D Effects, Drop Shadow, Same Settings
Edit, copy Ele 2
Edit, paste, paste as new layer
Effects, 3D Effects, Drop Shadow, same Settings
Layers, Duplicate
Image, Mirror
Image, Flip
Edit, copy Ele 22
Edit, paste, paste as new layer
Image, resize 80%
Move down below the previous element
Pull some of it up toward the right
Effects, 3D Effects, Drop Shadow, Same Settings
Layers, Duplicate
Image, Mirror
Edit, copy Ele 19
Edit, paste, paste as new layer
Image, Resize 70%
Layers, arrange, bring to top
Move to the bottom of the frame
Effects, 3D Effects, Drop Shadow, Same settings
Edit, Copy Ele 5
Edit, paste, paste as new layer
Image, resize 50%
Move to the far left placing on the side of the vine
Effects, 3D Effects, Drop Shadow, same Settings
Layers, Duplicate
Image, Mirror
Select Raster 2
Edit, copy Ele 9
Edit, paste, paste as new layer
Image, resize 70%
Image, rotate, free rotate, right 90
Move to the left side of the frame
Effects, 3D Effects, Drop Shadow, Same Settings
Edit, copy Ele 14
Edit, paste, paste as new layer
Image, resize 50%
Move to the bottom left placing in front of the greenery
Effects, 3D Effects, Drop Shadow, Same Settings
Layers, Duplicate
Image, Mirror
Select Raster 2
Edit, copy Ele 8
Edit, paste, paste as new layer
Move to the top right of the frame moving it around some
Image, resize 50%
Effects, 3D Effects, Drop Shadow, Same Settings
Edit, Copy Ele 1
Edit, paste, paste as new layer
Image, resize 50%
Move to the far left and move down til it is right below the frame
Effects, 3D Effects, Drop Shadow, Same Settings
Layers, Duplicate
Image, Mirror
Remember to add your copyright info. Make sure it is plain and legible
Add your name to the tag
Save as PNG
Labels:Amy(Gimptastic),CDO,PTU,PTU Tutorial,Tutorial | 0
comments
Saturday, April 30, 2016
4:19 PM | Edit Post
This tutorial was written by me. Any resemblance to any other tutorial is pure coincidence. Please DO NOT claim this tutorial as your own. It was written in PSP 9 but should be compatible with any version of PSP.
I am using the artwork of Barbara Jensen. You need a license to use this tube. You can buy this tube at her store HERE
I am using the PTU kit Spellbound by Ladyhawwk Designs You can find this kit exclusively at Barbara Jensen’s store HERE
Open new image 600 x 600
Edit, Copy Frame 4
Edit, paste, paste as new layer
Image, resize 60%
With your magic wand click inside of the frame
Selections, Modify, Expand by 8
Edit, copy Paper 5
Edit, paste, paste as new layer
Layers, arrange, send to bottom
Selections, Invert
Edit, Clear
Edit, copy Ele27
Edit, paste, paste as new layer
Image, resize 60%
Edit, Clear
Selections, Select None
Select Raster 2
Effects, 3D Effects, Drop Shadow, Settings of:
Vertical : 2
Horizontal:2
Opacity: 50
Blur: 6
Color: Black
Shadow on new layer NOT Checked
Edit, Copy Ele2
Edit, paste, paste as new layer
Layers, arrange, send to bottom
Effects, 3D Effects, Drop Shadow, same Settings
Edit, Copy Tube
Edit, paste, paste as new layer
Image, resize to fit your tag
Layers, arrange, bring to top
Effects, 3D Effects, Drop Shadow, Same Settings
Edit, copy Ele13
Edit, paste, paste as new layer
Layers, arrange, send to bottom..Move it above the glitter at the bottom
Image, resize 70%
Effects, 3D Effects, Drop Shadow, Same Settings
Layers, Duplicate
Image, Mirror
Edit, copy Ele21
Edit, paste, paste as new layer
Image, resize 70%
Move to the right side on Raster 2
Effects, 3D Effects, Drop Shadow, Same Settings
Select Raster 3
Edit, copy Ele30
Edit, paste, paste as new layer
Move to the left side
Image, resize 50%
Move up toward the top so you can see them
Effects, 3D Effects, Drop Shadow, Same Settings
Layers, Duplicate
Image, Mirror
Select Raster 2
Edit, copy Ele48
Edit, paste, paste as new layer
Image, resize 60%
Move to the top of the frame
Effects, 3D Effects, Drop Shadow, same Settings
Edit, Copy Ele7
Edit, paste, paste as new layer
Image, resize 50%
Move to the top left of the frame moving under the previous element
Effects, 3D Effects, Drop Shadow, Same Settings
Edit, copy Ele28
Edit, paste, paste as new layer
Image, resize 40%
Move to the right and place it on the base of the candelbra
Effects, 3D Effects, Drop Shadow, Same Settings
Edit, copy Ele31
Edit, paste, paste as new layer
Image, resize 60%
Move to the right and place behind the tube and candelabra. See my tag for placement
Effects, 3D Effects, Drop Shadow, Same Settings
Edit, copy Ele46
Edit, paste, paste as new layer
Image, resize 60%
Move to bottom left of the frame moving to Raster 2
Effects, 3D Effects, Drop Shadow, Same Settings
Edit, Copy Ele37
Edit, paste, paste as new layer
Image, resize 60%
Move to the bottom left and place on the right side and behind the previous element
Effects, 3D Effects, Drop Shadow, Same Settings
Select Raster 2
Edit, copy Ele14
Edit, paste, paste as new layer
Image, rotate, free rotate, right, 90
Image, mirror
Image, resize 50%
Move to the bottom left of the frame. See my tag for placement
Effects, 3D Effects, Drop Shadow, Same settings
Edit, copy Ele18
Edit, paste, paste as new layer
Image, resize 40%
Move to the right and place between the chest and candelbra
Effects, 3D Effects, Drop Shadow, Same Settings
Edit, copy Ele41
Edit, paste, paste as new layer
Image, resize 40%
Move to the bottom left placing in front of both of the jars
Effects, 3D Effects, Drop Shadow, Same Settings
Remember to add your copyright info. Make sure it is plain and legible
Add your name to the tag
Save as PNG
I am using the artwork of Barbara Jensen. You need a license to use this tube. You can buy this tube at her store HERE
I am using the PTU kit Spellbound by Ladyhawwk Designs You can find this kit exclusively at Barbara Jensen’s store HERE
Open new image 600 x 600
Edit, Copy Frame 4
Edit, paste, paste as new layer
Image, resize 60%
With your magic wand click inside of the frame
Selections, Modify, Expand by 8
Edit, copy Paper 5
Edit, paste, paste as new layer
Layers, arrange, send to bottom
Selections, Invert
Edit, Clear
Edit, copy Ele27
Edit, paste, paste as new layer
Image, resize 60%
Edit, Clear
Selections, Select None
Select Raster 2
Effects, 3D Effects, Drop Shadow, Settings of:
Vertical : 2
Horizontal:2
Opacity: 50
Blur: 6
Color: Black
Shadow on new layer NOT Checked
Edit, Copy Ele2
Edit, paste, paste as new layer
Layers, arrange, send to bottom
Effects, 3D Effects, Drop Shadow, same Settings
Edit, Copy Tube
Edit, paste, paste as new layer
Image, resize to fit your tag
Layers, arrange, bring to top
Effects, 3D Effects, Drop Shadow, Same Settings
Edit, copy Ele13
Edit, paste, paste as new layer
Layers, arrange, send to bottom..Move it above the glitter at the bottom
Image, resize 70%
Effects, 3D Effects, Drop Shadow, Same Settings
Layers, Duplicate
Image, Mirror
Edit, copy Ele21
Edit, paste, paste as new layer
Image, resize 70%
Move to the right side on Raster 2
Effects, 3D Effects, Drop Shadow, Same Settings
Select Raster 3
Edit, copy Ele30
Edit, paste, paste as new layer
Move to the left side
Image, resize 50%
Move up toward the top so you can see them
Effects, 3D Effects, Drop Shadow, Same Settings
Layers, Duplicate
Image, Mirror
Select Raster 2
Edit, copy Ele48
Edit, paste, paste as new layer
Image, resize 60%
Move to the top of the frame
Effects, 3D Effects, Drop Shadow, same Settings
Edit, Copy Ele7
Edit, paste, paste as new layer
Image, resize 50%
Move to the top left of the frame moving under the previous element
Effects, 3D Effects, Drop Shadow, Same Settings
Edit, copy Ele28
Edit, paste, paste as new layer
Image, resize 40%
Move to the right and place it on the base of the candelbra
Effects, 3D Effects, Drop Shadow, Same Settings
Edit, copy Ele31
Edit, paste, paste as new layer
Image, resize 60%
Move to the right and place behind the tube and candelabra. See my tag for placement
Effects, 3D Effects, Drop Shadow, Same Settings
Edit, copy Ele46
Edit, paste, paste as new layer
Image, resize 60%
Move to bottom left of the frame moving to Raster 2
Effects, 3D Effects, Drop Shadow, Same Settings
Edit, Copy Ele37
Edit, paste, paste as new layer
Image, resize 60%
Move to the bottom left and place on the right side and behind the previous element
Effects, 3D Effects, Drop Shadow, Same Settings
Select Raster 2
Edit, copy Ele14
Edit, paste, paste as new layer
Image, rotate, free rotate, right, 90
Image, mirror
Image, resize 50%
Move to the bottom left of the frame. See my tag for placement
Effects, 3D Effects, Drop Shadow, Same settings
Edit, copy Ele18
Edit, paste, paste as new layer
Image, resize 40%
Move to the right and place between the chest and candelbra
Effects, 3D Effects, Drop Shadow, Same Settings
Edit, copy Ele41
Edit, paste, paste as new layer
Image, resize 40%
Move to the bottom left placing in front of both of the jars
Effects, 3D Effects, Drop Shadow, Same Settings
Remember to add your copyright info. Make sure it is plain and legible
Add your name to the tag
Save as PNG
Labels:Barbara Jensen,Ladyhawwk,PTU,PTU Tutorial,Tutorial | 2
comments
Thursday, April 28, 2016
6:39 AM | Edit Post
This tutorial was written by me. Any resemblance to any other tutorial is pure coincidence. Please DO NOT claim this tutorial as your own. It was written in PSP 9 but should be compatible with any version of PSP.
I am using the artwork of Barbara Jensen. You need a license to use this tube. You can buy this tube at her store HERE
I am using the PTU kit Vino Vixen by Ladyhawwk Designs You can find this kit exclusively at Barbara Jensen’s store HERE
Squirrely Mask 36 found HERE.
Open new image 600 x 600
Edit, Copy Ele49
Edit, paste, paste as new layer
Image, resize 80%
Effects, 3D Effects, Drop Shadow, Settings of:
Vertical : 2
Horizontal:2
Opacity: 50
Blur: 6
Color: Black
Shadow on new layer NOT Checked
Edit, copy Tube
Edit, paste, paste as new layer
Image, resize to fit your tag
Effects, 3D Effects, Drop Shadow, Same Settings
Edit, copy Ele26
Edit, paste, paste as new layer
Image, resize 60%
Move to the right and place behind the tube and pull to the right some
Effects, 3D Effects, Drop Shadow, Same Settings
Edit, copy Ele42
Edit, paste, paste as new layer
Image, resize 30%
Move to right and place on top of the dresser
Effects, 3D Effects, Drop Shadow, Same Settings
Edit, copy Ele50
Edit, paste, paste as new layer
Image, resize 50%
Move to the left side placing behind the tube and to thel eft
Effects, 3D Effects, Drop Shadow, same Settings
Edit, Copy Ele23
Edit, paste, paste as new layer
Image, resize 50%
Move to the bottom of the cut off legs of the tube
Effects, 3D Effects, Drop Shadow, Same Settings
Edit, copy Ele32
Edit, paste, paste as new layer
Image, resize 40%
Move to the right and place on the dresser in front of the bowl of grapes on the right side
Effects, 3D Effects, Drop Shadow, Same Settings
Edit, copy Ele30
Edit, paste, paste as new layer
Image, resize 40%
Move to the right and place behind the wine glass
Effects, 3D Effects, Drop Shadow, Same Settings
Edit, copy Ele37
Edit, paste, paste as new layer
Image, resize 40%
Move to the right and place at the right corner of the dresser. See my tag for placement
Effects, 3D Effects, Drop Shadow, Same Settings
Edit, Copy Paper6
Edit, paste, paste as new layer
Layers, arrange, send to bottom
Layers, Load/save mask, load mask from disk, settings:
SquirrelyMask63
Source Luminance
Fit To Canvas
Invert Transparency NOT Checked
Hide All Mask
Layers, Merge, merge Group
Edit, copy Ele48
Edit, paste, paste as new layer
Image, resize 60%
Move to the left side placing on the screen. See my tag for placement
Effects, 3D Effects, Drop Shadow, Same settings
Edit, copy Ele9
Edit, paste, paste as new layer
Image, resize 40%
Move to the right and place in front of the dresser and behind the cat
Effects, 3D Effects, Drop Shadow, Same Settings
Edit, copy Ele7
Edit, paste, paste as new layer
Image, resize 40%
Move to the bottom left move over so part of it is in front of the vase
Effects, 3D Effects, Drop Shadow, Same Settings
Remember to add your copyright info. Make sure it is plain and legible
Add your name to the tag
Save as PNG
I am using the artwork of Barbara Jensen. You need a license to use this tube. You can buy this tube at her store HERE
I am using the PTU kit Vino Vixen by Ladyhawwk Designs You can find this kit exclusively at Barbara Jensen’s store HERE
Squirrely Mask 36 found HERE.
Open new image 600 x 600
Edit, Copy Ele49
Edit, paste, paste as new layer
Image, resize 80%
Effects, 3D Effects, Drop Shadow, Settings of:
Vertical : 2
Horizontal:2
Opacity: 50
Blur: 6
Color: Black
Shadow on new layer NOT Checked
Edit, copy Tube
Edit, paste, paste as new layer
Image, resize to fit your tag
Effects, 3D Effects, Drop Shadow, Same Settings
Edit, copy Ele26
Edit, paste, paste as new layer
Image, resize 60%
Move to the right and place behind the tube and pull to the right some
Effects, 3D Effects, Drop Shadow, Same Settings
Edit, copy Ele42
Edit, paste, paste as new layer
Image, resize 30%
Move to right and place on top of the dresser
Effects, 3D Effects, Drop Shadow, Same Settings
Edit, copy Ele50
Edit, paste, paste as new layer
Image, resize 50%
Move to the left side placing behind the tube and to thel eft
Effects, 3D Effects, Drop Shadow, same Settings
Edit, Copy Ele23
Edit, paste, paste as new layer
Image, resize 50%
Move to the bottom of the cut off legs of the tube
Effects, 3D Effects, Drop Shadow, Same Settings
Edit, copy Ele32
Edit, paste, paste as new layer
Image, resize 40%
Move to the right and place on the dresser in front of the bowl of grapes on the right side
Effects, 3D Effects, Drop Shadow, Same Settings
Edit, copy Ele30
Edit, paste, paste as new layer
Image, resize 40%
Move to the right and place behind the wine glass
Effects, 3D Effects, Drop Shadow, Same Settings
Edit, copy Ele37
Edit, paste, paste as new layer
Image, resize 40%
Move to the right and place at the right corner of the dresser. See my tag for placement
Effects, 3D Effects, Drop Shadow, Same Settings
Edit, Copy Paper6
Edit, paste, paste as new layer
Layers, arrange, send to bottom
Layers, Load/save mask, load mask from disk, settings:
SquirrelyMask63
Source Luminance
Fit To Canvas
Invert Transparency NOT Checked
Hide All Mask
Layers, Merge, merge Group
Edit, copy Ele48
Edit, paste, paste as new layer
Image, resize 60%
Move to the left side placing on the screen. See my tag for placement
Effects, 3D Effects, Drop Shadow, Same settings
Edit, copy Ele9
Edit, paste, paste as new layer
Image, resize 40%
Move to the right and place in front of the dresser and behind the cat
Effects, 3D Effects, Drop Shadow, Same Settings
Edit, copy Ele7
Edit, paste, paste as new layer
Image, resize 40%
Move to the bottom left move over so part of it is in front of the vase
Effects, 3D Effects, Drop Shadow, Same Settings
Remember to add your copyright info. Make sure it is plain and legible
Add your name to the tag
Save as PNG
Labels:Barbara Jensen,Ladyhawwk,PTU,PTU Tutorial,Tutorial | 0
comments
Sunday, April 24, 2016
3:14 PM | Edit Post
This tutorial was written by me. Any resemblance to any other tutorial is pure coincidence. Please DO NOT claim this tutorial as your own. It was written in PSP 9 but should be compatible with any version of PSP.
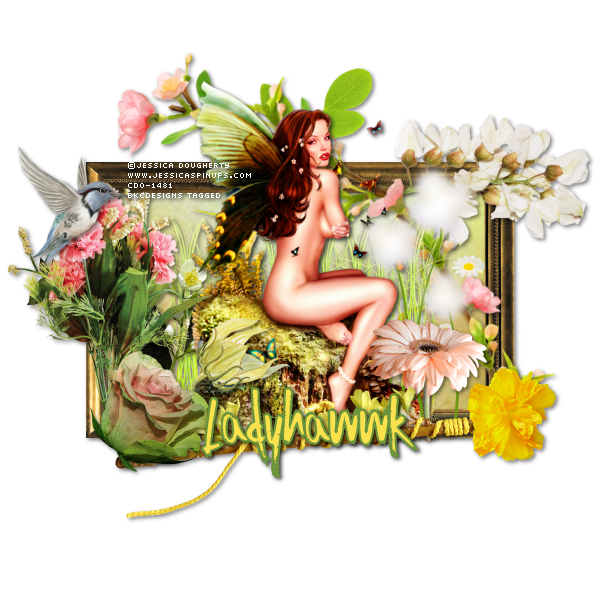
I am using the artwork of Jessica Dougherty. You need a license to use this tube. You can buy the tube at CDO
I am using the PTU kit IB Jessica Dougherty 21-1 by Ladyhawwk Designs. You can find this kit at CDO
Open new image 600 x 600
Edit, Copy Frame 1
Edit, paste, paste as new layer
Image, resize 50%
With your magic wand click inside of the frame
Selections, Modify, Expand by 8
Edit, copy Paper 6
Edit, paste, paste as new layer
Layers, arrange, send to bottom
Selections, Invert
Edit, Clear
Edit, copy Ele23
Edit, paste, paste as new layer
Image, resize 60%
Edit, Clear
Selections, Select None
Select Raster 2
Effects, 3D Effects, Drop Shadow, Settings of:
Vertical : 2
Horizontal: 2
Opacity: 50
Blur: 6
Color: Black
Shadow on new layer NOT Checked
Edit, copy Tube
Edit, paste, paste as new layer
Image, resize to fit your tag
Effects, 3D Effects, Drop Shadow, Same Settings
Edit, Copy Ele18
Edit, paste, paste as new layer
Image, resize 40%
Move behind the tube and to the left
Effects, 3D Effects, Drop Shadow, Same Settings
Layers, Duplicate
Image, Mirror
Select Raster 2
Edit, copy Ele17
Edit, paste, paste as new layer
Image, resize 50%
Image, rotate, free rotate, right 20
Effects, 3D Effects, Drop Shadow, Same Settings
Edit, copy Ele12
Edit, paste, paste as new layer
Layers, arrange, bring to top
Image, resize 40%
Move to the bottom left of the frame
Effects, 3D Effects, Drop Shadow, Same Settings
Edit, copy Ele2
Edit, paste, paste as new layer
Layers, arrange, bring to top
Image,resize 30%
Move to the right side of the tube. See my tag for placement
Effects, 3D Effects, Drop Shadow, Same Settings
Select Raster 2
Edit, copy Ele28
Edit, paste, paste as new layer
Image, resize 50%
Image, Mirror
Move to the right side at the top of the frame
Effects, 3D Effects, Drop Shadow, Same settings
Edit, copy Ele6
Edit, paste, paste as new layer
Image, resize 30%
Move to the left side of the tube. See my tag for placement
Effects, 3D Effects, Drop Shadow, Same settings
Edit, copy Ele3
Edit, paste, paste as new layer
Image, resize 40%
Layers, arrange, bring to top
Move to bottom left and cover up the bottoms of the flower stems
Effects, 3D Effects, Drop Shadow, Same settings
Edit, copy Ele22
Edit, paste, paste as new layer
Image, resize 40%
Move to the left and place in front of the grass and beside the tube
Effects, 3D Effects, Drop Shadow, Same settings
Edit, copy Ele19
Edit, paste, paste as new layer
Image, resize 50%
Move to place at the bottom of the rock of the tube. Making sure it covers the stems of the flowers you have so far
Effects, 3D Effects, Drop Shadow, Same settings
Edit, copy Ele32
Edit, paste, paste as new layer
Image, resize 30%
Move to the left and place near the top of the flowers
Effects, 3D Effects, Drop Shadow, Same Settings
Edit, copy Ele5
Edit, paste, paste as new layer
Image, resize 30%
Move to the left and move down til it is in front of the grass
Effects, 3D Effects, Drop Shadow, Same settings
Edit, Copy Ele27
Edit, paste, paste as new layer
Image, resize 20%
Layers, arrange, bring to top
Move to the bottom right of the frame
Effects, 3D Effects, Drop Shadow, Same Settings
Remember to add your copyright info. Make sure it is plain and legible
Add your name to the tag
Save as PNG
I am using the artwork of Jessica Dougherty. You need a license to use this tube. You can buy the tube at CDO
I am using the PTU kit IB Jessica Dougherty 21-1 by Ladyhawwk Designs. You can find this kit at CDO
Open new image 600 x 600
Edit, Copy Frame 1
Edit, paste, paste as new layer
Image, resize 50%
With your magic wand click inside of the frame
Selections, Modify, Expand by 8
Edit, copy Paper 6
Edit, paste, paste as new layer
Layers, arrange, send to bottom
Selections, Invert
Edit, Clear
Edit, copy Ele23
Edit, paste, paste as new layer
Image, resize 60%
Edit, Clear
Selections, Select None
Select Raster 2
Effects, 3D Effects, Drop Shadow, Settings of:
Vertical : 2
Horizontal: 2
Opacity: 50
Blur: 6
Color: Black
Shadow on new layer NOT Checked
Edit, copy Tube
Edit, paste, paste as new layer
Image, resize to fit your tag
Effects, 3D Effects, Drop Shadow, Same Settings
Edit, Copy Ele18
Edit, paste, paste as new layer
Image, resize 40%
Move behind the tube and to the left
Effects, 3D Effects, Drop Shadow, Same Settings
Layers, Duplicate
Image, Mirror
Select Raster 2
Edit, copy Ele17
Edit, paste, paste as new layer
Image, resize 50%
Image, rotate, free rotate, right 20
Effects, 3D Effects, Drop Shadow, Same Settings
Edit, copy Ele12
Edit, paste, paste as new layer
Layers, arrange, bring to top
Image, resize 40%
Move to the bottom left of the frame
Effects, 3D Effects, Drop Shadow, Same Settings
Edit, copy Ele2
Edit, paste, paste as new layer
Layers, arrange, bring to top
Image,resize 30%
Move to the right side of the tube. See my tag for placement
Effects, 3D Effects, Drop Shadow, Same Settings
Select Raster 2
Edit, copy Ele28
Edit, paste, paste as new layer
Image, resize 50%
Image, Mirror
Move to the right side at the top of the frame
Effects, 3D Effects, Drop Shadow, Same settings
Edit, copy Ele6
Edit, paste, paste as new layer
Image, resize 30%
Move to the left side of the tube. See my tag for placement
Effects, 3D Effects, Drop Shadow, Same settings
Edit, copy Ele3
Edit, paste, paste as new layer
Image, resize 40%
Layers, arrange, bring to top
Move to bottom left and cover up the bottoms of the flower stems
Effects, 3D Effects, Drop Shadow, Same settings
Edit, copy Ele22
Edit, paste, paste as new layer
Image, resize 40%
Move to the left and place in front of the grass and beside the tube
Effects, 3D Effects, Drop Shadow, Same settings
Edit, copy Ele19
Edit, paste, paste as new layer
Image, resize 50%
Move to place at the bottom of the rock of the tube. Making sure it covers the stems of the flowers you have so far
Effects, 3D Effects, Drop Shadow, Same settings
Edit, copy Ele32
Edit, paste, paste as new layer
Image, resize 30%
Move to the left and place near the top of the flowers
Effects, 3D Effects, Drop Shadow, Same Settings
Edit, copy Ele5
Edit, paste, paste as new layer
Image, resize 30%
Move to the left and move down til it is in front of the grass
Effects, 3D Effects, Drop Shadow, Same settings
Edit, Copy Ele27
Edit, paste, paste as new layer
Image, resize 20%
Layers, arrange, bring to top
Move to the bottom right of the frame
Effects, 3D Effects, Drop Shadow, Same Settings
Remember to add your copyright info. Make sure it is plain and legible
Add your name to the tag
Save as PNG
Labels:CDO,Ladyhawwk,PTU,PTU Tutorial,Tutorial | 0
comments
Saturday, April 23, 2016
5:14 PM | Edit Post
This tutorial was written by me. Any resemblance to any other tutorial is pure coincidence. Please DO NOT claim this tutorial as your own. It was written in PSP 9 but should be compatible with any version of PSP.
I am using the artwork of Monte Moore. You need a license to use this tube. You can buy this tube at CDO
I am using the PTU Kit IB Monte Moore 26-3 by Gimptastic Scraps . This kit is exclusive to CDO
Open new image 600 x 600
Edit, Copy Frame 2
Edit, paste, paste as new layer
Image, resize 70%
With your magic wand click inside of the frame
Selections, Modify, Expand by 8
Edit, copy Paper 3
Edit, paste, paste as new layer
Layers, arrange, send to bottom
Selections, Invert
Edit, Clear
Edit, copy Ele 17
Edit, paste, paste as new layer
Move over to the left just a bit
Edit, Clear
Selections, Select None
Effects, 3D Effects, Drop Shadow, Settings of:
Vertical : 2
Horizontal: 2
Opacity: 65
Blur: 5
Color: Black
Shadow on new layer NOT Checked
Edit, copy Tube
Edit, paste, paste as new layer
Image, resize to fit your tag
Effects, 3D Effects, Drop Shadow, Same settings
Edit, copy Ele 12
Edit, paste, paste as new layer
Layers, arrange, send to bottom
Move over to the right and up some
Effects, 3D Effects, Drop Shadow, Same Settings
Edit, copy Ele 11
Edit, paste, paste as new layer
Image, resize 70%
Move to the bottom of Raster 2. See my tag for placement
Effects, 3D Effects, Drop Shadow, same Settings
Select Raster 2
Edit, copy Ele 6
Edit, paste, paste as new layer
Image, resize 70%
Move to the bottom left of the frame
Effects, 3D Effects, Drop Shadow, Same Settings
Layers, Duplicate
Image, Mirror
Edit, copy Ele 21
Edit, paste, paste as new layer
Image, Resize 70%
Move to the right side of the frame on Raster 2
Effects, 3D Effects, Drop Shadow, Same settings
Edit, Copy Ele 20
Edit, paste, paste as new layer
Image, resize 70%
Image, Mirror
Image, Flip
Move to place on the boat. See my tag for placement
Effects, 3D Effects, Drop Shadow, same Settings
Edit, copy Ele 4
Edit, paste, paste as new layer
Image, resize 40%
Move to the left placing behind the fishing pole
Effects, 3D Effects, Drop Shadow, Same Settings
Edit, copy Ele 14
Edit, paste, paste as new layer
Image, resize 50%
Move to the bottom left placing in front of the greenery
Effects, 3D Effects, Drop Shadow, Same Settings
Edit, copy Ele 8
Edit, paste, paste as new layer
Move down to above the spray of the water on the left side
Image, rotate, free rotate, left, 20
Image, resize 50%
Effects, 3D Effects, Drop Shadow, Same Settings
Remember to add your copyright info. Make sure it is plain and legible
Add your name to the tag
Save as PNG
I am using the artwork of Monte Moore. You need a license to use this tube. You can buy this tube at CDO
I am using the PTU Kit IB Monte Moore 26-3 by Gimptastic Scraps . This kit is exclusive to CDO
Open new image 600 x 600
Edit, Copy Frame 2
Edit, paste, paste as new layer
Image, resize 70%
With your magic wand click inside of the frame
Selections, Modify, Expand by 8
Edit, copy Paper 3
Edit, paste, paste as new layer
Layers, arrange, send to bottom
Selections, Invert
Edit, Clear
Edit, copy Ele 17
Edit, paste, paste as new layer
Move over to the left just a bit
Edit, Clear
Selections, Select None
Effects, 3D Effects, Drop Shadow, Settings of:
Vertical : 2
Horizontal: 2
Opacity: 65
Blur: 5
Color: Black
Shadow on new layer NOT Checked
Edit, copy Tube
Edit, paste, paste as new layer
Image, resize to fit your tag
Effects, 3D Effects, Drop Shadow, Same settings
Edit, copy Ele 12
Edit, paste, paste as new layer
Layers, arrange, send to bottom
Move over to the right and up some
Effects, 3D Effects, Drop Shadow, Same Settings
Edit, copy Ele 11
Edit, paste, paste as new layer
Image, resize 70%
Move to the bottom of Raster 2. See my tag for placement
Effects, 3D Effects, Drop Shadow, same Settings
Select Raster 2
Edit, copy Ele 6
Edit, paste, paste as new layer
Image, resize 70%
Move to the bottom left of the frame
Effects, 3D Effects, Drop Shadow, Same Settings
Layers, Duplicate
Image, Mirror
Edit, copy Ele 21
Edit, paste, paste as new layer
Image, Resize 70%
Move to the right side of the frame on Raster 2
Effects, 3D Effects, Drop Shadow, Same settings
Edit, Copy Ele 20
Edit, paste, paste as new layer
Image, resize 70%
Image, Mirror
Image, Flip
Move to place on the boat. See my tag for placement
Effects, 3D Effects, Drop Shadow, same Settings
Edit, copy Ele 4
Edit, paste, paste as new layer
Image, resize 40%
Move to the left placing behind the fishing pole
Effects, 3D Effects, Drop Shadow, Same Settings
Edit, copy Ele 14
Edit, paste, paste as new layer
Image, resize 50%
Move to the bottom left placing in front of the greenery
Effects, 3D Effects, Drop Shadow, Same Settings
Edit, copy Ele 8
Edit, paste, paste as new layer
Move down to above the spray of the water on the left side
Image, rotate, free rotate, left, 20
Image, resize 50%
Effects, 3D Effects, Drop Shadow, Same Settings
Remember to add your copyright info. Make sure it is plain and legible
Add your name to the tag
Save as PNG
Labels:Amy(Gimptastic),CDO,PTU,Tutorial | 0
comments
Wednesday, April 20, 2016
5:29 PM | Edit Post
This tutorial was written by me. Any resemblance to any other tutorial is pure coincidence. Please DO NOT claim this tutorial as your own. It was written in PSP 9 but should be compatible with any version of PSP.
I am using the artwork of Enys Guerrero. You need a license to use this tube. You can buy this tube at CDO
I am using the PTU Kit IB Enys Guerrero 21-2 by Gimptastic Scraps . This kit is exclusive to CDO
Open new image 600 x 600
Edit, Copy Frame 1
Edit, paste, paste as new layer
Image, resize 75%
With your magic wand click inside of the frame
Selections, Modify, Expand by 8
Edit, copy Paper 6
Edit, paste, paste as new layer
Layers, arrange, send to bottom
Selections, Invert
Edit, Clear
Selections, Select None
Effects, 3D Effects, Drop Shadow, Settings of:
Vertical : 2
Horizontal: 2
Opacity: 65
Blur: 5
Color: Black
Shadow on new layer NOT Checked
Edit, copy Tube
Edit, paste, paste as new layer
Image, resize 60%
Effects, 3D Effects, Drop Shadow, Same settings
Select Raster 2
Layers, Duplicate
Layers, arrange, bring to top
Using your eraser tool erase the top of the frame from around the tube
Than go to the tube layer and eraser the tube at the bottom that you can see it hanging below the frame in the back
Edit, copy Ele 15
Edit, paste, paste as new layer
Layers, arrange, send to bottom
Move over to the left some and up
Effects, 3D Effects, Drop Shadow, Same Settings
Layers, Duplicate
Image, Mirror
Edit, copy Ele 12
Edit, paste, paste as new layer
Image, resize 60%
Layers, arrange, bring to top
Move to bottom left of the frame
Effects, 3D Effects, Drop Shadow, same Settings
Layers, Duplicate
Image, Mirror
Edit, copy Ele 5
Edit, paste, paste as new layer
Image, resize 60%
Move to the bottom of the frame
Effects, 3D Effects, Drop Shadow, Same Settings
Edit, copy Ele 22
Edit, paste, paste as new layer
Image, Mirror
Move to the right side of the frame placing behind the copied frame. See my tag for placement
Effects, 3D Effects, Drop Shadow, Same settings
Edit, Copy Ele 9
Edit, paste, paste as new layer
Image, resize 60%
Image, Flip
Move behind the flowers at the bottom of the frame
Effects, 3D Effects, Drop Shadow, same Settings
Edit, copy Ele 8
Edit, paste, paste as new layer
Layers, arrange, send to bottom
Move to the left and move down
Effects, 3D Effects, Drop Shadow, Same Settings
Layers, Duplicate
Image, Mirror
Edit, copy Ele 17
Edit, paste, paste as new layer
Layers, arrange, bring to top
Move to the far right placing on one of the branches
Image, resize 40%
Effects, 3D Effects, Drop Shadow, Same Settings
Edit, copy Ele 21
Edit, paste, paste as new layer
Move down to raster 2
Effects, 3D Effects, Drop Shadow, Same Settings
Edit, copy Ele 1
Edit, paste, paste as new layer
Move to the bottom left
Layers, arrange, send to bottom
Move below the flowers
Effects, 3D Effects, Drop Shadow, Same Settings
Layers, Duplicate
Image, Mirror
Remember to add your copyright info. Make sure it is plain and legible
Add your name to the tag
Save as PNG
I am using the artwork of Enys Guerrero. You need a license to use this tube. You can buy this tube at CDO
I am using the PTU Kit IB Enys Guerrero 21-2 by Gimptastic Scraps . This kit is exclusive to CDO
Open new image 600 x 600
Edit, Copy Frame 1
Edit, paste, paste as new layer
Image, resize 75%
With your magic wand click inside of the frame
Selections, Modify, Expand by 8
Edit, copy Paper 6
Edit, paste, paste as new layer
Layers, arrange, send to bottom
Selections, Invert
Edit, Clear
Selections, Select None
Effects, 3D Effects, Drop Shadow, Settings of:
Vertical : 2
Horizontal: 2
Opacity: 65
Blur: 5
Color: Black
Shadow on new layer NOT Checked
Edit, copy Tube
Edit, paste, paste as new layer
Image, resize 60%
Effects, 3D Effects, Drop Shadow, Same settings
Select Raster 2
Layers, Duplicate
Layers, arrange, bring to top
Using your eraser tool erase the top of the frame from around the tube
Than go to the tube layer and eraser the tube at the bottom that you can see it hanging below the frame in the back
Edit, copy Ele 15
Edit, paste, paste as new layer
Layers, arrange, send to bottom
Move over to the left some and up
Effects, 3D Effects, Drop Shadow, Same Settings
Layers, Duplicate
Image, Mirror
Edit, copy Ele 12
Edit, paste, paste as new layer
Image, resize 60%
Layers, arrange, bring to top
Move to bottom left of the frame
Effects, 3D Effects, Drop Shadow, same Settings
Layers, Duplicate
Image, Mirror
Edit, copy Ele 5
Edit, paste, paste as new layer
Image, resize 60%
Move to the bottom of the frame
Effects, 3D Effects, Drop Shadow, Same Settings
Edit, copy Ele 22
Edit, paste, paste as new layer
Image, Mirror
Move to the right side of the frame placing behind the copied frame. See my tag for placement
Effects, 3D Effects, Drop Shadow, Same settings
Edit, Copy Ele 9
Edit, paste, paste as new layer
Image, resize 60%
Image, Flip
Move behind the flowers at the bottom of the frame
Effects, 3D Effects, Drop Shadow, same Settings
Edit, copy Ele 8
Edit, paste, paste as new layer
Layers, arrange, send to bottom
Move to the left and move down
Effects, 3D Effects, Drop Shadow, Same Settings
Layers, Duplicate
Image, Mirror
Edit, copy Ele 17
Edit, paste, paste as new layer
Layers, arrange, bring to top
Move to the far right placing on one of the branches
Image, resize 40%
Effects, 3D Effects, Drop Shadow, Same Settings
Edit, copy Ele 21
Edit, paste, paste as new layer
Move down to raster 2
Effects, 3D Effects, Drop Shadow, Same Settings
Edit, copy Ele 1
Edit, paste, paste as new layer
Move to the bottom left
Layers, arrange, send to bottom
Move below the flowers
Effects, 3D Effects, Drop Shadow, Same Settings
Layers, Duplicate
Image, Mirror
Remember to add your copyright info. Make sure it is plain and legible
Add your name to the tag
Save as PNG
Labels:Amy(Gimptastic),CDO,PTU,Tutorial | 0
comments
Subscribe to:
Posts
(Atom)
Categories
- Amy(Gimptastic) (433)
- Amy(Gimptastic) Tutorial (4)
- Artistic Tag Passions Exclusive Tut (2)
- Barbara Jensen (24)
- Berry (1)
- Birthstone (36)
- CDO (651)
- Christmas (70)
- Cluster frame (106)
- Color Palette (2)
- Creative Addiction Exclusive (17)
- Creative Crazy Scraps (1)
- Crystals Creations (1)
- Curious Creative Dreams (10)
- Designs by Sarah Bryan (1)
- Diamond Creations (48)
- emo (2)
- Foxys Designz (62)
- Frames (4)
- Freek's Creations CT (22)
- FTU (300)
- FTU Tutorial (38)
- Halloween (10)
- Keith Garvey (5)
- Lady Mishka (1)
- Ladybug (2)
- Ladyhawwk (224)
- Magik (208)
- Manipulated by Magic Forum Exclusive (3)
- Manipulated by Magik (184)
- Masks (1)
- Mellie Beans (1)
- Michael Calandra (1)
- Michael Landefeld (1)
- Monti's Scraps (17)
- Mystical Scraps (7)
- Naughty Angelz Creationz (5)
- Ocean (3)
- Old School (8)
- Pammers Passions (1)
- Paper Pack (5)
- Pimpin' PSPers Warehouse (5)
- Pinup Toons (3)
- PTU (1250)
- PTU Now FTU (2)
- PTU Tutorial (705)
- Purple (1)
- Purple's CT (16)
- Schnegge's Scraps (49)
- Scrap-A-Licious CT (20)
- Snags (32)
- Steampunk (2)
- Summer (2)
- Sweet Cravings Scraps (80)
- tag show off (5)
- Tasha's Playground (188)
- Template (24)
- Textures (2)
- Thanksgiving (3)
- Treasured Scraps (4)
- Tutorial (1298)
- Valentine (11)
- Wallpaper (21)
- Whisprd Designz Store (9)
- Wicked Princess Scraps (101)
- Wordart (16)