NO to AI

You will not find AI on my blog!
Where I Play

CT Teams


Friday, September 7, 2012

This tutorial was written by me. Any resemblance to any other tutorial is pure coincidence.Please DO NOT claim this tutorial as your own. It was written for PSP 9, but should be compatible with any version of PSP
I am using the artwork of Anna Marine. You need a license to use her tubes. You can buy this tube at Creative Design Outlet
I am using the artwork of Anna Marine. You need a license to use her tubes. You can buy this tube at Creative Design Outlet
I am using the PTU kit called Natures Jewel By Amy(Gimptastic Scraps). You can find where this kit is by going to Amy's Blog HERE
Open new image 600 x 600
Edit, copy Frame 5
Edit, paste, paste as new layer
Image, resize 85%
Using your magic wand click inside of frame
Select, Selections, Modify, Expand by 8
Edit, copy Paper 3
Edit, paste, paste as new layer
Layers, arrange, send to bottom
Selections, Invert
Edit, Clear
Selections, Select None
Select Raster 2
Effects, 3D Effects, Drop Shadow, with the settings of:
Vertical: 3
Horizontal: 3
Opacity: 50
Blur: 5
Color: Black
Shadow on new layer NOT checked
Edit, copy Tube
Edit, paste, paste as new layer
Select Raster 2
Layers, Duplicate
Layers, Arrange bring to top
Use your eraser tool to erase the excess frame around her face. I have erased all of the frame except for the bottom part of the frame so it covers up where the tube is cut off
Edit, copy Flower 2
Edit, paste, paste as new layer
Place behind tube and to the right
Image, Rotate, Free Rotate, left 10
Image, resize 85%
Effects, 3D Effects, Drop Shadow, Same settings
Layers, Duplicate
Image, Mirror
Edit, Copy Basket
Edit, paste, paste as new layer
Layers, arrange, bring to top
Image, resize 40%
Move to the left bottom of frame
Effects, 3D Effects, Drop Shadow, Same Settings
Edit, copy Apple
Edit, paste, paste as new layer
Move to the bottom left of the frame. Place in front of basket
Image, resize 40%
Effects, 3D Effects, Drop Shadow, same Settings
Edit, copy Fruit
Edit, paste, paste as new layer
Move to the left and next to the apple
Image, resize 40%
Effects, 3D Effects, Drop Shadow, Same Settings
Edit, copy Ball
Edit, paste, paste as new layer
Move behind the basket to make it look like it is in the basket
Image, resize 60%
Effects, 3D Effects, Drop Shadow, same settings
Edit, copy Lantern
Select Raster 2
Edit, paste, paste as new layer
Move to top right of frame. See my tag for placement
Image, resize 40%
Effects, 3D Effects, Drop Shadow, Same Settings
Edit, copy Jewel Scatter
Select Copy of Raster 2
Move to the bottom of the frame
Image, resize 85%
Effects, 3D Effects, Drop Shadow, Same Settings
Edit Copy Book
Edit, paste, paste as new layer
Move to the bottom right of frame
Image, resize 50%
Effects, 3D Effects, Drop Shadow, Same Settings
Edit, copy glasses
Edit, paste, paste as new layer
Move to the bottom right of frame and place on top of book
Image, resize 40%
Effects, 3D Effects, Drop Shadow, same Settings
Edit, copy Bottle
Edit, paste, paste as new layer
Move to right and place behind book
Image, resize 60%
Effects, 3D Effects, Drop Shadow, Same settings
My tag is just a guide
Remember to add your copyright info. Make sure it is plain and legible
Add your name to the tag
Save as PNG
Thursday, September 6, 2012
Seeing all the Halloween stuff going around I decided to make a new Halloween Template..This template is FTU..I just ask that if you should use it in a tutorial to please link back to my blog. There is a PSP and PSD file in the zip. Click on the preview below to take you to the download.

Wednesday, September 5, 2012

This tutorial was written by me. Any resemblance to any other tutorial is pure coincidence.Please DO NOT claim this tutorial as your own. It was written for PSP 9, but should be compatible with any version of PSP
I am using the artwork of Alex Prihodko. You need a license to use his tubes. You can buy this tube at PicsforDesign
I am using the PTU kit called Visions OF Autumn By Manipulated by Magik . You can buy this kit at Scrap-A-Licious
Open new image 600 x 600
Edit, copy Frame 2
Edit, paste, paste as new layer
Image, resize 80%
Using your magic wand click inside of frame
Select, Selections, Modify, Expand by 8
Edit, copy Paper 13
Edit, paste, paste as new layer
Layers, arrange, send to bottom
Selections, Invert
Edit, Clear
Selections, Select None
Select Raster 2
Effects, 3D Effects, Drop Shadow, with the settings of:
Vertical: 3
Horizontal: 3
Opacity: 50
Blur: 5
Color: Black
Shadow on new layer NOT checked
Edit, copy Tube
Edit, paste, paste as new layer
Image, resize by 40% or your preference
Effects, 3D Effects, Drop Shadow, Same settings
Select Raster 3
Edit, copy Tree 2
Edit, paste, paste as new layer
Image, resize 70%
Effects, 3D Effects, Drop Shadow, Same Settings
Edit, copy Old Log
Edit, paste, paste as new layer
Move to bottom of frame so that it looks like the tube is setting on the log
Image, resize 85%
Effects, 3D Effects, Drop Shadow, Same settings
Edit, Copy Leaf 3
Edit, paste, paste as new layer
Image, Mirror
Image, resize 80%
Move to the right of the frame and below the log
Effects, 3D Effects, Drop Shadow, Same Settings
Edit, copy Acorns
Edit, paste, paste as new layer
Move to the bottom left of the frame
Image, resize 60%
Effects, 3D Effects, Drop Shadow, same Settings
Edit, copy Chestnut
Edit, paste, paste as new layer
Move to the left and move below acorns
Image, resize 60%
Effects, 3D Effects, Drop Shadow, Same Settings
Edit, copy Hazelnuts
Edit, paste, paste as new layer
Move below acorns and chestnut and move to the left
Image, resize 60%
Image, rotate, free rotate, right, 20
Effects, 3D Effects, Drop Shadow, same settings
Edit, copy Walnut
Edit, paste, paste as new layer
Move to left between the acorns and hazelnuts. See my tag for placement
Image, resize 60%
Effects, 3D Effects, Drop Shadow, Same Settings
Edit, copy 2 Pumpkins
Layers, arrange, bring to top
Move to the bottom left of the frame. See my tag for placement
Image, resize 50%
Effects, 3D Effects, Drop Shadow, Same Settings
Edit Copy Dandeloins
Select Raster 2
Edit, paste, paste as new layer
Place behind the nuts. See my tag for placement
Effects, 3D Effects, Drop Shadow, Same Settings
Layers, duplicate
Image, resize 85%
Edit, copy word art
Edit, paste, paste as new layer
Move and place at the top of the frame. See my tag for placement
Image, resize 85%
Effects, 3D Effects, Drop Shadow, same Settings
My tag is just a guide
Remember to add your copyright info. Make sure it is plain and legible
Add your name to the tag
Save as PNG
Tuesday, September 4, 2012
Seeing all the Halloween stuff going around I decided to make a new Halloween Template..This template is FTU..I just ask that if you should use it in a tutorial to please link back to my blog. There is a PSP and PSD file in the zip. Click on the preview below to take you to the download.

Monday, September 3, 2012
This tutorial was written by me. Any resemblance to any other tutorial is pure coincidence.Please DO NOT claim this tutorial as your own. It was written for PSP 9, but should be compatible with any version of PSP
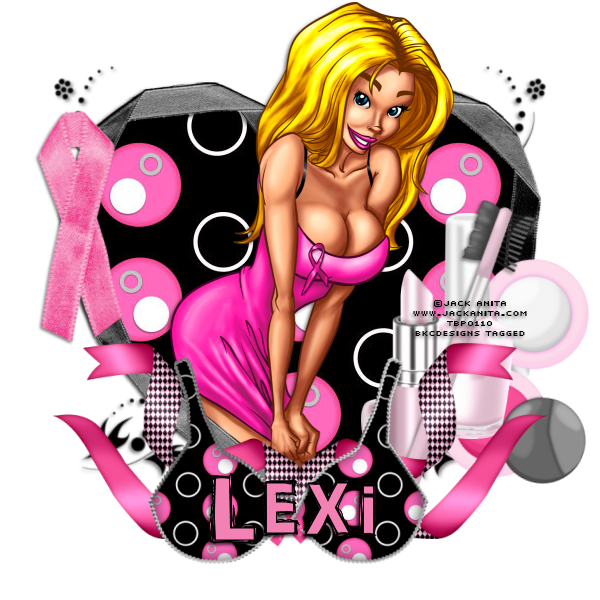
I am using the artwork of Jack Anita. You need a license to use his tubes. I received this tube through the Taking Back PSP Event
I am using the artwork of Jack Anita. You need a license to use his tubes. I received this tube through the Taking Back PSP Event
I am using the PTU kit called Hope Whispers BCA By Lexi Creationz Scrapz. You can buy this kit at Scrap-A-Licious
Open new image 600 x 600
Edit, copy Frame 1
Edit, paste, paste as new layer
Image, resize 80%
Using your magic wand click inside of frame
Select, Selections, Modify, Expand by 8
Edit, copy Paper 8
Edit, paste, paste as new layer
Layers, arrange, send to bottom
Selections, Invert
Edit, Clear
Selections, Select None
Select Raster 2
Effects, 3D Effects, Drop Shadow, with the settings of:
Vertical: 3
Horizontal: 3
Opacity: 50
Blur: 5
Color: Black
Shadow on new layer NOT checked
Edit, copy Tube
Edit, paste, paste as new layer
Effects, 3D Effects, Drop Shadow, Same settings
Select Raster 2
Layers, Duplicate
Layers, arrange bring to top
Use your eraser tool to erase the top of the frame from the tubes face. See my tag for what I mean
Edit, copy FlowerDoodle
Edit, paste, paste as new layer
Layers, arrange, move to bottom
Effects, 3D Effects, Drop Shadow, Same Settings
Image, rotate, free rotate, left 40
Layers, Duplicate
Image, Mirror
Edit, copy Ribbon 2
Edit, paste, paste as new layer
Move to bottom of frame
Image, resize 80%
Effects, 3D Effects, Drop Shadow, Same settings
Layers, Duplicate
Image, Mirror
Edit, Copy Lipstick
Edit, paste, paste as new layer
Image, resize 60%
Move to the right of the frame and below the ribbons..To the left just a bit..see my tag for placement
Effects, 3D Effects, Drop Shadow, Same Settings
Edit, copy Nailpolish
Edit, paste, paste as new layer
Place below the lipstick
Image, resize 60%
Effects, 3D Effects, Drop Shadow, same Settings
Edit, copy Brow Brush
Edit, paste, paste as new layer
Move to the right and place in front of lipstick and nailpolish
Image, resize 60%
Image, rotate, free rotate, right, 20
Effects, 3D Effects, Drop Shadow, Same Settings
Edit, copy Compact
Edit, paste, paste as new layer
Move below the brow brush, nail polish and lipstick
Image, resize 60%
Effects, 3D Effects, Drop Shadow, same settings
Image, rotate, free rotate, right, 20
Edit, copy Awareness Ribbon
Edit, paste, paste as new layer
Move to left of the frame. See my tag for placement
Image, resize 60%
Effects, 3D Effects, Drop Shadow, Same Settings
Edit, copy Bra
Layers, arrange, bring to top
Move to the bottom of the frame. See my tag for placement
Image, resize 70%
Effects, 3D Effects, Drop Shadow, Same Settings
My tag is just a guide
Remember to add your copyright info. Make sure it is plain and legible
Add your name to the tag
Save as PNG
 The kit for this is called Falling for Fall by Amy (Gimptastic Scraps) of Amy and Leah's Gimptastic Tuts. The scrapkit can be purchased at PicsforDesign.I made some extras for all of you, click on the tag to get the full size version. Please Do NOT alter these in anyway.


This tutorial was written by me. Any resemblance to any other tutorial is pure coincidence.Please DO NOT claim this tutorial as your own. It was written for PSP 9, but should be compatible with any version of PSP
I am using the artwork of PinupToons. You need a license to use her tubes. You can purchase this tube at Creative Design Outlet
I am using the artwork of PinupToons. You need a license to use her tubes. You can purchase this tube at Creative Design Outlet
I am using the FTU kit called Fall For All by Gimptastic Scraps.
Open new image 600 x 600
Edit, copy Frame 6
Edit, paste, paste as new layer
Image, resize 80%
Using your magic wand click inside of frame
Select, Selections, Modify, Expand by 8
Edit, copy Paper 5
Edit, paste, paste as new layer
Layers, arrange, send to bottom
Selections, Invert
Edit, Clear
Select Raster 2
Effects, 3D Effects, Drop Shadow, with the settings of:
Vertical: 3
Horizontal: 3
Opacity: 50
Blur: 5
Color: Black
Shadow on new layer NOT checked
Edit, copy Tube
Edit, paste, paste as new layer
Effects, 3D Effects, Drop Shadow, Same settings
Edit, copy Wagon
Edit, paste, paste as new layer
Layers, arrange, move down below tube. See my tag for placement
Image, resize 75%
Effects, 3D Effects, Drop Shadow, Same Settings
Edit, copy Flower 2
Edit, paste, paste as new layer
Move to place below the wagon. See my tag for placement
Effects, 3D Effects, Drop Shadow, Same settings
Edit, Copy Pumpkin
Edit, paste, paste as new layer
Image, resize 60%
Image, resize 80%
Move to the right of the frame and place in front of the wagon
Effects, 3D Effects, Drop Shadow, Same Settings
Edit, copy Leaves 1
Edit, paste, paste as new layer
Image, Mirror
Move to the right and above the sunflower
Image, resize 75%
Effects, 3D Effects, Drop Shadow, same Settings
Edit, copy Berries 2
Edit, paste, paste as new layer
Image, Mirror
Move to the left. See my tag for placement
Effects, 3D Effects, Drop Shadow, Same Settings
Edit, copy Apple
Edit, paste, paste as new layer
Move to the bottom left of the frame. See my tag for placement
Image, resize 40%
Effects, 3D Effects, Drop Shadow, same settings
Edit, copy Pear
Edit, paste, paste as new layer
Move to place below the apple
Image, resize 50%
Effects, 3D Effects, Drop Shadow, Same Settings
Edit, copy Corn
Place between apple and pear
Image, resize 60%
Image, rotate, free rotate, left, 20
Effects, 3D Effects, Drop Shadow, Same Settings
Edit, copy Acorn
Edit, paste, paste as new layer
Image, resize 40%
Move to place at the bottom right of the frame in front of the wagon. See my tag for placement
Image, rotate, free rotate, 20, left
Effects, 3D Effects, Drop Shadow, Same Settings
Edit, copy Owl
Edit, Paste, paste as new layer
Image, resize 50%
Place to look like it is setting on the wagon
Effects, 3D Effects, Drop Shadow, Same Settings
My tag is just a guide
Remember to add your copyright info. Make sure it is plain and legible
Add your name to the tag
Save as PNG
Subscribe to:
Posts
(Atom)