NO to AI

You will not find AI on my blog!
Where I Play

CT Teams


Friday, September 30, 2016

I am using the artwork of Elias Chatzoudis. You need a license to use this tube. You can buy the tube at CDO
I am using the PTU kit IB Elias Chatzoudis 110-1 by Ladyhawwk Designs. You can find this kit at CDO
Open new image 600 x 600
Edit, Copy Frame 1
Edit, paste, paste as new layer
Image, resize 70%
With your magic wand click inside of the frame
Selections, Modify, Expand by 8
Edit, copy Paper 2
Edit, paste, paste as new layer
Layers, arrange, send to bottom
Selections, Invert
Edit, Clear
Edit, copy Ele 21
Edit, paste, paste as new layer
Edit, Clear
Selections, Select None
Select Raster 2
Effects, 3D Effects, Drop Shadow, Settings of:
Vertical : 2
Horizontal: 2
Opacity: 50
Blur: 6
Color: Black
Shadow on new layer NOT Checked
Edit, copy Tube
Edit, paste, paste as new layer
Image, resize to fit your tag
Effects, 3D Effects, Drop Shadow, Same Settings
Select Raster 2
Edit, Copy Ele 29
Edit, paste, paste as new layer
Move to the bottom of the frame
Image, resize 70%
Effects, 3D Effects, Drop Shadow, Same Settings
Edit, copy Ele 26
Edit, paste, paste as new layer
Image, resize 50%
Move to the bottom right of the tag behind the tube
Effects, 3D Effects, Drop Shadow, Same Settings
Select Raster 2
Edit, copy Ele 16
Edit, paste, paste as new layer
Image, resize 70%
Move to the right side of the frame
Effects, 3D Effects, Drop Shadow, Same Settings
Edit, copy Ele 18
Edit, paste, paste as new layer
Image, resize 70%
Image, Mirror
Move to the right and move up some. See my tag for placement
Effects, 3D Effects, Drop Shadow, Same Settings
Edit, copy Ele 28
Edit, paste, paste as new layer
Image, resize 70%
Image, Mirror
Move to the bottom left placing behind the tube and on top of the leaves
Effects, 3D Effects, Drop Shadow, Same Settings
Edit, copy Ele 27
Edit, paste, paste as new layer
Image, resize 70%
Move to the right and place in front of the rock but behind the pumpkins
Effects, 3D Effects, Drop Shadow, Same Settings
Edit, copy Ele 25
Edit, paste, paste as new layer
Move to the left side of the frame
Layers, arrange, send to bottom
Effects, 3D Effects, Drop Shadow, Same settings
Layers, Duplicate
Image, Mirror
Edit, copy Ele 24
Edit, paste, paste as new layer
Layers, Arrange, bring to top
Image, resize 70%
Move to the right and move up in front of the rock and over to the right some. See my tag for placement
Effects, 3D Effects, Drop Shadow, Same settings
Edit, copy Ele 15
Edit, paste, paste as new layer
Image, resize 50%
Move to the right placing behind the tube. See my tag for placement
Effects, 3D Effects, Drop Shadow, Same settings
Remember to add your copyright info. Make sure it is plain and legible
Add your name to the tag
Save as PNG

I am using the artwork of Enamorte. You need a license to use this tube. You can buy the tube at CDO
I am using the PTU kit Dark Dreams by Tasha's Playground. You can find this kit at CDO
Open new image 600 x 600
Edit, Copy Frame 06
Edit, paste, paste as new layer
Image, resize 80%
With your magic wand click inside of the frame
Selections, Modify, Expand by 8
Edit, copy Paper 01
Edit, paste, paste as new layer
Layers, arrange, send to bottom
Selections, Invert
Edit, Clear
Selections, Select None
Select Raster 2
Effects, 3D Effects, Drop Shadow, Settings of:
Vertical : 2
Horizontal: 2
Opacity: 50
Blur: 6
Color: Black
Shadow on new layer NOT Checked
Edit, Copy e31
Edit, paste, paste as new layer
Image, resize 90%
Layers, arrange, send to bottom
Effects, 3D Effects, Drop Shadow, same Settings
Edit, Copy Tube
Edit, paste, paste as new layer
Layers, arrange, bring to top
Image, resize 80%
Effects, 3D Effects, Drop Shadow, Same Settings
Select Raster 2
Layers, Duplicate
Layers, arrange, bring to top
Using your eraser brush erase all but the little strip at the bottom of the frame so that it will cover up the cut off of the tube I am using
Edit, copy e20
Edit, paste, paste as new layer
Image, resize 50%
Move to the top right of the frame
Layers, arrange, send to bottom
Effects, 3D Effects, Drop Shadow, same settings
Edit, copy e05
Edit, paste, paste as new layer
Layers, arrange, bring to top
Move to the right side of the frame
Effects, 3D Effects, Drop Shadow, same Settings
Edit, Copy e02
Edit, paste, paste as new layer
Image, resize 50%
Move to the bottom left of the frame
Effects, 3D Effects, Drop Shadow, Same Settings
Select Raster 2
Edit, copy e21
Edit, paste, paste as new layer
Image, resize 60%
Move to near the top left of the frame
Effects, 3D Effects, Drop Shadow, Same Settings
Edit, copy e47
Edit, paste, paste as new layer
Layers, arrange, bring to top
Image, resize 60%
Move to the bottom left of the frame
Effects, 3D Effects, Drop Shadow, Same Settings
Layers, Duplicate
Image, Mirror
Select Raster 2
Edit, copy e67
Edit, paste, paste as new layer
Image, resize 60%
Move to the top right of the frame
Effects, 3D Effects, Drop Shadow, Same Settings
Layers, Duplicate
Image, mirror
Edit, copy e11
Edit, paste, paste as new layer
Move to the bottom below the blue leaves
Image, rotate, free rotate, right 50
Image, resize 50%
Effects,3D Effects, Drop Shadow, Same settings
Layers, Duplicate
Image, Mirror
Remember to add your copyright info. Make sure it is plain and legible
Add your name to the tag
Save as PNG
Tuesday, September 27, 2016

I am using the artwork of Anna Liwanag. You need a license to use this tube. You can buy this tube at CDO
I am using the PTU Kit Spellbound-mini by Gimptastic Scraps . This kit is exclusive to CDO
Open new image 600 x 600
Edit, Copy Frame 2
Edit, paste, paste as new layer
Image, resize 70%
Move down your image some
With your magic wand click inside of the frame
Selections, Modify, Expand by 8
Edit, copy Paper 4
Edit, paste, paste as new layer
Layers, arrange, send to bottom
Selections, Invert
Edit, Clear
Edit, copy Ele 31
Edit, paste, paste as new layer
Edit, clear
Selections, Select None
Select Raster 2
Effects, 3D Effects, Drop Shadow, Settings of:
Vertical : 2
Horizontal: 2
Opacity: 65
Blur: 5
Color: Black
Shadow on new layer NOT Checked
Edit, copy Ele 34
Edit, paste, paste as new layer
Image, resize 80%
Move to the right side of the frame
Effects, 3D Effects, Drop Shadow, Same settings
Select Raster 2
Edit, copy Ele 5
Edit, paste, paste as new layer
Image, Mirror
Image, resize 70%
Move to the right and place beneath the tree. See my tag for placement
Effects, 3D Effects, Drop Shadow, Same Settings
Edit, copy Tube
Edit, paste, paste as new layer
Layers, arrange, bring to top
Image, resize 70%
Effects, 3D Effects, Drop Shadow, Same Settings
Edit, copy Ele 30
Edit, paste, paste as new layer
Image, resize 60%
Move to the right and place it in front of the tree
Effects, 3D Effects, Drop Shadow, Same settings
Edit, Copy Ele 1
Edit, paste, paste as new layer
Image, Mirror
Image, resize 60%
Move to the right and place at the bottom of the headstone
Effects, 3D Effects, Drop Shadow, same Settings
Select Raster 2
Edit, copy Ele 24
Edit, paste, paste as new layer
Move to the bottom left of the frame
Image, resize 70%
Effects, 3D Effects, Drop Shadow, Same Settings
Edit, copy Ele 8
Edit, paste, paste as new layer
Move to the right side of the frame
Layers, arrange, send to bottom
Effects, 3D Effects, Drop Shadow, Same Settings
Layers, Duplicate
Image, Mirror
Edit, copy Ele 25
Edit, paste, paste as new layer
Move up toward the top of the frame
Image, resize 70%
Effects, 3D Effects, Drop Shadow, same setting
Edit, copy Ele 4
Edit, paste, paste as new layer
Image, resize 70%
Layers, arrange, bring to top
Move to the left side in front of the tube. See my tag for placement
Effects, 3D Effects, Drop Shadow, Same Settings
Edit, copy Ele 9
Edit, paste, paste as new layer
Move to the right and place on a branch of the tree
Image, resize 60%
Effects, 3D Effects, Drop Shadow, Same Settings
Select Raster 2
Edit, copy Ele 42
Edit, paste, paste as new layer
Effects, 3D effects, Drop Shadow, Same Settings
Edit, copy Ele 23
Edit, paste, paste as new layer
Layers, arrange, send to bottom
Move up just a bit
Effects, 3D Effects, Drop Shadow, Same Settings
Edit, Copy Ele 41
Edit, paste, paste as new layer
Image, resize 60%
Layers, arrange, bring to top
Move to the bottom right and sit on the arm bone
Effects, 3D Effects, Drop Shadow, Same Settings
Remember to add your copyright info. Make sure it is plain and legible
Add your name to the tag
Save as PNG
Saturday, September 24, 2016

I am using the artwork of Arthur Crowe. You must have a license to use this tube. You can buy the tube at his store HERE
I am using the kit Season of Colour by Manipulated by Magik. You can buy this kit only at the new site store found HERE
Open new image 600 x 600
Edit, Copy Frame 3
Edit, paste, paste as new layer
Image, rotate, free rotate, right 90
Image, resize 70%
With your magic wand click inside of the frame
Selections, Modify, Expand by 8
Edit, copy Paper 7
Edit, paste, paste as new layer
Layers, arrange, send to bottom
Selections, Invert
Edit, Clear
Selections, Select None
Select Raster 2
Effects, 3D Effects, Drop Shadow, Settings of:
Vertical : 2
Horizontal: 2
Opacity: 50
Blur: 6
Color: Black
Shadow on new layer NOT Checked
Edit, copy Tube
Edit, paste, paste as new layer
Image, resize to fit your tag
Effects, 3D Effects, Drop Shadow, Same Settings
Select Raster 2
Edit, copy Tree Stump
Edit, paste, paste as new layer
Image, Mirror
Move to the left side of the frame
Effects, 3D Effects, Drop Shadow, Same Settings
Edit, copy Leaves
Edit, paste, paste as new layer
Layers, arrange, bring to top
Move to the bottom left of the frame placing in front of the tree and the cut off legs of the tube
Effects, 3D Effects, Drop Shadow, Same Settings
Layers, Duplicate
Image, Mirror
Edit, copy Acorns 2
Edit, paste, paste as new layer
Image, resize 30%
Move to place on the tree..see my tag for placement
Effects, 3D Effects, Drop Shadow, Same Settings
Edit, Copy Harvest Pumpkin
Edit, paste, paste as new layer
Image, resize 60%
Layers, arrange, bring to top
Move to the bottom left of the frame in front of the tree on top of the leaves
Effects, 3D Effects, Drop Shadow, Same Settings
Edit, copy Mushrooms
Edit, paste, paste as new layer
Image, resize 40%
Move to the far left placing behind the pumpkin and to the left..see my tag for placement
Effects, 3D Effects, Drop Shadow, Same Settings
Edit, copy Rose
Edit, paste, paste as new layer
Image, resize 60%
Image, Mirror
Move to place in front of the tree stump and move to the left
Effects, 3D Effects, Drop Shadow, Same Settings
Edit, copy Cider Barrel
Edit, paste, paste as new layer
Image, resize 60%
Move to the right and place on the leaves. See my tag for placement
Effects, 3D Effects, Drop Shadow, Same Settings
Edit, copy Owl
Edit, paste, paste as new layer
Image, resize 30%
Move to the left and move up to place on top of the acorns.
Effects, 3D Effects, Drop Shadow, same settings
Edit, copy Doodle
Edit, paste, paste as new layer
Image, Mirror
Layers, arrange, send to bottom
Move to the right. See how I have it on my tag
Effects, 3D Effects, Drop Shadow, Same settings
Layers, Duplicate
Image, Mirror
Edit, copy Foliage
Edit, paste, paste as new layer
Image, resize 60%
Move to Raster 2 and move to the top of the frame
Effects, 3D Effects, Drop Shadow, Same settings
Edit, copy Peacock
Edit, Paste, paste as new layer
Image, resize 50%
Move to the right and place on top of the barrel
Effects, 3D Effects, Drop Shadow, Same Settings
Edit, copy Snail
Edit, paste, paste as new layer
Image, resize 30%
Layers, arrange, bring to top
Move to the far left placing on the leaves in front and to the left of the pumpkin
Effects, 3D Effects, Drop Shadow, Same Settings
Edit, copy Bunny
Edit, paste, paste as new layer
Move to the right to place in front of the barrel
Image, resize 40%
Effects, 3D Effects, Drop Shadow, Same Settings
Remember to add your copyright info. Make sure it is plain and legible
Add your name to the tag
Save as PNG
Friday, September 23, 2016

I am using the artwork of Anna Liwanag. You need a license to use this tube. You can buy the tube at CDO
I am using the PTU kit Anna Liwanag Package 92 by Ladyhawwk Designs. You can find this kit at CDO
Open new image 600 x 600
Edit, Copy Frame 4
Edit, paste, paste as new layer
Image, resize 80%
With your magic wand click inside of the frame
Selections, Modify, Expand by 8
Edit, copy Paper 11
Edit, paste, paste as new layer
Layers, arrange, send to bottom
Selections, Invert
Edit, Clear
Selections, Select None
Select Raster 2
Effects, 3D Effects, Drop Shadow, Settings of:
Vertical : 2
Horizontal: 2
Opacity: 50
Blur: 6
Color: Black
Shadow on new layer NOT Checked
Edit, copy Tube
Edit, paste, paste as new layer
Image, resize to fit your tag
Effects, 3D Effects, Drop Shadow, Same Settings
Select Raster 2
Edit, Copy Ele 47
Edit, paste, paste as new layer
Move to the top of the frame
Image, resize 65%
Effects, 3D Effects, Drop Shadow, Same Settings
Edit, copy Ele 30
Edit, paste, paste as new layer
Image, resize 50%
Layers, arrange, bring to top
Move to the bottom of the tube to cover the cut off legs
Effects, 3D Effects, Drop Shadow, Same Settings
Edit, copy Ele 26
Edit, paste, paste as new layer
Image, resize 40%
Move to the left bottom placing behind the previous element
Effects, 3D Effects, Drop Shadow, Same Settings
Layers, Duplicate
Image, Mirror
Edit, copy Ele 12
Edit, paste, paste as new layer
Image, resize 50%
Move to Raster 2 and move to the left side of the frame
Effects, 3D Effects, Drop Shadow, Same Settings
Select Raster 2
Edit, copy Ele 32
Edit, paste, paste as new layer
Image, resize 80%
Effects, 3D Effects, Drop Shadow, Same Settings

I am using the artwork of Anna Liwanag. You need a license to use this tube. You can buy the tube at CDO
I am using the PTU kit Anna Liwanag Package 92 by Ladyhawwk Designs. You can find this kit at CDO
Open new image 600 x 600
Edit, Copy Element 62
Edit, paste, paste as new layer
Image, resize 80%
With your magic wand click inside of the frames
Selections, Modify, Expand by 8
Edit, copy Paper 2
Edit, paste, paste as new layer
Layers, arrange, send to bottom
Selections, Invert
Edit, Clear
Edit, copy Ele 43
Edit, paste, paste as new layer
Image, resize 60%
Edit, Clear
Selections, Select None
Select Raster 2
Effects, 3D Effects, Drop Shadow, Settings of:
Vertical : 2
Horizontal: 2
Opacity: 50
Blur: 6
Color: Black
Shadow on new layer NOT Checked
Edit, copy Tube
Edit, paste, paste as new layer
Image, resize to fit your tag
Move to the bottom of the frame and move to the left some. See my tag for placement
Effects, 3D Effects, Drop Shadow, Same Settings
Edit, Copy Ele 50
Edit, paste, paste as new layer
Layers, arrange, send to bottom
Effects, 3D Effects, Drop Shadow, Same Settings
Select Raster 2
Edit, copy Ele 15
Edit, paste, paste as new layer
Image, resize 50%
Move to the bottom left of the frame behind the tube
Effects, 3D Effects, Drop Shadow, Same Settings
Edit, copy Ele 18
Edit, paste, paste as new layer
Image, resize 80%
Move to the left and place behind the watering can
Effects, 3D Effects, Drop Shadow, Same Settings
Edit, copy Ele 46
Edit, paste, paste as new layer
Image, resize 50%
Move to the bottom right of the frame, moving down enough so that the hand of the tube is on the packages
Effects, 3D Effects, Drop Shadow, Same Settings
Select Raster 2
Edit, copy Ele 40
Edit, paste, paste as new layer
Image, resize 60%
Move to the bottom right of the frame behind the packages and to the right
Effects, 3D Effects, Drop Shadow, Same Settings
Edit, copy Ele 32
Edit, paste, paste as new layer
Image, resize 60%
Move to the left and place in front of the sign and move down so it looks to be wrapped around the sign
Effects, 3D Effects, Drop Shadow, Same Settings
Edit, copy Ele 6
Edit, paste, paste as new layer
Image, resize 60%
Move to the right side of the frame
Layers, arrange, send to bottom
Move up once to go above the splatter
Place on the side of the frame
Effects, 3D Effects, Drop Shadow, Same settings
Edit, copy Ele 65
Edit, paste, paste as new layer
Layers, arrange, bring to top
Image, resize 30%
Place on the sign on the right side. See my tag for placement
Effects, 3D Effects, Drop Shadow, Same settings
Select Raster 2
Edit, copy Ele 22
Edit, paste, paste as new layer
Image, resize 20%
Move to place on the left side of the tube. See my tag for placement
Effects, 3D Effects, Drop Shadow, Same settings
Remember to add your copyright info. Make sure it is plain and legible
Add your name to the tag
Save as PNG

I am using the artwork of Anna Liwanag. You need a license to use this tube. You can buy the tube at CDO
I am using the PTU kit Anna Liwanag Package 92 by Ladyhawwk Designs. You can find this kit at CDO
Open new image 600 x 600
Edit, Copy Frame 3
Edit, paste, paste as new layer
Image, resize 70%
With your magic wand click inside of the frame
Selections, Modify, Expand by 8
Edit, copy Paper 1
Edit, paste, paste as new layer
Layers, arrange, send to bottom
Selections, Invert
Edit, Clear
Selections, Select None
Select Raster 2
Effects, 3D Effects, Drop Shadow, Settings of:
Vertical : 2
Horizontal: 2
Opacity: 50
Blur: 6
Color: Black
Shadow on new layer NOT Checked
Edit, copy Tube
Edit, paste, paste as new layer
Image, resize 70%
Move to the bottom of the frame
Effects, 3D Effects, Drop Shadow, Same Settings
Select Raster 2
Edit, Copy Ele 63
Edit, paste, paste as new layer
Image, resize 80%
Move to the right side of the frame behind the tube
Effects, 3D Effects, Drop Shadow, Same Settings
Edit, copy Ele 14
Edit, paste, paste as new layer
Image, resize 40%
Image, Mirror
Layers, arrange, bring to top
Move to the bottom right and place near the bottom of the column on the right
Effects, 3D Effects, Drop Shadow, Same Settings
Edit, copy Ele 27
Edit, paste, paste as new layer
Image, resize 30%
Image, Mirror
Move to the right and move down below the other flower
Effects, 3D Effects, Drop Shadow, Same Settings
Edit, copy Ele 31
Edit, paste, paste as new layer
Image, resize 40%
Image, Mirror
Move to the right placing behind the other flowers and moving to the right side of the column
Effects, 3D Effects, Drop Shadow, Same Settings
Select Raster 2
Edit, copy Ele 7
Edit, paste, paste as new layer
Image, resize 60%
Move to the bottom left of the frame
Effects, 3D Effects, Drop Shadow, Same Settings
Edit, copy Ele 57
Edit, paste, paste as new layer
Image, resize 50%
Move to place on top of the chest on the left
Effects, 3D Effects, Drop Shadow, Same Settings
Edit, copy Ele 42
Edit, paste, paste as new layer
Image, resize 40%
Layers, arrange, bring to top
Move in front of the tube to make it look like she is drinking it
Effects, 3D Effects, Drop Shadow, Same settings
Edit, copy Ele 4
Edit, paste, paste as new layer
Move behind the tubes feet and place in front of the chest on the left
Image, resize 40%
Effects, 3D Effects, Drop Shadow, Same settings
Edit, copy Ele 2
Edit, paste, paste as new layer
Image, resize 40%
Move to the left placing behind the purse and in front of the chest
Effects, 3D Effects, Drop Shadow, Same settings
Select Raster 2
Edit, copy Ele 21
Edit, paste, paste as new layer
Image, resize 60%
Move to the top of the frame placing it in the middle
Effects, 3D Effects, Drop Shadow, Same settings
Edit, copy Ele 60
Edit, paste, paste as new layer
Layers, arrange, send to bottom
Image, resize 70%
Move to the left side of the frame
Effects, 3D Effects, Drop Shadow, Same Settings
Layers, Duplicate
Image, Mirror
Remember to add your copyright info. Make sure it is plain and legible
Add your name to the tag
Save as PNG
Saturday, September 17, 2016

I am using the artwork of Barbara Jensen. You need a license to use this tube. You can buy this tube at her store HERE
I am using the PTU kit Color Field by Ladyhawwk Designs You can find this kit exclusively at Barbara Jensen’s store HERE
Open new image 600 x 600
Edit, Copy Frame 3
Edit, paste, paste as new layer
Image, resize 70%
With your magic wand click inside of the frame
Selections, Modify, Expand by 8
Edit, copy Paper 10
Edit, paste, paste as new layer
Layers, arrange, send to bottom
Selections, Invert
Edit, Clear
Selections, Select None
Select Raster 2
Effects, 3D Effects, Drop Shadow, Settings of:
Vertical : 2
Horizontal:2
Opacity: 50
Blur: 6
Color: Black
Shadow on new layer NOT Checked
Edit, Copy Ele 23
Edit, paste, paste as new layer
Image, resize 40%
Move to the bottom of your frame
Effects, 3D Effects, Drop Shadow, same Settings
Edit, Copy Ele 38
Edit, paste, paste as new layer
Image, resize 40%
Move to the bottom of the frame
Effects, 3D Effects, Drop Shadow, Same Settings
Edit, copy Tube
Edit, paste, paste as new layer
Move to look like tube is sitting on the bench
Image, resize to fit your tag
Effects, 3D Effects, Drop Shadow, Same Settings
Select Raster 2
Edit, copy Ele 25
Edit, paste, paste as new layer
Image, rotate, free rotate, right 90
Image, resize 40%
Move to the top of the frame
Effects, 3D Effects, Drop Shadow, Same Settings
Edit, copy Ele 42
Edit, paste, paste as new layer
Move to the bottom left behind the bench and in front of the fence
Image, resize 50%
Effects, 3D Effects, Drop Shadow, Same Settings
Select The Fence
Edit, copy Ele 26
Edit, paste, paste as new layer
Image, resize 50%
Move to the left side of the tag in front of the fence
Effects, 3D Effects, Drop Shadow, same Settings
Edit, Copy Ele 33
Edit, paste, paste as new layer
Image, resize 40%
Move in front of the fence and move all the way down to the bottom of the fence
Effects, 3D Effects, Drop Shadow, Same Settings
Edit, copy Ele 52
Edit, paste, paste as new layer
Image, resize 40%
Move to the right side of the frame beside the bench but behind it and in front of the fence
Effects, 3D Effects, Drop Shadow, Same Settings
Edit, copy Ele 10
Edit, paste, paste as new layer
Image, resize 40%
Move to the far left of the frame behind the herb box
Effects, 3D Effects, Drop Shadow, Same Settings
Layers, Duplicate
Image, Mirror
Move back and place beside the original
Layers, arrange, move down
Edit, copy Ele 15
Edit, paste, paste as new layer
Image, resize 40%
Move to right side of the frame placing this element behind the flower that is laying at the bottom of the fence
Effects, 3D Effects, Drop Shadow, Same Settings
Edit, Copy Ele 21
Edit, paste, paste as new layer
Image, resize 30%
Layers, arrange, bring to top
Move to the top left placing on the flower there
Effects, 3D Effects, Drop Shadow, Same Settings
Edit, copy Ele 51
Edit, paste, paste as new layer
Image, resize 40%
Move in front of the fence and to the left side of the tube some
Effects, 3D Effects, Drop Shadow, Same settings
Layers, Duplicate
Image, Mirror
Remember to add your copyright info. Make sure it is plain and legible
Add your name to the tag
Save as PNG
Friday, September 16, 2016

I am using the artwork of Enys Guerrero. You need a license to use this tube. You can buy this tube at CDO
I am using the PTU Kit IB Enys Guerrero 15-1 by Gimptastic Scraps . This kit is exclusive to CDO
Open new image 600 x 600
Edit, Copy Frame 2
Edit, paste, paste as new layer
Image, resize 70%
Move down your image some
With your magic wand click inside of the frame
Selections, Modify, Expand by 8
Edit, copy Paper 1
Edit, paste, paste as new layer
Layers, arrange, send to bottom
Selections, Invert
Edit, Clear
Edit, copy Tube
Edit, paste, paste as new layer
Image, Resize 70%
Edit, clear
Selections, Select None
Effects, 3D Effects, Drop Shadow, Settings of:
Vertical : 2
Horizontal: 2
Opacity: 65
Blur: 5
Color: Black
Shadow on new layer NOT Checked
Select Raster 2
Effects, 3D Effects, Drop Shadow, Same settings
Edit, copy Ele 4
Edit, paste, paste as new layer
Image, resize 80%
Layers, arrange, send to bottom
Effects, 3D Effects, Drop Shadow, Same settings
Edit, copy Ele 23
Edit, paste, paste as new layer
Image, resize 80%
Effects, 3D Effects, Drop Shadow, Same Settings
Edit, copy Ele 9
Edit, paste, paste as new layer
Image, resize 60%
Layers, arrange, bring to top
Move to the bottom right of the frame
Effects, 3D Effects, Drop Shadow, Same Settings
Edit, copy Ele 3
Edit, paste, paste as new layer
Image, resize 40%
Move to the top left of the frame
Effects, 3D Effects, Drop Shadow, Same settings
Edit, Copy Ele 14
Edit, paste, paste as new layer
Move to the left side of the frame
Layers, arrange, send to bottom
Move up two times
Image, resize 50%
Move to the top just a bit.see my tag for placement
Effects, 3D Effects, Drop Shadow, same Settings
Layers, Duplicate
Move down so it is below the original. See my tag for placement
Edit, copy Ele 11
Edit, paste, paste as new layer
Layers, arrange, bring to top
Image, resize 50%
Move to the top right of the frame
Image, rotate, free rotate, right 20
Effects, 3D Effects, Drop Shadow, Same Settings
Edit, copy Ele 6
Edit, paste, paste as new layer
Image, resize 50%
Move to the bottom left of the frame
Effects, 3D Effects, Drop Shadow, Same Settings
Edit, copy Ele 17
Edit, paste, paste as new layer
Move to right side of the tag
Layers, arrange, send to bottom
Move up two times
Effects, 3D Effects, Drop Shadow, same setting
Edit, copy Ele 10
Edit, paste, paste as new layer
Image, resize 40%
Move to the top left side of the frame placing on top of the grind there
Image, rotate, free rotate, right, 20
Effects, 3D Effects, Drop Shadow, Same Settings
Edit, copy Ele
Edit, paste, paste as new layer
Layers, arrange, send to bottom
Effects, 3D Effects, Drop Shadow, Same Settings
Remember to add your copyright info. Make sure it is plain and legible
Add your name to the tag
Save as PNG
Sunday, September 11, 2016
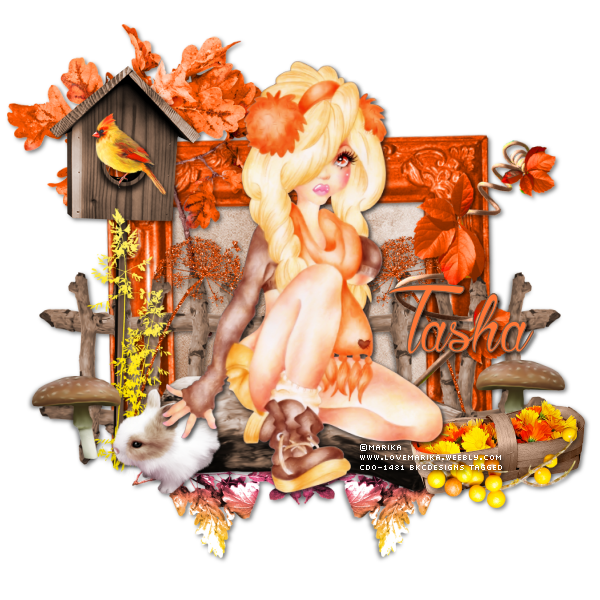
I am using the artwork of Marika. You need a license to use this tube. You can buy the tube at CDO
I am using the PTU kit Autumn Sunrise by Tasha's Playground. You can find this kit at CDO
Open new image 600 x 600
Edit, Copy Frame 01
Edit, paste, paste as new layer
Image, rotate, free rotate, left 87
Image, resize 80%
With your magic wand click inside of the frame
Selections, Modify, Expand by 8
Edit, copy Paper 08
Edit, paste, paste as new layer
Layers, arrange, send to bottom
Selections, Invert
Edit, Clear
Selections, Select None
Select Raster 2
Effects, 3D Effects, Drop Shadow, Settings of:
Vertical : 2
Horizontal: 2
Opacity: 50
Blur: 6
Color: Black
Shadow on new layer NOT Checked
Edit, Copy e08
Edit, paste, paste as new layer
Image, resize 60%
Move to the bottom left of the frame
Effects, 3D Effects, Drop Shadow, same Settings
Layers, Duplicate
Image, Mirror
Edit, Copy e18
Edit, paste, paste as new layer
Image, resize 70%
Move to the bottom of the fence
Effects, 3D Effects, Drop Shadow, Same Settings
Edit, copy Tube
Edit, paste, paste as new layer
Image, resize 80%
Move to sit on the log
Effects, 3D Effects, Drop Shadow, same settings
Edit, copy e38
Edit, paste, paste as new layer
Move to the left side of the frame
Effects, 3D Effects, Drop Shadow, same Settings
Edit, Copy e57
Edit, paste, paste as new layer
Image, resize 30%
Move to place it on the hole of the birdhouse
Effects, 3D Effects, Drop Shadow, Same Settings
Edit, copy e14
Edit, paste, paste as new layer
Image, Mirror
Image, resize 50%
Move to left side of the log making sure it is below the tube so it looks like the tube is petting the rabbit
Effects, 3D Effects, Drop Shadow, Same Settings
Edit, copy e13
Edit, paste, paste as new layer
Image, resize 60%
Image, Mirror
Move to the left placing on the stem of the birdhouse
Effects, 3D Effects, Drop Shadow, Same Settings
Edit, copy e33
Edit, paste, paste as new layer
Image, resize 50%
Move to the right in front of the log and fence. See my tag for placement
Effects, 3D Effects, Drop Shadow, Same Settings
Edit, copy e32
Edit, paste, paste as new layer
Image, Mirror
Image, resize 60%
Move to the right side placing in front of the fence
Effects,3D Effects, Drop Shadow, Same settings
Select Raster 2
Edit, copy e16
Edit, paste, paste as new layer
Image, resize 70%
Image, rotate, free rotate, left 90
Move behind the birdhouse and pull up some
Effects, 3D Effects, Drop Shadow, same settings
Edit, copy e41
Edit, paste, paste as new layer
Image, resize 50%
Layers, arrange, bring to top
Image, Flip
Move to the bottom right placing in front of the basket of flowers
Effects, 3D Effects, Drop Shadow. Same Settings
Edit, copy e06
Edit, paste, paste as new layer
Image, Mirror
Image, resize 60%
Move to the left placing in front of the fence and to the left of the tube
Effects, 3D Effects, Drop Shadow, Same settings
Layers, Duplicate
Image, Mirror
Edit, copy e22
Edit, paste, paste as new layer
Image, resize 60%
Move to the right placing in front of the fence on the very far right
Effects, 3D Effects, Drop Shadow Same Settings
Layers, Duplicate
Image, mirror
Edit, copy e04
Edit, paste, paste as new layer
Image, resize 60%
Move below the log and pull down some. Move to the left
Effects, 3D effects, Drop Shadow, Same settings
Layers, Duplicate
Image, mirror
Remember to add your copyright info. Make sure it is plain and legible
Add your name to the tag
Save as PNG
Friday, September 9, 2016

I am using the artwork of Cuddly Rigor Mortis. You need a license to use this tube. You can buy this tube at CDO
I am using the PTU Kit Cuddly Rigor Mortis Package 103 by Gimptastic Scraps . This kit is exclusive to CDO
Open new image 600 x 600
Edit, Copy Frame 5
Edit, paste, paste as new layer
Image, resize 70%
Move down your image some
With your magic wand click inside of the frame
Selections, Modify, Expand by 8
Edit, copy Paper 3
Edit, paste, paste as new layer
Layers, arrange, send to bottom
Selections, Invert
Edit, Clear
Edit, copy Ele 24
Edit, paste, paste as new layer
Move to the top of the frame
Edit, clear
Selections, Select None
Select Raster 2
Effects, 3D Effects, Drop Shadow, Settings of:
Vertical : 2
Horizontal: 2
Opacity: 65
Blur: 5
Color: Black
Shadow on new layer NOT Checked
Edit, copy Ele 39
Edit, paste, paste as new layer
Image, resize 70%
Move to the bottom of the frame
Effects, 3D Effects, Drop Shadow, Same settings
Edit, copy Tube
Edit, paste, paste as new layer
Image, resize 70%
Effects, 3D Effects, Drop Shadow, Same Settings
Select Raster 2
Edit, copy Ele 37
Edit, paste, paste as new layer
Image, resize 60%
Move to the bottom left of the frame. See my tag for placement
Effects, 3D Effects, Drop Shadow, Same Settings
Edit, copy Ele 25
Edit, paste, paste as new layer
Image, resize 60%
Image, Mirror
Move to the bottom right of the frame
Effects, 3D Effects, Drop Shadow, Same settings
Select Raster 2
Edit, Copy Ele 9
Edit, paste, paste as new layer
Move to bottom left of the frame
Image, rotate, free rotate, left 20
Image, resize 60%
Effects, 3D Effects, Drop Shadow, same Settings
Edit, copy Ele 28
Edit, paste, paste as new layer
Image, resize 60%
Move to the right side of the frame placing on the left side of the cone
Effects, 3D Effects, Drop Shadow, Same Settings
Edit, copy Ele 18
Edit, paste, paste as new layer
Image, resize 60%
Move to the left side of the frame
Make sure it is on the whipped cream but behind the tube
Effects, 3D Effects, Drop Shadow, Same Settings
Edit, copy Ele 29
Edit, paste, paste as new layer
Move to right side of the tag on the whipped cream
Image, resize 60%
Effects, 3D Effects, Drop Shadow, same setting
Layers, Duplicate
Image, Mirror
Edit, copy Ele 38
Edit, paste, paste as new layer
Image, resize 60%
Move to the left side of the frame placing on the right side of the ice cream cone
Effects, 3D Effects, Drop Shadow, Same Settings
Select Raster 2
Edit, copy Ele 4
Edit, paste, paste as new layer
Image, resize 60%
Move to the top right of the frame. See my tag for placement
Effects, 3D Effects, Drop Shadow, Same Settings
Edit, copy Ele 27
Edit, paste, paste as new layer
Image, resize 70%
Move to the far right of the frame
Layers, arrange, send to bottom
Effects, 3D Effects, Drop Shadow, Same Settings
Layers, Duplicate
Image, Mirror
Edit, copy Ele 12
Remember to add your copyright info. Make sure it is plain and legible
Add your name to the tag
Save as PNG

I am using the artwork of Cuddly Rigor Mortis. You need a license to use this tube. You can buy this tube at CDO
I am using the PTU Kit Cuddly Rigor Mortis Package 103 by Gimptastic Scraps . This kit is exclusive to CDO
Open new image 600 x 600
Edit, Copy Frame 4
Edit, paste, paste as new layer
Image, resize 70%
Move down your image some
With your magic wand click inside of the frames
Selections, Modify, Expand by 8
Edit, copy Paper 2
Edit, paste, paste as new layer
Layers, arrange, send to bottom
Selections, Invert
Edit, Clear
Selections, Select None
Select Raster 2
Effects, 3D Effects, Drop Shadow, Settings of:
Vertical : 2
Horizontal: 2
Opacity: 65
Blur: 5
Color: Black
Shadow on new layer NOT Checked
On the frame on the far left I clicked inside the frame did a expand by 8 than added part of the tube..Did a selections, invert, edit, clear, selections, select none than changed the blend mode to soft light. I repeated this on all three of the frame
Edit, copy Tube
Edit, paste, paste as new layer
Image, resize 60%
Sit on top of the frame. See my tag for placement
Effects, 3D Effects, Drop Shadow, Same settings
Edit, copy Ele 5
Edit, paste, paste as new layer
Image, resize 90%
Layers, arrange, send to bottom
Effects, 3D Effects, Drop Shadow, Same Settings
Edit, copy Ele 15
Edit, paste, paste as new layer
Image, resize 80%
Image, rotate, free rotate, right, 90
Move behind the frame and move to the right
Effects, 3D Effects, Drop Shadow, Same Settings
Layers, Duplicate
Image, Mirror
Edit, copy Ele 6
Edit, paste, paste as new layer
Image, resize 40%
Layers, arrange, bring to top
Move to the bottom left of the frame
Effects, 3D Effects, Drop Shadow, Same settings
Layers, Duplicate
Image, Mirror
Select Raster 2
Edit, Copy Ele 33
Edit, paste, paste as new layer
Move to bottom of the frame and to the left
Image, resize 40%
Effects, 3D Effects, Drop Shadow, same Settings
Layers, Duplicate
Image, Mirror
Edit, copy Ele 1
Edit, paste, paste as new layer
Image, resize 30%
Move to the top left of the frame
Effects, 3D Effects, Drop Shadow, Same Settings
Layers, Duplicate
Image, Mirror
Remember to add your copyright info. Make sure it is plain and legible
Add your name to the tag
Save as PNG

I am using the artwork of Cuddly Rigor Mortis. You need a license to use this tube. You can buy this tube at CDO
I am using the PTU Kit Cuddly Rigor Mortis Package 103 by Gimptastic Scraps . This kit is exclusive to CDO
Open new image 600 x 600
Edit, Copy Frame 1
Edit, paste, paste as new layer
Image, resize 70%
With your magic wand click inside of the frame
Selections, Modify, Expand by 8
Edit, copy Paper 6
Edit, paste, paste as new layer
Layers, arrange, send to bottom
Selections, Invert
Edit, Clear
Edit, copy Ele 24
Edit, paste, paste as new layer
Move to the top of the frame
Edit, clear
Selections, Select None
Select Raster 2
Effects, 3D Effects, Drop Shadow, Settings of:
Vertical : 2
Horizontal: 2
Opacity: 65
Blur: 5
Color: Black
Shadow on new layer NOT Checked
Edit, copy Tube
Edit, paste, paste as new layer
Image, resize to fit your tag
Effects, 3D Effects, Drop Shadow, Same settings
Select Raster 2
Edit, copy Ele 14
Edit, paste, paste as new layer
Image, resize 60%
Move to the left side of the frame
Effects, 3D Effects, Drop Shadow, Same Settings
Layers, Duplicate
Image, Mirror
Edit, copy Ele 13
Edit, paste, paste as new layer
Image, resize 50%
Move to the left and place in front of the whipped cream
Effects, 3D Effects, Drop Shadow, Same Settings
Layers, Duplicate
Image, Mirror
Edit, copy Ele 5
Edit, paste, paste as new layer
Image, resize 90%
Layers, arrange, send to bottom
Effects, 3D Effects, Drop Shadow, Same settings
Edit, Copy Ele 21
Edit, paste, paste as new layer
Move to place behind the strawberry on the left
Effects, 3D Effects, Drop Shadow, same Settings
Layers, Duplicate
Image, Mirror
Edit, copy Ele 3
Edit, paste, paste as new layer
Image, resize 40%
Move to left behind the candy you used added and move to the left
Effects, 3D Effects, Drop Shadow, Same Settings
Layers, Duplicate
Image, Mirror
Remember to add your copyright info. Make sure it is plain and legible
Add your name to the tag
Save as PNG
Wednesday, September 7, 2016

I am using the artwork of Arthur Crowe. You must have a license to use this tube. You can buy the tube at his store HERE
I am using the kit Shabby Autumn by Manipulated by Magik. You can buy this kit only at the new site store found HERE
Open new image 600 x 600
Edit, Copy Frame 2
Edit, paste, paste as new layer
Image, resize 70%
Image, rotate, free rotate, right, 5
With your magic wand click inside of the frame
Selections, Modify, Expand by 8
Edit, copy Paper 4
Edit, paste, paste as new layer
Layers, arrange, send to bottom
Selections, Invert
Edit, Clear
Edit, copy Rain
Edit, paste, paste as new layer
Edit, clear
Selections, Select None
Select Raster 2
Effects, 3D Effects, Drop Shadow, Settings of:
Vertical : 2
Horizontal: 2
Opacity: 50
Blur: 6
Color: Black
Shadow on new layer NOT Checked
Edit, copy Grass
Edit, paste, paste as new layer
Move to the bottom left of the frame
Image, resize 80%
Effects, 3D Effects, Drop Shadow, Same Settings
Layers, Duplicate
Image, mirror
Edit, copy Tree
Edit, paste, paste as new layer
Move to the left side of the frame
Move up toward the top of the frame some. See my tag for placement
Image, resize 60%
Effects, 3D Effects, Drop Shadow, Same Settings
Edit, copy Well
Edit, paste, paste as new layer
Image, resize 70%
Move to the bottom right if the frame
Effects, 3D Effects, Drop Shadow, Same Settings
Edit, copy Crates
Edit, paste, paste as new layer
Image, resize 60%
Move to the left and place in front of the tree
Effects, 3D Effects, Drop Shadow, Same Settings
Edit, Copy Corn Cob
Edit, paste, paste as new layer
Image, resize 60%
Move to the left side of the frame placing on the middle of the crates
Effects, 3D Effects, Drop Shadow, Same Settings
Edit, copy Tube
Edit, paste, paste as new layer
Image, resize to fit your tag
Effects, 3D Effects, Drop Shadow, Same Settings
Edit, copy Hazelnuts
Edit, paste, paste as new layer
Image, resize 50%
Move to the bottom left in front of the crates
Effects, 3D Effects, Drop Shadow, Same Settings
Edit, copy Pears
Edit, paste, paste as new layer
Image, resize 30%
Move to place on the right side of the bag of hazelnuts
Effects, 3D Effects, Drop Shadow, Same Settings
Edit, copy Toadstools
Edit, paste, paste as new layer
Image, resize 50%
Move behind the well and in front of the grass
Effects, 3D Effects, Drop Shadow, same settings
Edit, copy Baxter
Edit, paste, paste as new layer
Layers, arrange, bring to top
Image, resize 50%
Move to the bottom right placing in front and to the right some of the well
Effects, 3D Effects, Drop Shadow, Same settings
Edit, copy Owl
Edit, paste, paste as new layer
Image, resize 40%
Move to the top of the well
Effects, 3D Effects, Drop Shadow, Same settings
Edit, copy Pumpkin
Edit, Paste, paste as new layer
Image, resize 40%
Move to place behind the tube and to the right placing in front of the well but behind the cat on the right
Effects, 3D Effects, Drop Shadow, Same Settings
Edit, copy Wagon Wheel
Edit, paste, paste as new layer
Image, resize 50%
Move to the left and place in front of the tree and behind the crates
Effects, 3D Effects, Drop Shadow, Same Settings
Select Raster 2
Edit, copy Berry Branch 1
Edit, paste, paste as new layer
Image, rotate, free rotate, right, 25
Move to the right behind the well
Effects, 3D Effects, Drop Shadow, Same Settings
Edit, copy Squirrel
Edit, paste, paste as new layer
Image, resize 40%
Move to the left and place on the left side of the hazelnuts. See my tag for placement
Effects, 3D Effects, Drop Shadow, Same Settings
Remember to add your copyright info. Make sure it is plain and legible
Add your name to the tag
Save as PNG
Monday, September 5, 2016

I am using the artwork of Fiodorova_Maria. You need a license to use this tube. You can buy this tube at PFD
I am using the PTU kit Worth It by Sweet Cravings Scraps. You can buy the kit at Scraps and Tubes and Mystical Scraps
Open new image 600 x 600
Edit, copy Frame 4
Edit, paste, paste as new layer
Image, resize 50%
With your magic wand click inside of the frame
Selections, Modify, Expand by 8
Edit, copy Paper 10
Edit, paste, paste as new layer
Layers, arrange, send to bottom
Selections, Invert
Edit, Clear
Edit, copy Colorburst
Edit, paste, paste as new layer
Edit, clear
Select Glitter Stars
Image, rotate, free rotate, right 90
Edit, copy Glitter Stars
Edit, paste, paste as new layer
Move up toward the top of the frame
Image, resize 50%
Edit, Clear
Selections, Select None
Layers, Duplicate
Image, Flip
Select Raster 2
Effects, 3D Effects, Drop Shadow, Settings of:
Vertical : 2
Horizontal: 2
Opacity: 50
Blur: 6
Color: Black
Shadow on new layer NOT Checked
Edit, copy Rainbow
Edit, paste, paste as new layer
Image, resize 60%
Move to the top of the frame
Image, rotate, free rotate, right, 30
Effects, 3D Effects, Drop Shadow, Same Settings
Edit, Copy Tree
Edit, paste, paste as new layer
Image, resize 50%
Move to the left side of the frame and move up some
Effects, 3D Effects, Drop Shadow, same Settings
Edit, Copy Tube
Edit, paste, paste as new layer
Image, resize to fit your tag
Effects, 3D Effects, Drop Shadow, Same Settings
Edit, copy Swirl 3
Edit, paste, paste as new layer
Image, resize 60%
Layers, arrange, send to bottom
Move to the bottom of the frame
Effects, 3D Effects, Drop Shadow, Same Settings
Select Raster 2
Edit, copy Flower 8
Edit, paste, paste as new layer
Image, Mirror
Move to the right side of the frame
Image, resize 40%
Effects, 3D Effects, Drop Shadow, same Settings
Edit, Copy Bucket
Edit, paste, paste as new layer
Image, resize 30%
Image, Mirror
Move to the left and place in front of the tree but behind the tube
Effects, 3D Effects, Drop Shadow, Same Settings
Edit, copy Cute Snail
Edit, paste, paste as new layer
Image, resize 20%
Move to the bottom right in front of the flower
Effects, 3D Effects, Drop Shadow, Same Settings
Edit, copy Cute Catepillar
Edit, paste, paste as new layer
Image, resize 20%
Move to the bottom left placing in front of the bucket
Effects, 3D Effects, Drop Shadow, Same settings
Edit, copy Mushroom 1
Edit, paste, paste as new layer
Image, resize 20%
Move to the right in front of the flower. See my tag for placement
Effects, 3D Effects, Drop Shadow, Same settings
Edit, copy Mushroom 2
Edit, paste, paste as new layer
Image, resize 30%
Move to the left and place on the left side of the bucket
Effects, 3D Effects, Drop Shadow, Same settings
Edit, copy Wand
Edit, paste, paste as new layer
Image, resize 10%
Layers, arrange, bring to top
Move to make it look like the wand is in the tubes hand
Effects, 3D Effects, Drop Shadow, Same settings
Select Raster 2
Edit, copy Crazy Vine
Edit, paste, paste as new layer
Image, Mirror
Image, Resize 50%
Move to the right side of the frame behind the flower
Effects, 3D Effects, Drop Shadow, same settings
Edit, copy Flower 9
Edit, paste, paste as new layer
Image, resize 30%
Move to the left placing in front of the tree
Effects, 3D effects, Drop Shadow, Same settings
Edit, Copy Cute Butterfly
Edit, paste, paste as new layer
Image, resize 30%
Layers, arrange, bring to top
Move to place on the flower on the right side of the frame
Effects, 3D Effects, Drop Shadow, same settings
Remember to add your copyright info. Make sure it is plain and legible
Add your name to the tag
Save as PNG
Friday, September 2, 2016

I am using the artwork of Ana Neves. You need a license to use this tube. You can buy the tube at CDO
I am using the PTU kit Under The Moonlight-mini by Tasha's Playground. You can find this kit at CDO
Open new image 600 x 600
Edit, Copy Frame 03
Edit, paste, paste as new layer
Image, resize 70%
With your magic wand click inside of the frames
Selections, Modify, Expand by 8
Edit, copy Paper 04
Edit, paste, paste as new layer
Layers, arrange, send to bottom
Selections, Invert
Edit, Clear
Edit, copy e01
Edit, paste, paste as new layer
Edit, clear
Selections, Select None
Select Raster 2
Effects, 3D Effects, Drop Shadow, Settings of:
Vertical : 2
Horizontal: 2
Opacity: 50
Blur: 6
Color: Black
Shadow on new layer NOT Checked
Edit, Copy e47
Edit, paste, paste as new layer
Image, resize 70%
Move to the bottom of the frame
Effects, 3D Effects, Drop Shadow, same Settings
Edit, Copy e26
Edit, paste, paste as new layer
Image, resize 70%
Layers, arrange, send to bottom
Move down below the frame some. See my tag for placement
Effects, 3D Effects, Drop Shadow, Same Settings
Edit, copy e48
Edit, paste, paste as new layer
Image, resize 70%
Layers, arrange, bring to top
Move to the bottom sitting on the sidewalk
Effects, 3D Effects, Drop Shadow, same settings
Edit, copy Tube
Edit, paste, paste as new layer
Image, resize to fit your tag
Place on the suitcases
Effects, 3D Effects, Drop Shadow, same Settings
Select Raster 2
Edit, Copy e06
Edit, paste, paste as new layer
Image, resize 80%
Effects, 3D Effects, Drop Shadow, Same Settings
Edit, copy e21
Edit, paste, paste as new layer
Image, Mirror
Move to the top of the frame
Effects, 3D Effects, Drop Shadow, Same Settings
Edit, copy e02
Edit, paste, paste as new layer
Image, resize 50%
Move to the top right of the frame
Layers, arrange, send to bottom
Effects, 3D Effects, Drop Shadow, Same Settings
Edit, copy e26
Edit, paste, paste as new layer
Image, resize 60%
Move to the right placing behind the suitcases and to the far right
Effects, 3D Effects, Drop Shadow, Same Settings
Edit, copy e11
Edit, paste, paste as new layer
Move to the far right placing in front of the grass
Image, resize 60%
Effects,3D Effects, Drop Shadow, Same settings
Edit, copy e04
Edit, paste, paste as new layer
Image, resize 60%
Layers, arrange, bring to top
Image, mirror
Move to the left placing beside the tube
Effects, 3D Effects, Drop Shadow, same settings
Edit, copy e09
Edit, paste, paste as new layer
Image, resize 60%
Move to the top right over the Moon
Effects, 3D Effects, Drop Shadow. Same Settings
Edit, copy e15
Edit, paste, paste as new layer
Image, resize 50%
Move to the top left and place on the branch
Effects, 3D Effects, Drop Shadow, Same settings
Edit, copy e22
Edit, paste, paste as new layer
Image, Mirror
Image, resize 50%
Move to the right and place on the branch in front of the moon
Effects, 3D Effects, Drop Shadow Same Settings
Remember to add your copyright info. Make sure it is plain and legible
Add your name to the tag
Save as PNG
Thursday, September 1, 2016

I am using the artwork of Enamorte. You need a license to use this tube. You can buy this tube at CDO
I am using the PTU Kit Kiss Of Death by Gimptastic Scraps . This kit is exclusive to CDO
Open new image 600 x 600
Edit, Copy Frame 4
Edit, paste, paste as new layer
Image, resize 70%
Image, rotate, free rotate, right 90
With your magic wand click inside of the frame
Selections, Modify, Expand by 8
Edit, copy Paper 1
Edit, paste, paste as new layer
Layers, arrange, send to bottom
Selections, Invert
Edit, Clear
Selections, Select None
Select Raster 2
Effects, 3D Effects, Drop Shadow, Settings of:
Vertical : 2
Horizontal: 2
Opacity: 65
Blur: 5
Color: Black
Shadow on new layer NOT Checked
Edit, copy Ele 46
Edit, paste, paste as new layer
Image, resize 85%
Effects, 3D Effects, Drop Shadow, Same settings
Edit, copy Ele 31
Edit, paste, paste as new layer
Image, resize 80%
Move to the top of the previous element
Effects, 3D Effects, Drop Shadow, Same Settings
Edit, copy Tube
Edit, paste, paste as new layer
Image, resize to fit your tag
Effects, 3D Effects, Drop Shadow, Same Settings
Select Raster 2
Layers, Duplicate
Layers, arrange bring to top
Using your eraser brush take away all the frame except for the bottom to cover up the cut off of the tube
Edit, copy Ele 32
Edit, paste, paste as new layer
Image, resize 60%
Move down and to the bottom right
Effects, 3D Effects, Drop Shadow, Same settings
Edit, Copy Ele 49
Edit, paste, paste as new layer
Layers, arrange, send to bottom
Pull down below the casket. See my tag for placement
Effects, 3D Effects, Drop Shadow, same Settings
Edit, copy Ele 48
Edit, paste, paste as new layer
Image, resize 60%
Move to the right side of the frame and place behind the casket. See my tag for placement
Effects, 3D Effects, Drop Shadow, Same Settings
Edit, copy Ele 41
Edit, paste, paste as new layer
Image, resize 50%
Move to the top right of the frame
Layers, arrange, send to bottom
Effects, 3D Effects, Drop Shadow, Same Settings
Edit, copy Ele 18
Edit, paste, paste as new layer
Move to the left side of the frame
Image, resize 60%
Effects, 3D Effects, Drop Shadow, same setting
Edit, copy Ele 17
Edit, paste, paste as new layer
Image, rotate, free rotate, right, 90
Image, resize 60%
Move to the bottom left and place in front of the globe
Effects, 3D Effects, Drop Shadow, Same Settings
Edit, copy Ele 23
Edit, paste, paste as new layer
Image, resize 80%
Move to the very top of the frame
Layers, arrange, send to bottom
Effects, 3D Effects, Drop Shadow, Same Settings
Edit, copy Ele 30
Edit, paste, paste as new layer
Image, resize 60%
Layers, arrange, bring to top
Image, resize 60%
Move to place on the left side of the casket. See my tag for placement
Effects, 3D Effects, Drop Shadow, Same Settings
Edit, copy Ele 12
Edit, paste, paste as new layer
Image, resize 60%
Move to place on top of the purple oracle ball
Effects, 3D effects, Drop Shadow, same Settings
Select Raster 3
Edit, copy Ele 37
Edit, paste, paste as new layer
Image, resize 60%
Move to the left side
Effects, 3D Effects, Drop Shadow, Same settings
Layers, Duplicate
Move to the right side of the original
Remember to add your copyright info. Make sure it is plain and legible
Add your name to the tag
Save as PNG
Subscribe to:
Comments
(Atom)