Sunday, March 18, 2012
6:06 PM | Edit Post

This tutorial was written by me. Any resemblance to any other tutorial is
pure coincidence. Please DO NOT claim this tutorial as your own. It was written for PSP 9, but should be compatible with any version of PSP.
I am using the artwork of Jessica Dougherty. You need a license to use her
tubes. You can purchase the tube at CDO
I am using Template168 by Smooochez Kreationz. It can be found HERE
I am using the PTU kit called Earthly Body by Naughty Angelz
Creationz
Open Template168
Image resize making sure resize all layers is checked. Resize to 600 in width
Image, canvas size, 600 x 600, middle placement checked
Delete the top layer
Delete the background layer
In the layer palette select the rectangle layer
Selections, Select All, Float, Defloat
Select Paper10
Edit, Copy
Edit, paste, paste as new layer
Selections, Invert
Edit, Clear
Selections, Select None
Effects, 3D Effects, Drop Shadow settings of:Vertical: 2
Horizontal: -2
Opacity: 40
Blur: 4
Color: Black
Shadow on new layer NOT checked
Delete the background layer
In the layer palette select Oval Shape
Selections, Select All, Float, Defloat
Select Paper7
Edit, Copy
Edit, paste, paste as new layer
Selections, Invert
Edit, Clear
Selections, Select None
Effects, 3D Effects Drop shadow same settings
Delete Oval Shape
In layer palette select Bracket BG
Selections, Select All, Float, Defloat
Select Paper1
Edit, Copy
Edit, paste, paste as new layer
Move up til the grass and flowers are showing
Edit, clear
Selections, select none
Effects, 3D Effects, Drop Shadow same settings
Delete Bracket BG
In layer palette select Bracket Frame
Selections, Select All, Float, Defloat
Select Paper9
Edit, copy
Edit, paste, paste as new layer
Selections, Invert
Edit, Clear
Selections, Select None
Effects, 3D Effects drop shadow same settings
Delete Bracket Frame
In the layer palette select Butterflies
Selections, Select All, Float, Defloat
Edit, copy Paper2
Edit, paste, paste as new layer
Selections, Invert
Edit, Clear
Selection, Select None
Effects, 3D Effects same settings
Delete Butterflies layer
Open grass element
Resize by 80%
Resize again by 80%
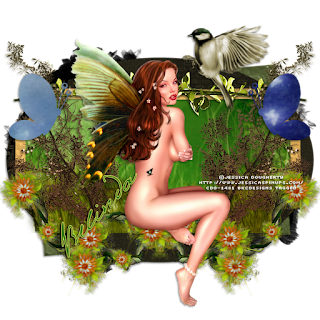
Place at the bottom of the bracket frame. See my tag for placement
Edit, copy your tube
Edit, paste, paste as new layer
Place as you wish on your tag or place her as I have my tag..See above for placement
Effects, 3D Effects, Drop Shadow same settings
Select branch1
Image, Rotate, Rotate Clockwise 90
Edit, copy
Edit, paste, paste as new layer
Make sure it is above Raster 4
Effects, 3D Effects, Drop Shadow same settings
Layers, Duplicate
Image, mirror
Select Branch4
Edit, copy
Edit, paste, paste as new layer
Place above Raster 6. See my tag for placement
Layers, Duplicate
Image, Mirror
Select bird2
Resize by 70%
Resize again by 70%
Edit, copy
Edit, Paste, Paste as new layer
Layers, arrange bring to top
Bring to top of template. See my tag for placement
Effects, 3D Effects, Drop Shadow same settings
Select Vine2
Image, rotate, free rotate to the left 45.00
Edit, Copy
Edit, paste, paste as new layer
Place above copy of raster 9
Move to the left. See my tag for placement
Effects, 3D Effects, Drop shadow same settings
Layers, Duplicate
Image, mirror
Now you can add more elements if you wish..My tutorial is just a guide to go by.
Remember to add your copyright info making sure it is clear and legible
Add your name to the tag and you are done
Save as PNG file
Subscribe to:
Post Comments
(Atom)
Categories
- Amy(Gimptastic) (433)
- Amy(Gimptastic) Tutorial (4)
- Artistic Tag Passions Exclusive Tut (2)
- Barbara Jensen (24)
- Berry (1)
- Birthstone (36)
- CDO (651)
- Christmas (60)
- Cluster frame (98)
- Creative Addiction Exclusive (17)
- Creative Crazy Scraps (1)
- Crystals Creations (1)
- Curious Creative Dreams (10)
- Designs by Sarah Bryan (1)
- Diamond Creations (3)
- emo (2)
- Foxys Designz (62)
- Frames (4)
- Freek's Creations CT (22)
- FTU (279)
- FTU Tutorial (18)
- Halloween (6)
- Keith Garvey (5)
- Lady Mishka (1)
- Ladybug (2)
- Ladyhawwk (224)
- Magik (189)
- Manipulated by Magic Forum Exclusive (3)
- Masks (1)
- Mellie Beans (1)
- Michael Calandra (1)
- Michael Landefeld (1)
- Monti's Scraps (17)
- Mystical Scraps (7)
- Naughty Angelz Creationz (5)
- Ocean (3)
- Old School (8)
- Pammers Passions (1)
- Paper Pack (5)
- Pimpin' PSPers Warehouse (5)
- Pinup Toons (3)
- PTU (1238)
- PTU Tutorial (662)
- Purple (1)
- Purple's CT (16)
- Schnegge's Scraps (49)
- Scrap-A-Licious CT (20)
- Snags (32)
- Steampunk (1)
- Summer (1)
- Sweet Cravings Scraps (80)
- tag show off (5)
- Tasha's Playground (188)
- Template (23)
- Textures (1)
- Thanksgiving (3)
- Treasured Scraps (4)
- Tutorial (1297)
- Valentine (4)
- Wallpaper (21)
- Whisprd Designz Store (9)
- Wicked Princess Scraps (101)
- Wordart (14)


0 comments:
Post a Comment